

Turn any photo into a dot grid artwork with these Photoshop actions. You'll get great results with dots that change size. They get larger in brighter areas and smaller in darker areas. Free download available.
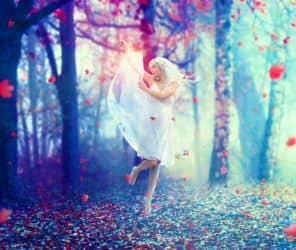
In this tutorial, I'll show you how to create a scene of an emotional dancer in a forest. You'll learn how to combine and blend different stock photos in a cohesive scene, adjust color, use layer masks, manage lighting, work with groups, and more.
What you'll be creating
We'll start this tutorial by creating an autumn forest scene from two stock photos. Then we'll adjust color, shade and light as well as make a dreamy effect. Later we'll add the model and do some retouch to match her with the scene. After that, we'll use two stocks to create a lighting effect. Finally, we'll use some adjustment layers to boost the final result. You'll need Photoshop CS3 or newer to follow this tutorial.

Tutorial Resources
Step 1
Create a new document in Photoshop with the settings below:

Step 2
Open the forest image. Use the Move Tool (V) to drag it into our white canvas:

Go to Edit > Transform > Flip Horizontal:

Step 3
To create some depth to the background , go to Filter > Blur > Gassian Blur and set the radius to 6 px:

Step 4
To make some light for the background, go to Layer > New Adjustment Layer > Curves and increase the lightness:

On this Curves layer mask use a basic, soft brush with black color to erase the left:

Step 5
To make the left darker I used another Curves adjustment layer :

On this Curves layer mask use a soft black brush to erase the right to keep its brightness:

Step 6
Open the ground image. Hit Cmd/Ctrl+Option/Alt+Shift+N to make a new layer. Active the Clone Tool (S) and use it to remove some branches on the ground:

Step 7
Press Cmd/Ctrl+Option/Alt+Shift+E to merge the background layer and the clone one. Move the merged layer into our main document:

Click the second button at the bottom of the Layers Panel to add a mask to this ground layer. Use a soft black brush to remove the trees and blend the ground with the background:

Step 8
Apply Gassian Blur with 4 px to this ground:

On this Filter Mask use a soft black brush to remove the blur effect on the foreground:

Step 9
To change the color of the ground, I used an adjustment layer with Clipping Mask. Go to Layer > New Adjutment Layer > Hue/Saturation:
24 comments on “Create a Photo Manipulation of an Emotional Dancer in a Forest”
ok
The color choices are spectacular!! Great JOB!
NICE AND GREATE TUTORIAL
NICE GREAT EXPLAINE THE TUTORIAL
I'm only new to composites and just came across this by a fluke. Just what I was looking for to learn and practice.
Thanks so much...
hi!could you tell me how to extract a model from its original photo?
I like this because it shows skills and it shows emotion
very good!
It's my creation http://j-p-g.net/if/2015/08/13/0540766001439480057.jpg
Thanks for this divine lesson.It's a miracle
The most amazing lesson!!!!! better seen.Thank you for this fab ripping tutorial
Amazing Tip i like your steps
Thank!!!
Thanks. Your tutorial is great as well as the other is. Keep going. But you didn't say how you removed the model from it's original background!!!!
Amazing. . Very nice,
A very smart approach to explain the things, Ilike your step by step tutorial.
Thank you for this great achievement and tutorial that I had fun to be completed in 2 different versions:
http://cartes-mireilled.eklablog.com/photomontage-scene-de-foret-en-automne-a109215440
Emotional model and emotional background scenery very pretty with tutorial.
Wow , very inspiring Shows that I still have a long way to go Thanks though for sharing your brilliant work
very good
I will use this one for my girl photo.
Beautiful work. Thanks so much for sharing.
I am highly inspired by your tutorials.As a learner,I found it very helpful.Thank you very much.
Looks like something I should try now. Thank you for the step by step Tutorial. I’ve book marked your post. :) Keep Going!!!
thanks for your tutorial, I really learned a lot