

Turn any photo into a dot grid artwork with these Photoshop actions. You'll get great results with dots that change size. They get larger in brighter areas and smaller in darker areas. Free download available.

Use the same method as in the step 5 - Blending the Dress to cut out the background with Channels. If you're not comfortable with this method feel free to use the Lasso Tool (L) or the Pen Tool (P) or any other tool you usually work with to cut out the background.
After you cut out the background right click on REED I and choose the option Duplicate layer. Name the new layer REED II. Go to Edit > Transform > Flip Horizontal to flip it. Place it in the down right corner. Right click on the REED I layer again and duplicate it again. Name the new layer REED III. Press Ctrl+T to activate the Free Transform Tool and rotate it and place it similarly as on the following picture.

Step 14 - Blurring the Reed
To create more movie like effect and create an illusion of the shallow depth of field you'll blur the reed a little in this step. Select all three layers with reed (Ctrl+click on each of them) and merge them into one layer (right click and select option Merge Layers). Go to Filter > Blur > Gaussian Blur and set the value Radius on 1,5 pixels. Press OK.

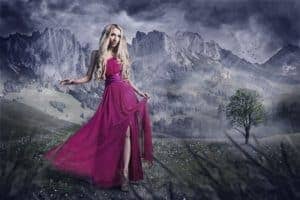
Step 15 - Adding Birds
The main parts of your photo manipulation are already placed. Now let's move on some details. Download the bird brushes listed in the beginning of the tutorial and install them into Photoshop.Create a new layer on the top of all layers and name it BIRDS. Grab the Brush Tool (B) and select some of the brushes you've just installed. Press Alt on your keyboard to activate the Eye Dropper Tool (I) and select some dark blue color from the image. Now simply paint some birds around the tree. On the following photo you can see how your photo manipulation should look like so far.

Step 16 - Desaturating
According to me the whole picture is little too much saturated. To lower its saturation add new adjustment layer Hue/saturation on the top of all layers and set it as on the following picture.

Step 17 - Bluer Tones
To create more interesting atmosphere you'll add bluer tones to your image in this step. First add new adjustment layer Gradient Map on the top of all layers and set the colors same as you can see below.
12 comments on “Create This Striking Fairy Tale Photo Manipulation in Photoshop”
you have done a good work.......
Nice technique. Really useful…thanks for the post…
Cool! Tot luv the tutorial...
Super
thanks for the tutorial
it really helped me :)
Thanks for this tutorial Jarka
Thank you for this tutorial creative well explained.
My realization:
http://www.chez-mireilled.com/article-paysage-conte-de-fee-avec-photoshop-119754637.html
hye
Estupendo, me ha gustado mucho y ya he hecho una prueba. Gracias
nice
Super tut I will have to try this
hey