
Download Lightroom presets and LUTs, absolutely free. Use the presets to add creativity and style to your photos.

Step 7
Select the "model" layer and hit Ctrl+Alt+R (Refine Edge). Use the same or similar settings as mine. You should see on the live preview on image how it's working. When your done apply it by hitting OK.
Output will create another layer with the settings below applied, so you can just basically delete or just turn off the previous layer. It's up to you.

Step 8
We still have some white edges left, especially over hair and clothes that she holds. Basically, at that point I decided to cut some hair totally and don't play around with further extraction. We want to create some cool light effects over the model, not to do a full and elegant retouch after all. I've indicated spots that you might find useful to get rid of. But before you start some erasing, move onto the next step.

Step 9
Grab Brush Tool (B), set it all the way to 100%, but decrease the Spacing to 1% and check the Smoothing option. Again use black color for painting and go to Layer Mask of the "model" layer. Now paint over the Layer Mask, in indicated spots, referring to step 8.
You should handle this easily by mouse, 1% spacing let's you to give a very accurate erasing. When something goes wrong you can always undo the masking by painting with white on mask.

Step 10
You should achieve similar results to mine if you painted accurately. Now pay attention to the red line surrounding the model. It's indicating how we're going to shade her to make her body and clothes blend with the background better. So go to Layers Palette, create new layer above "model" and hit Ctrl+Alt+G, this will create a Clipping Mask (and it should look like you see in the preview below).

Step 11
Set your brush options as shown below and reduce the Flow option of brush to 5%. Next, pick #572e16 color and paint on the "shading" layer as indicated in previous step. Do it along the suggested red line and trust your own taste of where to add more and where less.

Step 12
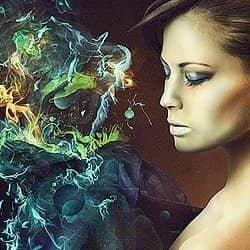
Great! Look at the comparison, the light edges completely disappeared now.

Step 13
Now go to Layers Palette, make sure you're on the "shading" layer (the last one created as Clipping Mask). Add Curves adjustment layer on the top, select it and hit Ctrl+Alt+G (Clipping Mask). Then grab Paint Bucket (G), pick black color and fill Curves layer mask with black (1st image below).
12 comments on “Create this Amazing Fashion Photo Manipulation with Abstract Smoke and Light Effects”
Can't download the "PSD Light Effects.zip | 22.16 MB (Download from Website)" as it just says "404 Page not found"
:(
why is no complete?
Bonjour W.P.
C'est vraiment très joli et je vous félicite !
J'essaye de traduire et je le fais, encore merci et si je me trompe, je peux regarder votre .psd, c'est gentil à vous !
A very smart approach to explain the things,like your step by step tutorial.
Step 7
Select the “model” layer and hit Ctrl+Alt+R (Refine Edge).
Output will create another layer with the settings below applied, so you can just basically delete or just turn off the previous layer. It’s up to you.
Step 9
Grab Brush Tool (B), set it all the way to 100%, but decrease the Spacing to 1% and check the Smoothing option. Again use black color for painting and go to Layer Mask of the “model” layer. Model layer???????????????????????????
In Step 7 you say delete previous layer (layer "model") because we have another layer ("model copy").
Step 10
You should achieve similar results to mine if you painted accurately. Now pay attention to the red line surrounding the model. It’s indicating how we’re going to shade her to make her body and clothes blend with the background better. So go to Layers Palette, create new layer above “model” and hit Ctrl+Alt+G, this will create a Clipping Mask (and it should look like you see in the preview below). Above "model" layer? Again???????????
Dude, WTF?????????
Great tutorial, i agree with everything that Rickard wrote.
Keep up the good work :)
This really is a awesome tutorial, im gonna follow it step by step this afternoon. Looking forward to see similair results
Wojciech Pijecki (your name, yes?)
Thank you so much, a truly great work, and in my opinion just enough info to be able to do it yourself if you wanted to. I especially liked the chiffon-"trick" and the attention to detail in the little "planets" at the end.
Now for agnes b and photogabe above:
I really can't believe how inpolite you are being. From what I can see he only skips the most basic stuff. If you look at the first image (end result) you should be able to see that this tutorial will require some beforehand knowledge. To be fair, you are both somewhat constructive in your critisism, but there is really no excuse for that tone of voice.
stupid tutorial didnt show us how to do the smoke.
yes... it did... there is a next page button which i think you didn't see lol
uaua auauauauauusdhat ushdhauusgdhahdgiasdga gidai dgaid is like that the instruction.. your mind and our mind are different, you should be more thourough and use more commond words than intelectual ones, basic stuff in public communication are crutial.. like kindergarden languages... is better to detailed that too confusing..
totally awesome