

Make your artwork look like they're from an alternate universe. These Cyberpunk presets work with Photoshop (via the Camera Raw filter) and Lightroom. Download all 788 presets for 90% off.
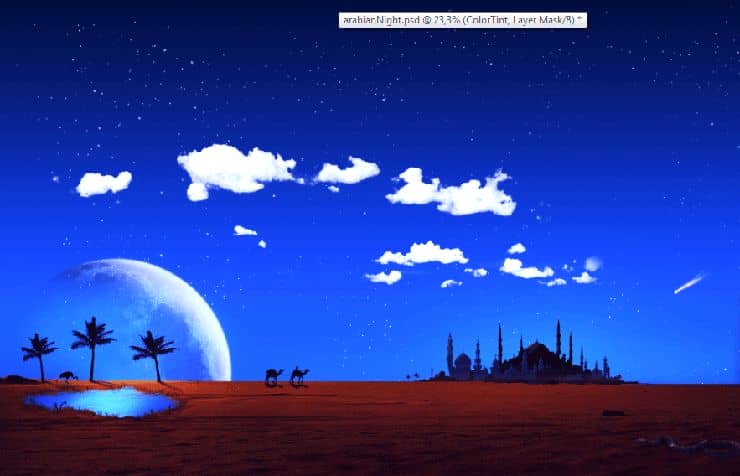
Learn how to create a beautiful Arabian night photo manipulation with Photoshop. You will learn several blending tricks and composting tips that will help you create a vivid vector-like landscape.
What you'll be creating
This photo manipulation is my vision on how the desert should look in a story: mysterious and welcoming. You will need Photoshop CS5 or newer to create this tutorial..

Tutorial Resources
- Stars Brush – Keren-r
- Mosque Brush – KeMoOo
- CamelsBrush - gamarai
- Mosque – freeimages.com
- Moon– Wikipedia
- Desert. – freeimages.com
- Palm Tree - digitaltwist
- Snake - madetobeunique
- Crane. - SalsolaStock
Step 1
Create a new document 3797x2440 px. Using the Gradient Tool to create a nice gradient with #04243f as foreground color and #0e74d6 as background color.

Step 2
Create a new layer (Ctrl + Shift + N), set the foreground color to white and using the stars brush create some stars.

Step 3
Create a new layer and using white and white-orange draw a comet coming from above. It’s not that hard really, just draw with the white brush a couple of short diagonal lines and draw a loose circle at the end of those lines (head of the comet).

Step 4
Open the clouds image and choose Select> Color Range. Click with the marker once on a bright spot in the picture to select most of the white clouds. Click Ok. Press Ctrl + C to copy the selection and close the clouds document. Go back to our document and press Ctrl + V to paste. Rename the pasted layer Clouds to keep layers from cluttering. Right click the Clouds layer and choose Convert To Smart Object. Press Ctrl + T to enter Free Transform and resize the clouds as I did in the image below. Finally, set the blending mode of the layer to Lighten.

Step 5
Add a layer mask to the Clouds layer (Layer > Layer Mask > Reveal All). With a soft black brush mask the edges of the clouds so that they integrate flawlessly with the sky.

Step 6
Create a new layer and set the blending mode to Overlay. Choose #e37952 as foreground color and with a soft brush paint lightly in the area indicated below. Lower the opacity of the layer to 40-50 %. This will be the horizon diffuse light later when we will add the terrain. You can also group all the layers we created until now. To group layers select them by shift- clicking each and press Ctrl + G.

Step 7
Open the file Moon and using the Elliptical Marquee Tool select the moon. Copy (Ctrl + C) and paste (Ctrl + V) into our document. Right click on the pasted layer and choose Convert to Smart Object. Resize and position as I did in the image below.

Step 8
Double-click the moon layer to enter Advanced Blending Mode and apply a color overlay (#71a8e3) set to Overlay Blending Mode.

Step 9
Add a layer mask to the layer moon and using a round black soft brush mask the lower and the left side of the moon.

Step 10
Let’s add some highlight to our moon. Create a new layer and add a layer mask (Layer > Layer Mask > Hide All). Ctrl- click on the moon layer to make a selection than press D to set the default colors. Finally, press Alt + Backspace to fill the selection with white. Click on the layer again to select it and with a white brush paint some highlights on the right and up side of the moon.
19 comments on “How to Create Vivid Arabian Night Composite in Photoshop”
File please..
Hello
link to the download ?
This is some half-assed work indeed. The stars can been seen straight through all over the moon. The clouds are overblown to white and badly blended. This looks like the work of a troll to me. I mean come on.
There’s no link to the download file!!!
The PSD file ...
its so informative tutorial.
its really helpful tut i learn many things from this.
wtf is this shit? looks like something a kid in elementary school would draw = /
There's no link to the Clouds image... : ((
This is a really inspiring collection for all, I like it, thanks for shearing!
Thank you for the great tutorial! It has been very helpful to see a few techniques in action.
Really amazing photo manipulation tutorial.
Nice tut!
what a hard im just a highschool