

Make skin look perfect in one-click with these AI-powered Photoshop actions.
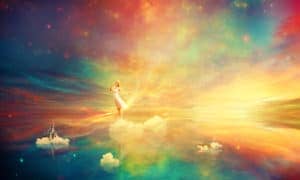
What you'll be creating
We'll start this tutorial by creating a beautiful lake scene from a sky image. Then we'll add nebula texture to increase fantasy effect for the scene. Later we'll add clouds, paper boat, model, castle and blend them using adjustment layers, masking and brush. Then we'll continue to build up the color and light of the image with light and nebula textures. Finally, we'll use an adjustment layer to enhance the final effect. I recommend you to use Photoshop CS3 or newer to follow this tutorial properly.
Tutorial Resources
Step 1
Create a new document in Photoshop with the given settings:
Step 2
Open the sky stock. Use the Retangular Marquee Tool (M) to make a selection of the sky part:

Step 3
Press Cmd/Ctrl+J to duplicate this layer. Go to Edit > Transform > Flip Vertical, move it down then place this layer under the sky one.


Step 4
To add some red and blue to the scene, I used an adjustment layer. Go to Layer > New Adjustment Layer > Color Balance:

Step 5
I used a Curves adjustment layer to add some nice cyan tone to the picture:

Step 6
To change the contrast of the pic, I used a Levels adjustment layer:

Step 7
To create more light for the sky I used a soft brush with color #f9e398 to paint over the right of the horizon. Change the mode to Overlay 100%:

Step 8
Place the nebula 1 image over the picture, then change the mode to Hard Light 100%:

Step 9
Duplicate this layer, flip it vertically and move it down to create reflection for this nebula effect:


Step 10
Make the nebula 1 layer and its reflection selected then press Cmd/Ctrl+G to create a group for them. Change the mode of this group from Pass Through (default group mode) to Hard Light 100%. Make a Curves adjustment layer on the top of the layers within this group to change the color of the nebula effect:

Step 11
I used a Color Balance adjustment layer to make this effect more vibrant:

Step 12
Make a new layer on the top (above the nebula 1 group). Change the brush to the cloud ones. I used number 1252, color #fcf5db to paint a cloud at the middle section of the lake:
21 comments on “Create a Wonderfully Colorful and Everlasting Dream Fantasy Manipulation”
beautiful thanks a lot
Amazing tutorial!!
beautiful thank you
Thank you! really great work.
More posts like this. Excellent
Yup Indeed
My pic http://j-p-g.net/if/2015/08/16/0941499001439726706.jpg
Thanks. I love this wonderful lesson. Author - genius. the great manipulator adjustment layers
What a great tutorial and different to what you usually see. Thanks.
Dank memes brah
(look at the date)
Thanks a lot! Loved this tutorial =) Here is my version http://milanaserk.deviantart.com/art/Sensibilia-489040508?ga_submit_new=10%253A1413571430
amazing!! great to see the amazing work of great experienced art directors!!
Awesome...
Thanks, really good work!
Thank you for the tutorial!
amazing...
super
Thank u..
Breathtaking picture!! I will try
خوب بود.ممنون
means:good thank you!!
Final image looks amazing brilliant job !!
okay only...