

Make your artwork look like they're from an alternate universe. These Cyberpunk presets work with Photoshop (via the Camera Raw filter) and Lightroom. Download all 788 presets for 90% off.


When it opens, input the following:

Make sure that this Color Balance adjustment layer is clipped to the girl.

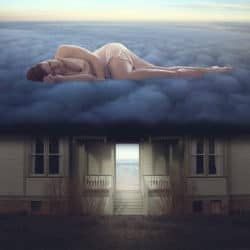
Now, let’s enhance the lighting on the girl, to further enhance the light produced from the horizon. Create a new layer (Ctrl/Cmd + Shift + N) over the girl’s layer and create a clipping mask to the girl by right-clicking on the new layer and clicking on Create Clipping Mask.

Click on the Color Picker and use the following settings:
- H: 0
- S: 0
- B: 50

Now, again, on the new layer we created, fill it with gray using this shortcut: Alt/Option + Delete. Use the Overlay blending mode to make the gray color become invisible. Activate the Dodge tool (O), input the following settings and brighten the areas shown below:
- Brush size: 175px
- Hardness: 0%
- Range: Midtones
- Exposure: 45%


Let’s add some glowing sunshine over the girl and the clouds. Create a new layer (Ctrl/Cmd + Shift + N) over the stack of layers. Activate the Brush tool (B) and input the following:
- Brush size: 1200px
- Hardness: 0%
- Opacity: 25%
- Flow: 100%
- #: fffdd6
Brush on the following area:

Now, select all the layers from this Step and group them (Ctrl/Cmd + G). Name the group to “Sleeping Giant”.

Step 7: Final Adjustments
Now, let’s enhance the color and light of our image. First, let’s create a Solid Color adjustment layer from the Create New Fill/Adjustment layer button on the Layer window.

Once opened, it will show a contextual menu; on this contextual menu, click on Solid Color.

Once open, input the following on the # space.
- #: 00011d

Now, your screen is filled with a dark blue color. We don’t want that so change the Blending Mode and Opacity to the following:
- Blending Mode: Exclusion
- Opacity: 70%

Result:

Repeat the same process, but this time, on the Solid Color box, input the following:

Change the Blending mode to the following:

Create another Solid Color Adjustment, and this time input the following:

Change the blending mode to the following:

Create a Gradient Map adjustment layer next.


Once open, do the following:

Next, set the blending mode and layer opacity to the following:


Next, create a Brightness/Contrast Adjustment layer from the same Create New Fill/Adjustment layer menu and input the following settings:


Result:

Create an Exposure Adjustment layer from the Create New Fill/Adjustment layer menu next and input the following once open:
19 comments on “How to Create a World Under the Sky using Photoshop”
It is very helpful tutorial and great idea for this tutorial….many many thanks a lot
Awesome! :)
Wtf?
Yup Indeed
outstanding fantastic Fab work amazing
Please re uploaded PSD file because when i click on download showing 404 error, this is best work for me i want check how did you do this
Awesome! Excellent tutorial. Thanks for sharing!
Good image, but the instructions could be better.
Thank you, this was good practice, Though I did change some things, such as the shadow beneath the clouds. I made it more of a slow fade together of the house and cloud pictures, looked more cloudlike.
Thanks for sharing this tutorial
This is nice but I agree with what the others said
I can`t understand. It is very tough
espectacular la imagen las tima que eltutorial no sea hablado
I can't understand
so was i
thank you
"Activate the Transform tool (Ctrl/Cmd + T), take note we don’t have to convert this image to a Smart Object since we only have to resize it once."
WTF? Nothing is more wrong than that
I understand that from the authors point of view but the larger issue here is that he doesn't understand the concept of non-destructing editing. The tutorial is constantly copying and pasting when it should have been imported as smart obj and stenciled with a layer mask. He knows how to use it but purposefully teaches destructing editing. Thus, leading myself to believe that the authors does not grasp the concept of non-destructing editing.
I really hate this tutorial. You start by explaining "non-destructive editing" and then everything is destructive from the 2nd page on.