

Download Lightroom presets and LUTs, absolutely free. Use the presets to add creativity and style to your photos.

Step 36
In this step will create fog so, load the smoke brush and create a new layer by pressing Ctrl+shift+n then paint some fog. I used two layer to make fog. After that select both layer and group them then name it fog.
Step 37
Create a new layer and select the soft round brush with opacity and flow set to 30%. Choose color #1f3343 and paint it as shown below

Step 38
Again, make new layer and this time paint light on ground(white arrow indicating) with same color in previous step then change the blend mode to color dodge.
Step 39
Place the death valley tree.
Step 40
Add a layer mask to the tree and select the soft round black brush then paint on layer mask it as shown in the image.
Step 41
Set the blend mode to multiply and as you can see we have blended the tree without making the selection. Don't worry about the blue part we'll fix it later with final adjustments layers.
Step 42
Add a level adjustment to tree and clip it then set the setting as shown in the image.

Step 43
Now, duplicate the tree layer one more time.
Step 44
Add a levels adjustment to this layer then clip it and set the setting as shown in the image. This time reduce the opacity to 48%.

Step 45
Paint shadows by choosing soft round black brush. The white arrow indicating where to paint shadows. Select all the tree layers and group them. Name it creepy trees.
Step 46
Add a curves adjustment layer don't clip it and set the setting as shown in the image. Then select a soft round black brush and paint on the curves layer mask. Because I want to lighten the landscape.

Step 47
Now, place the lamp image and add a layer mask to it. On lamp layer mask, White arrow indicating where to paint with soft round black brush. So, It looks like that the lamp is hanging.
Step 48
Add a hue/Saturation adjustment layer and clip it to lamp. On layer mask of this layer make a dot with soft round brush.

Step 49
To make the glowing light on lamp, I Created a new layer and pick soft round brush with 100% opacity and flow also set the size to 100. Choose the color #874b1d and make two stroke on lamp. Then change the blend mode to linear dodge and reduce the opacity to 71%. Name this layer lamp lights.
Step 50
Now create a new layer and name this layer light of lamp. Pick soft round brush and set the opacity to 50% and choose the same color in previous step. Paint more lights on the ground and set the blend mode to linear dodge then reduce the opacity to 23%. Group all the lamp layers and name it lamp.
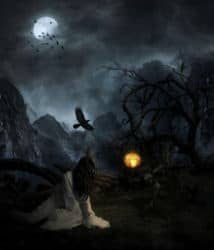
Step 51
Now, extract the model and place it as shown in the image. Then create a new layer below the model layer and paint the shadows with soft round black brush.
13 comments on “Creepy Lady on a Dark Mountain - Learn How to Create This Composite in Photoshop”
Nice work. Thanks for sharing.
my version: http://srokaml.deviantart.com/art/Crow-Lady-horizontal-version-536607986
Awesome post I love it
as always, superb tutorial. Thanks!
as always, superb tutorial. Thanks!
as always, superb tutorial. thanks a lot
Nice Tutorial. I always get the best photo manipulation tutorials here... Great going
入木三分
спасибо за урок!
That's really stunning, Bunty. Great work!
hoo
Super fotomanipulacja
molto interessante impegnativo ma chiaro