
Turn any photo into a dot grid artwork with these Photoshop actions. You'll get great results with dots that change size. They get larger in brighter areas and smaller in darker areas. Free download available.

Next, input the following values on the Tool Options box on the right side of the Liquify box:
- Brush size - 160
- Brush density - 50
- Brush pressure - 100
- Brush rate - 80
- Turbulent Jitter - 50
- Reconstruct mode - Revert
See image below for further instructions:

Now we will be darkening the sides of the layer “3d”. To do that activate the Burn tool (O) and input the following values:

- Brush size - 150 px
- Hardness - 0%
- Range - Midtones
- Exposure - 25%

Now we’re done with the water in the glass, it’s time we grouped these layers. Rename the group to water in the glass.
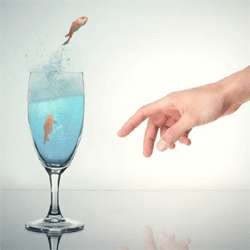
Step 4 - Add the goldfishes
In this Step we would be adding the fishes, particularly the aquarium favorite – the goldfish. Let’s open the stock image Gold Fish. This stock image features a lot of gold fishes inside, but we would be choosing only two.

First let’s separate gold fish #1 from the background. To do that let’s use the Magnetic Lasso tool (L) which is also located on the Lasso tool menu. Once you’ve dragged a selection area around goldfish # 1, click on it , activate the Move tool (V) and drag it to our canvas and put it on top of all the layers and groups we have created. Name this layer to goldfish #1. Let’s scale this layer down using the Transform tool (Ctrl/Cmd + T).
See image below:

Next, we would need to soften the edges of the fish, activate the Eraser tool (E), and use the following values:
- Brush size - 100 px
- Opacity - 60%
- Flow - 100%

Then let’s change the color of the fish; click on its layer and then from the Menu bar, go to Image > Adjustments > Color Balance.
Use the following values:
- Color Levels - +30, 0, -18
- Tone Balance - Midtones
- Preserve Luminosity - Checked
Then finally let’s edit its brightness and contrast. To do that, go to Image > Adjustments > Brightness/Contrast and input the following:
- Brightness - +25
- Contrast - +17
Now, that that’s done, it is time we added the second goldfish. Let’s go back to the stock image – Gold Fish; let us now cut gold fish # 2 from its background using the Magnetic Lasso tool (M). When you’ve done that, activate the Move tool (V) once again so we could transfer the image to our canvas. Once transferred, rename it to gold fish # 2. Activate the Transform tool (Ctrl/Cmd + T) and scale the fish as it is in the image below:

We would need to soften the edges of the gold fish, so activate the Eraser tool (E) again and use the following settings:
One comment on “How to Make a Fish Jump Out of Water”
Great Tutorial thx :D