
Download Lightroom presets and LUTs, absolutely free. Use the presets to add creativity and style to your photos.
Now add a Selective Color adjustment layer and modify the Yellows like shown below.
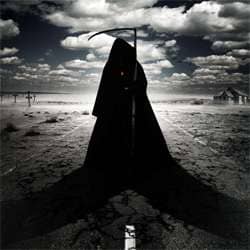
Add a Curves adjustment layer and drag the curve upward to lighten the image than fill the layer mask with black then make white as foreground color and black as background and drag with the Radial Gradient tool in the layer mask to lighten only the central part of the image. This step will create a focal point and will increase the contrast between the Reaper and the background making him look more dark.
Then add a Color Balance adjustment layer and increase the Cyan. Than use the Linear Gradient Tool to apply this effect only to the right side of the image. This step will add some visual interest.
And the final adjustment is to add a Curves adjustment layer and drag the curve upwards to lighten the image. Than fill the mask wit black and using a round white soft brush paint selectively in the layer mask to further lighten the light areas surrounding the Reaper.

Step 9.
Let’s add some more spooky elements to our scene. First make a new layer and using a Birds brush paint some black birds in the horizon.

Step 10
Open file “House” and make a selection of the house. Ctrl+C to copy and Ctrl+V to paste into our document. Pres Ctrl+T to free transform the house like shown below. Add a clipped Curves adjustment layer to color correct the house than make a new layer and using a black soft brush at 20% opacity paint some shadows on the left side of the house. Change the shadow layer blend mode to Multiply.

Step 11
Open file “Cross” and make a selection of the cross. Ctrl+C to copy and Ctrl+V to paste the cross into our document and press Ctrl+T to free transform the cross like below. Add a clipped Curves adjustment layer to decrease it’s luminosity and a clipped Hue/Saturation adjustment layer to decrease it’s saturation. Than make a new layer below the cross layer and paint some shadows. Change the shadows layer(s) to multiply. Use you intuition when painting shadows and consider the fact that we have a multidirectional lightning in this scene but most of the light comes from the left (from the cross point of view). Group all these cross related layers than duplicate this group and free transform it so it seems more distant and different from the first cross. Repeat the operation until you have around 8 crosses.
4 comments on “How to Create a Grim Reaper Scene Artwork in Photoshop”
some very cool designs. Thanks a lot for compiling an st.d sharing this li
Do I HAVE to pay for "Clouds" picture to have it..?
This is an awesome tut but the "desert" picture is no longer available on DeviantArt.....Could you suggest another pic?
@PhasmaParanorma I just looked at different pictures on Google of a "cracked desert" and found the most suitable one! :)