
Make your artwork look like they're from an alternate universe. These Cyberpunk presets work with Photoshop (via the Camera Raw filter) and Lightroom. Download all 788 presets for 90% off.
In this tutorial, we are going to learn how to create a realistic Silent Hill inspired artwork. This tutorial covers techniques such as creating fog using only a few fill layers and the Cloud render tool, easy ways on how to blend images together to make them look like they are in a foggy scene, painting-in real looking ash through a few brush strokes and giving the image a soft contrast using the Blur tool and a few blending modes.
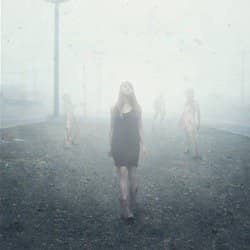
Preview of Final Results

Silent Hill Inspired Photo-Manipulation Photoshop Tutorial
Resources
- Silent Hill BG - hielorei
- Blood Brushes - KeRen-R
- Winter SnowFlake Brushes PS7 - KeepWaiting
- ballade iii - medusestock
- Silent Hill Nurses 1 - Stickfishies Stock
- Creature 01-01 - stiks 1969
Step 1: Create a Photoshop Image File
Let’s begin by creating a new image file, go to the Menu bar and click File > New, and then input the following values on their respective fields:
- Presets: International Paper
- Size: A4
- Width: 2480 pixels
- Height: 3508 pixels
- Resolution: 300 pixels/inch
- Color Mode: RGB Color; 8 bit
- Background Contents: White

Step 2: Create the Background
In this step, we will be creating the background. To start, let’s open Silent Hill BG by hielorei. Once open, activate the Move tool by pressing V on your keyboard. Now, drag that image into our canvas. It should appear like this:

Next, activate the Transform tool (Ctrl/Cmd + T) and resize the image as shown below:

The result should be like this:

Next, let’s fix the angle of our background. To do that, activate the Transform tool (Ctrl/Cmd + T) and then once the grid appears, right click on the image and a contextual menu would appear. Click on Distort. See image below:

To distort the image, see the instructions shown on the image below:

The result should be similar to this:

Next, let’s clean up this background - let’s remove that unwanted bulky thing on the road. To do that, activate the Clone Stamp tool (S). Once active, input the following:
- Brush size: 300px
- Hardness: 0%
- Opacity: 100%
- Flow: 100%

Now, let’s get to it!


The result:

Let’s clean it up some more - activate the Clone Stamp tool again and set the following:
- Brush size: 100px
- Hardness: 0%
- Opacity: 100%
- Flow: 100%
Now, remove the unwanted parts shown below:

The result:

Now, let’s adjust the darkness of the foreground. To start, let’s create a new layer (Ctrl/Cmd + Shift + N) and when the New Layer box opens, input “Darken” on the name field.

Next, activate the Brush tool by pressing B on the keyboard. Once open, make sure that the brushes are the default Photoshop brushes. See image below:

To make sure that you’re using that, simply right click the canvas while a layer is selected and while the Brush tool (B) is activated and then click on the button highlighted below: