

Make your artwork look like they're from an alternate universe. These Cyberpunk presets work with Photoshop (via the Camera Raw filter) and Lightroom. Download all 788 presets for 90% off.
Let's focus on creating highlights first. Add new adjustment layer Levels on the top of all layers and set the Input Levels on 0; 2,83; 255.
![17_1[4]](https://cdn.photoshoptutorials.ws/images/stories/4f283df24450_28B2/17_14.jpg?strip=all&lossy=1&quality=70&webp=70&avif=70&w=1920&ssl=1 "17_1[4]")
You want to make only some parts of the image that light. Grab the Paint Bucket Tool (G), pick black color and fill the layer mask with it. The whole adjustment disappears. Now you can let it appear only on parts you want. To do that grab the Brush Tool (B), select some soft round brush and set the Opacity on about 10%. Pick white color and paint over the areas which should be lighter.
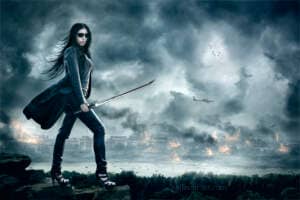
On the picture below you can get the inspiration where to paint. These areas are highlighted with red.
![17_2[3]](https://cdn.photoshoptutorials.ws/images/stories/4f283df24450_28B2/17_23.jpg?strip=all&lossy=1&quality=70&webp=70&avif=70&w=1920&ssl=1 "17_2[3]")
As you may notice the highlighted areas are around the flames, in the clouds where light from the fire may shine and on the tops of the trees - basically everywhere where light from fire could hit.
Step 18 - Adjusting Shadows
Let's move on shadows. By adjusting them you'll be able to add more volume to clouds and create vignette to create more depth.
Add new adjustment layer Levels on the top of all layers and set the Input Levels on 0; 0,19; 255.
![18_1[3]](https://cdn.photoshoptutorials.ws/images/stories/4f283df24450_28B2/18_13.jpg?strip=all&lossy=1&quality=70&webp=70&avif=70&w=1920&ssl=1 "18_1[3]")
You want to adjust only some parts of the image again. Because of that you need to fill the layer mask of this adjustment layer with black. Grab the Paint Bucket Tool (G), pick black color and fill it.
Grab the Brush Tool (B), use the same setting as in the previous step and start painting shadows. Below you can see where you should paint.
![18_2[3]](https://cdn.photoshoptutorials.ws/images/stories/4f283df24450_28B2/18_23.jpg?strip=all&lossy=1&quality=70&webp=70&avif=70&w=1920&ssl=1 "18_2[3]")
On the following picture you can compare how the picture looks before and after last two steps.
![18_3[3]](https://cdn.photoshoptutorials.ws/images/stories/4f283df24450_28B2/18_33.jpg?strip=all&lossy=1&quality=70&webp=70&avif=70&w=1920&ssl=1 "18_3[3]")
Step 19 - Light of Fire
There should be some orange light in the picture around flames. You'll add it in this step. On the following photo you can see how the buildings look before this step.
![19_1[3]](https://cdn.photoshoptutorials.ws/images/stories/4f283df24450_28B2/19_13.jpg?strip=all&lossy=1&quality=70&webp=70&avif=70&w=1920&ssl=1 "19_1[3]")
Not much realistic isn't it?
To make it more real you'll add two types of light - one very soft and diffused and one sharper.
Add new layer on the top of all layers and name it FIRE LIGHT. Grab the Brush Tool (B), select some soft round brush and set the Opacity on about 20%. Hold Alt on your keyboard to activate the Eyedropper Tool (I) and pick some nice orange color from flames. Paint gentle diffused light around the flames (see the photo below for example).
5 comments on “How to Create Dramatic Sci-Fi Photo Manipulation in Photoshop”
Amazing photo manipulation tutorial in Photoshop. Local adjustment, global adjustment, fire and light effects are raeally art work.
This is impressive, thanks for sharing.
one of the best Photo Manipulation tutorial! Well done)
Nice tutorial and awesome final result pic.
Thanks for sharing and for the nice brushes you suggested ;)
Nice artwork, Jarka. Thanks for sharing us your knowledge :)