
Luminar AI lets you turn your ideas into reality with powerful, intelligent AI. Download the photo editor and see how you can completely transform your photos in a few clicks.

Step 15 – Soft Light
Choose the option soft light for the layer of the mountains and reduce the opacity to -70%

Step 16 - Texture
Add a fractal texture to the image to increase the colors of the scene.

Step 17 – More soft light
Choose soft light mode to the layer and reduce opacity to 50%.

Step 18 - Softer
If you think the colors are to strong go to the layer of the mountains the one of the step 10 and use that layer in soft light mode with 90% of opacity. And you will get this result:

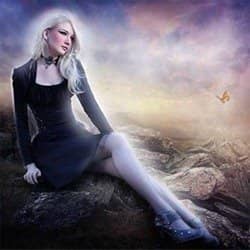
Step 19 – Shadows and Light
Add some shadows and light behind the model. To do that create two different layers paint one with a soft round brush color black, and the other with white.

Step 20 – Layers mode.
The layer you paint with the white brush use it in soft light with 60% of opacity

And the layer you paint with black just reduce the opacity to 85%

Step 21 - Legs
Make the model's legs less darker, to do that select the legs with the lasso tool (L). and the press Ctrl+J to duplicate the selection.

Step 22 – Layer mode
Change layer's mode to Screen and reduce the opacity to 60%.

Step 23 – Select the Skin
Now select the model's skin using the lasso tool once again, duplicate the selection pressing Ctrl+J.

Step 24 – Less Saturation
Go to the menu Image – Adjustments – Hue/ Saturation (Ctrl+U) and in the option saturation use: -30

Step 25 – The eyes
Paint over the eyes with a soft round brush 2px in a blue tone. Also paint details with black and white.

Step 26 - Lips
Go to model's original layer select the lips with the lasso tool and change the color to soft pink (Ctrl+U).

Change the layer mode to Multiply and reduce the opacity to 50%

Step 27 - Brighter
To give to the lips a glossy look duplicate the layer you used before and use it in soft light mode.

Step 28 - Blush
Add a new layer, choose multiply mode, then paint over the model's cheeks with a round soft brush in a pink tone. Remember to reduce the opacity of the brush to 70%.

Step 29 – Reduce Opacity
Reduce layer opacity to 50%

Step 30 - Eyebrows
Paint over the model's eyebrows with a soft round brush in a brown tone, and then pass the blur tool to make it softer.

Step 31 - Eye shadows
Paint with a soft round brush in a purple tone the eye shadow.

Step 32 – Change mode
Use layer in multiply mode and change the opacity to 70%

Step 33 - Hair
Choose hair brushes, to add more strand and make the hair more natural. Also you can pass the blur tool over the strands to get them softer.
25 comments on “How to Create This Mystical Scene and Add Makeup to a Girl in Photoshop”
Awesome job... This is a well detailed tutorial, I will try it out
This is a very interesting tutorial, I love it.
I love your tutorials they are fantastic
i love it
love the fanpage
<3handheld power tools ?
yep<3
have nice work....thanks for sharing.
im fan of your site. :) :) :)
nice tutorials. helps a lot in learning things
Hi
I'm a newbie at Photoshop and all I have to say is : Wow.
You're Tutorial is awesome (Y)
LOVE IT! :3 i wish i could edit in that way one day... :) thanks for shared it with us :)sorry for my english xD
Great tutorial...
May I ask in step 41 - texture, why I can't find it in resource, could you mind to reupload it? Thanks so much for useful tut..:)
A.A.
How are you?
Please information to share me ,who can you make this pitchers.
I am a Photographer of fashion shoot.
Multan (Pakistan).
Nice work
What is a fractal texture?
No link to it in the resources... probably means this:
http://browse.deviantart.com/resources/textures/abstract/?q=fractal
I love your tuts! Thank you
great as before i am a fan of your website.go on
The butterfly is a nice touch. The glow... mmm.. it not very natural looking
She's so pretty
thanks you for share
THaaanks so much for this type of tutorials. I have never used photoshop but today I came to know such great demonstration. Now I am going to learn photoshop ...
Thanks Again...
The glow around the girl looks more like the halos you see in HDR photos than a glow that's emitting from the girl. I would make it glow only around the parts where her skin is revealed... so not so much around the hair and none around the arms but only in the parts where her skin is.
Also, I would use a vector mask instead of making a selection and duplicating the layer in step 3.
Yeahhhh looks fake and overall amateur tutorial. No usage of layer masks or smart filters. You can do it anyway you like but teach it properly so people don't end up like you.
Ok I agree with some of the things you said but as a whole this tutorial is great! Well explained.
PS: ARIGATO Andrea!!