
Make skin look perfect in one-click with these AI-powered Photoshop actions.
In this Photoshop tutorial, we are going to learn how to create a realistic yet surreal photo-manipulation. This tutorial covers techniques such as correcting barrel distortion and blending images seamlessly by correcting the brightness/contrast. We will also learn how to adjust and improve the local contrast of an image through applying filters such as the Unsharp Mask.
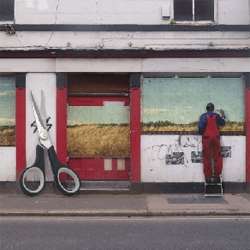
Painting on Wall Photo Manipulation Photoshop Tutorial
Tutorial Details:
- Program: Adobe Photoshop CS2
- Version: 9
- Difficulty: Easy
- Estimated Completion Time: 1 to 1.5 hours
Resources
- Grotty street stock by Theshelfs (Creative Commons License)
- Painter by Michael Vincent Manalo (Royalty Free License)
- Landscape stock 5 by AJK-Original-Stock (Creative Commons License)
- scissors_cut 009 by Michael Vincent Manalo (Royalty Free License)
Preview of Final Results

Step 1 - Create a new image
To begin, let’s create a new file, go to the Menu bar and click on File > New and find the Preset drop-down menu and click on A4 on the contextual menu or you can input the A4 settings manually:
- Width: 2480 pixels
- Height: 3508 pixels
- Resolution: 300 dpi
- Color Mode: RGB Color; 8bit
- Background Contents: White

We would need a landscape canvas so we would need to rotate the newly created layer; so as the layer opens, go to Image > Rotate Canvas > 90’ CW.
Step 2 - Correct the perspective of our background
In this step, we would be opening “Grotty street stock” to our canvas and we would be fixing its asymmetrical perspective. So open our street stock from the folder you’ve saved it into and drag that image using the Move tool (V) to our A4 canvas.
Take a look at our image you’d notice the lopsided angles on the window and on the street which are produced by the camera, these lopsided angles are often called Barrel Distortion. There are a lot of ways on how to correct barrel distortion on an image, like using the Lens Correction Filter of Photoshop to downloading software that could do that specific job, but on this tutorial we are going to use a simpler way and that is through the use of the Warp and Liquify tool.
Note that you may do as you please, but here we will be learning how to use the Warp transform tool and the Liquify tool in correcting distorted images.
To start duplicate “Grotty street stock” by pressing Ctrl/Cmd + J, this should create a backup when you make mistakes from the transformation. We would need to resize the image since we won’t need the extra window on the left. Activate the Transform tool by right clicking on the image.

Activate the Transform tool again and as the contextual menu pops up, click on Warp. Once you’ve clicked on it, a grid with 9 squares will form around the image.