

Luminar AI lets you turn your ideas into reality with powerful, intelligent AI. Download the photo editor and see how you can completely transform your photos in a few clicks.
Activate the Brush tool (B) and input the following settings:
- Brush size: 800px
- Hardness: 0%
- Opacity: 15%
- Flow: 100%
- #: ff9000
![image068[5]](https://cdn.photoshoptutorials.ws/wp-content/uploads/migrated-images/49d5c6feaab3_14854/image0685.jpg?strip=all&lossy=1&quality=70&webp=70&avif=70&w=1920&ssl=1 "image068[5]")
Now, let's start painting!
![image070[5]](https://cdn.photoshoptutorials.ws/wp-content/uploads/migrated-images/49d5c6feaab3_14854/image0705.jpg?strip=all&lossy=1&quality=70&webp=70&avif=70&w=1920&ssl=1 "image070[5]")
The result of that should be similar to this:
![image072[5]](https://cdn.photoshoptutorials.ws/wp-content/uploads/migrated-images/49d5c6feaab3_14854/image0725.jpg?strip=all&lossy=1&quality=70&webp=70&avif=70&w=1920&ssl=1 "image072[5]")
Now the light and darkness adjustments have been made, let us now enhance the color of the background. Let's create a Hue/Saturation adjustment layer by clicking on the "Create New Fill/Adjustment layer" button.
![image073[8]](https://cdn.photoshoptutorials.ws/wp-content/uploads/migrated-images/49d5c6feaab3_14854/image0738.jpg?strip=all&lossy=1&quality=70&webp=70&avif=70&w=1920&ssl=1 "image073[8]")
Once it opens, click on "Hue/Saturation"
![image074[5]](https://cdn.photoshoptutorials.ws/wp-content/uploads/migrated-images/49d5c6feaab3_14854/image0745.jpg?strip=all&lossy=1&quality=70&webp=70&avif=70&w=1920&ssl=1 "image074[5]")
When the Hue/Saturation box is open, input the following:
- Edit: Master
- Hue: 0
- Saturation: +25
- Lightness: 0
![image075[5]](https://cdn.photoshoptutorials.ws/wp-content/uploads/migrated-images/49d5c6feaab3_14854/image0755.jpg?strip=all&lossy=1&quality=70&webp=70&avif=70&w=1920&ssl=1 "image075[5]")
The result of that would be like this:
![image077[5]](https://cdn.photoshoptutorials.ws/wp-content/uploads/migrated-images/49d5c6feaab3_14854/image0775.jpg?strip=all&lossy=1&quality=70&webp=70&avif=70&w=1920&ssl=1 "image077[5]")
When you're done, select all the layers and the press Ctrl/Cmd + G to group them. After that, rename this group to "Background".
Note: Renaming a group is similar to renaming a layer. Just double click on the words "Group 1" and a text box would appear. You would also notice that the layers have been hidden from view, to view them again just left click on the arrow beside the Group's name. See below:
![image078[5]](https://cdn.photoshoptutorials.ws/wp-content/uploads/migrated-images/49d5c6feaab3_14854/image0785.jpg?strip=all&lossy=1&quality=70&webp=70&avif=70&w=1920&ssl=1 "image078[5]")
Step 5: Create the Bathtub
In this step, we will be adding the bathtub to our image. To start, open the stock image: "Antique Bathtub 2" by Falln Stock. Once it is open, activate the Magnetic Lasso Tool (L) and create a selection area around the bathtub. See images below:
![image079[5]](https://cdn.photoshoptutorials.ws/wp-content/uploads/migrated-images/49d5c6feaab3_14854/image0795.jpg?strip=all&lossy=1&quality=70&webp=70&avif=70&w=1920&ssl=1 "image079[5]")
![image081[5]](https://cdn.photoshoptutorials.ws/wp-content/uploads/migrated-images/49d5c6feaab3_14854/image0815.jpg?strip=all&lossy=1&quality=70&webp=70&avif=70&w=1920&ssl=1 "image081[5]")
With the bathtub selected, activate the Move tool (V) and drag that to our canvas. Put this bathtub on top of the "Background" group. After that, rename this layer to "Bathtub".
Next, position this bathtub as shown below:
![image083[5]](https://cdn.photoshoptutorials.ws/wp-content/uploads/migrated-images/49d5c6feaab3_14854/image0835.jpg?strip=all&lossy=1&quality=70&webp=70&avif=70&w=1920&ssl=1 "image083[5]")
Once you're done with that, change its Brightness/Contrast by going to Image > Adjustments > Brightness/Contrast. Make sure that the "bathtub" layer is active.
Input these settings when the Brightness/Contrast layer is open:
- Brightness: -33
- Contrast: -28
![image084[5]](https://cdn.photoshoptutorials.ws/wp-content/uploads/migrated-images/49d5c6feaab3_14854/image0845.jpg?strip=all&lossy=1&quality=70&webp=70&avif=70&w=1920&ssl=1 "image084[5]")
The result of that should be similar to this:
![image086[5]](https://cdn.photoshoptutorials.ws/wp-content/uploads/migrated-images/49d5c6feaab3_14854/image0865.jpg?strip=all&lossy=1&quality=70&webp=70&avif=70&w=1920&ssl=1 "image086[5]")
Next, we will make the tub look like it really is on the grass. To do that, we will need to activate the Eraser tool (E). Once it is active, right-click on the canvas and then choose the following brush:
![image087[5]](https://cdn.photoshoptutorials.ws/wp-content/uploads/migrated-images/49d5c6feaab3_14854/image0875.jpg?strip=all&lossy=1&quality=70&webp=70&avif=70&w=1920&ssl=1 "image087[5]")
Now, let's set the Eraser's brush settings to the following:
- Brush size: 35px
- Hardness: Default 100%
- Opacity: 100%
- Flow: 100%
- Zoom level: 100%
![image089[5]](https://cdn.photoshoptutorials.ws/wp-content/uploads/migrated-images/49d5c6feaab3_14854/image0895.jpg?strip=all&lossy=1&quality=70&webp=70&avif=70&w=1920&ssl=1 "image089[5]")
Now, let's start erasing!
![image090[5]](https://cdn.photoshoptutorials.ws/wp-content/uploads/migrated-images/49d5c6feaab3_14854/image0905.jpg?strip=all&lossy=1&quality=70&webp=70&avif=70&w=1920&ssl=1 "image090[5]")
The result of that should be similar to this:
![image091[5]](https://cdn.photoshoptutorials.ws/wp-content/uploads/migrated-images/49d5c6feaab3_14854/image0915.jpg?strip=all&lossy=1&quality=70&webp=70&avif=70&w=1920&ssl=1 "image091[5]")
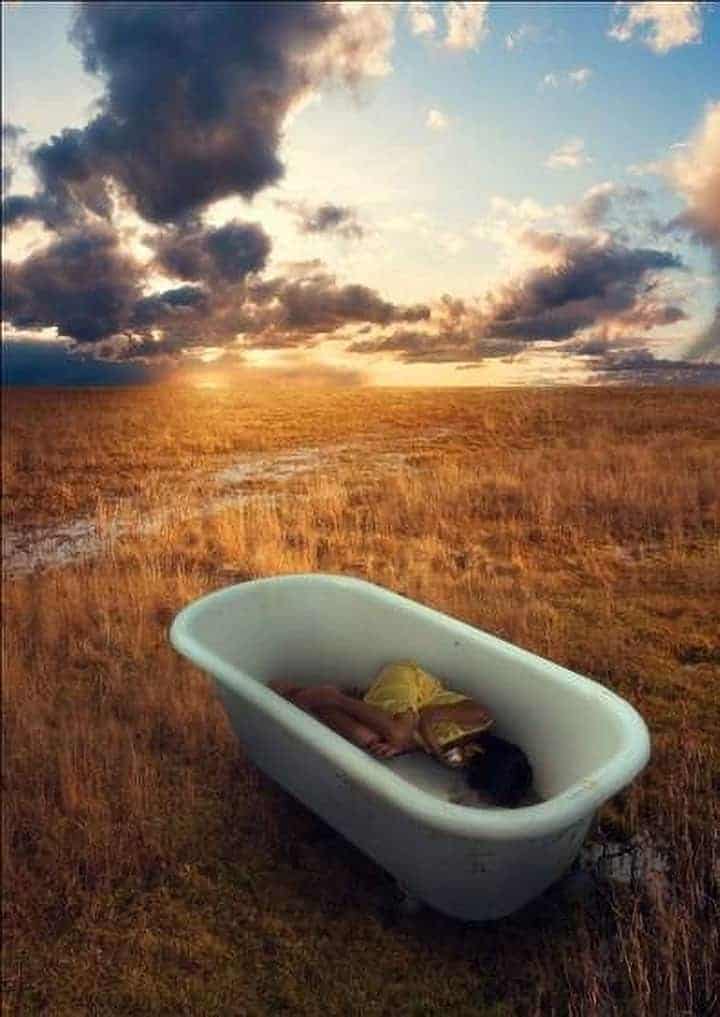
Now, let's create the shadow to make this tub look like it really is part of the image.
One comment on ““Sleeping Girl in Tub” Photo Manipulation”
Great work.