

Turn any photo into a dot grid artwork with these Photoshop actions. You'll get great results with dots that change size. They get larger in brighter areas and smaller in darker areas. Free download available.
![image115[4]](https://cdn.photoshoptutorials.ws/wp-content/uploads/migrated-images/49d5c6feaab3_14854/image1154.jpg?strip=all&lossy=1&quality=70&webp=70&avif=70&w=1920&ssl=1 "image115[4]")
![image117[4]](https://cdn.photoshoptutorials.ws/wp-content/uploads/migrated-images/49d5c6feaab3_14854/image1174.jpg?strip=all&lossy=1&quality=70&webp=70&avif=70&w=1920&ssl=1 "image117[4]")
The result:
![image119[4]](https://cdn.photoshoptutorials.ws/wp-content/uploads/migrated-images/49d5c6feaab3_14854/image1194.jpg?strip=all&lossy=1&quality=70&webp=70&avif=70&w=1920&ssl=1 "image119[4]")
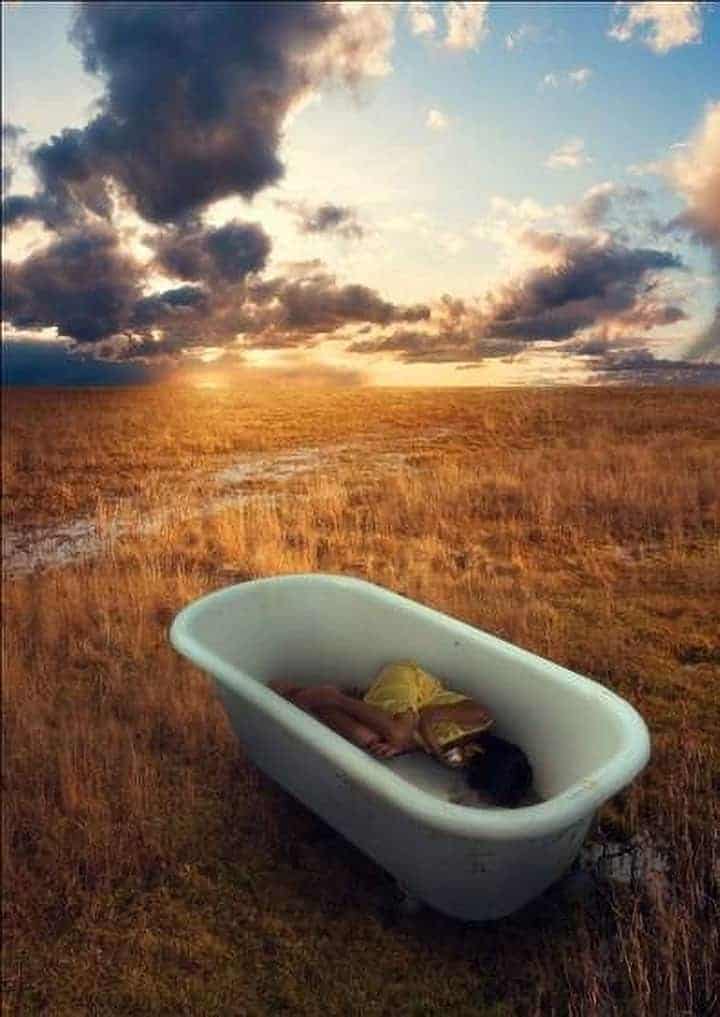
Next, let's enhance the light of the sleeping child. Go to Image > Adjustments > Brightness/Contrast and once it opens, input the following:
- Brightness: -60
- Contrast: 0
The result of that should be like this:
![image121[4]](https://cdn.photoshoptutorials.ws/wp-content/uploads/migrated-images/49d5c6feaab3_14854/image1214.jpg?strip=all&lossy=1&quality=70&webp=70&avif=70&w=1920&ssl=1 "image121[4]")
Now, let's create the shadow of this girl. To start, create a new layer (Ctrl/Cmd + Shift + N) and name it "Shadow". Remember, for easy painting of shadows, always put the shadow layer below the targeted layer. In this case, put the shadow layer below the "girl" layer.
Next, activate the Brush tool (B) and then input the following:
- Brush size: 400px
- Hardness: 0%
- Opacity: 25%
- Flow: 100%
- #: 000000
![image123[4]](https://cdn.photoshoptutorials.ws/wp-content/uploads/migrated-images/49d5c6feaab3_14854/image1234.jpg?strip=all&lossy=1&quality=70&webp=70&avif=70&w=1920&ssl=1 "image123[4]")
The result of that should be similar to this:
![image125[4]](https://cdn.photoshoptutorials.ws/wp-content/uploads/migrated-images/49d5c6feaab3_14854/image1254.jpg?strip=all&lossy=1&quality=70&webp=70&avif=70&w=1920&ssl=1 "image125[4]")
Although there is one thing that you should remove and that is -
![image127[4]](https://cdn.photoshoptutorials.ws/wp-content/uploads/migrated-images/49d5c6feaab3_14854/image1274.jpg?strip=all&lossy=1&quality=70&webp=70&avif=70&w=1920&ssl=1 "image127[4]")
![image129[4]](https://cdn.photoshoptutorials.ws/wp-content/uploads/migrated-images/49d5c6feaab3_14854/image1294.jpg?strip=all&lossy=1&quality=70&webp=70&avif=70&w=1920&ssl=1 "image129[4]")
Next, we will darken the child for it to look seamless together with the other images. First let's create a new layer (Ctrl/Cmd + Shift + N) and then name this image "Darken 1". Put this layer above the "girl" layer. After that, right-click on it and then click on "Create Clipping Mask".
Activate the Brush tool (B) and input the following:
- Brush size: 45px
- Hardness: 0%
- Opacity: 20%
- Flow: 100%
- #: 170600
- Zoom level: 50%
![image130[4]](https://cdn.photoshoptutorials.ws/wp-content/uploads/migrated-images/49d5c6feaab3_14854/image1304.jpg?strip=all&lossy=1&quality=70&webp=70&avif=70&w=1920&ssl=1 "image130[4]")
Now, let's start painting:
![image132[4]](https://cdn.photoshoptutorials.ws/wp-content/uploads/migrated-images/49d5c6feaab3_14854/image1324.jpg?strip=all&lossy=1&quality=70&webp=70&avif=70&w=1920&ssl=1 "image132[4]")
The result of that should be similar to this:
![image134[4]](https://cdn.photoshoptutorials.ws/wp-content/uploads/migrated-images/49d5c6feaab3_14854/image1344.jpg?strip=all&lossy=1&quality=70&webp=70&avif=70&w=1920&ssl=1 "image134[4]")
Click all the layers and then press Ctrl/Cmd + G to group these layers.
Step 7: Enhance the Light, Color, and Impact of the Photo
Now, we will be enhancing the overall photo, from its color to its light. First, let's start off by adjusting the brightness/contrast of the image. Let's create a Brightness/Contrast adjustment layer through the "Create New Fill/Adjustment layer" button.
![image073[9]](https://cdn.photoshoptutorials.ws/wp-content/uploads/migrated-images/49d5c6feaab3_14854/image0739.jpg?strip=all&lossy=1&quality=70&webp=70&avif=70&w=1920&ssl=1 "image073[9]")
When it opens, click on "Brightness/Contrast" and then input the following:
![image136[4]](https://cdn.photoshoptutorials.ws/wp-content/uploads/migrated-images/49d5c6feaab3_14854/image1364.jpg?strip=all&lossy=1&quality=70&webp=70&avif=70&w=1920&ssl=1 "image136[4]")
- Brightness: 20
- Contrast: 15
The result of that should be similar to this:
![image138[4]](https://cdn.photoshoptutorials.ws/wp-content/uploads/migrated-images/49d5c6feaab3_14854/image1384.jpg?strip=all&lossy=1&quality=70&webp=70&avif=70&w=1920&ssl=1 "image138[4]")
Next, let's create a Solid Color adjustment layer through the "Create New Fill/Adjustment layer"
![image139[4]](https://cdn.photoshoptutorials.ws/wp-content/uploads/migrated-images/49d5c6feaab3_14854/image1394.jpg?strip=all&lossy=1&quality=70&webp=70&avif=70&w=1920&ssl=1 "image139[4]")
When it opens, the box that would see is of the Color Picker so, input the following on the # space:
- #: 000226
![image140[4]](https://cdn.photoshoptutorials.ws/wp-content/uploads/migrated-images/49d5c6feaab3_14854/image1404.jpg?strip=all&lossy=1&quality=70&webp=70&avif=70&w=1920&ssl=1 "image140[4]")
Now you'd see that the whole canvas is covered in a dark blue hue. We don't want that so let's change the blending mode and opacity of that layer to the following:
- Blending mode: Exclusion
- Opacity: 50%
![image142[7]](https://cdn.photoshoptutorials.ws/wp-content/uploads/migrated-images/49d5c6feaab3_14854/image1427.jpg?strip=all&lossy=1&quality=70&webp=70&avif=70&w=1920&ssl=1 "image142[7]")
Next, create another Solid Color adjustment layer and once the box is open, input the following:
- #: 542b10
Change the Blending mode and Opacity to the following:
One comment on ““Sleeping Girl in Tub” Photo Manipulation”
Great work.