

Make your artwork look like they're from an alternate universe. These Cyberpunk presets work with Photoshop (via the Camera Raw filter) and Lightroom. Download all 788 presets for 90% off.
Now simply paint some mist. Don't overdo it because it wouldn't look realistic. On the photo below you can get the inspiration of how much you should paint.

Note: The trick of doing good looking photo manipulations is to do more gentle changes instead of one big. Yes, it's more time consuming but it gives you much more realistic results.
Step 7 - Increasing Contrast
In this step you'll add more drama to your picture by increasing its contrast. How? Simply add new adjustment layer Levels on the top of all layers and set the Input Levels on 0; 0,7; 200.

If you look at your image now you see that some parts of it are too dark and it doesn't look nice and some details stop being visible.

To correct that grab the Brush Tool (B). Select some soft round brush, lower its Opacity on about 40% and pick black color. Click on the layer mask of this adjustment layer and start painting over the areas where you want to make the adjustment less visible. You should end up with something similar as on the following picture.

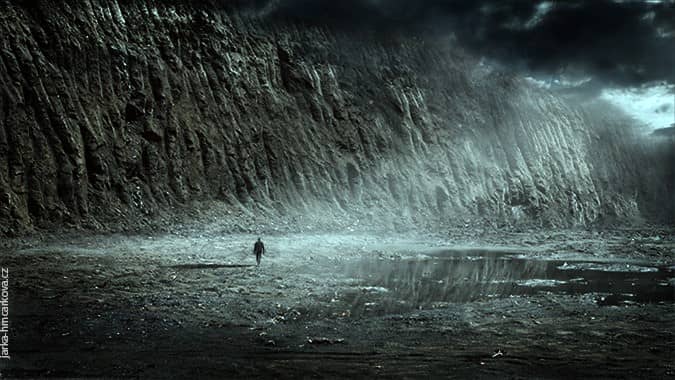
Step 8 - Changing Light and Shadows
As I said before we want drama in your picture! Another way how you can achieve it is by adding more interesting lighting. Right now the photo manipulations looks quite flat with no difference between lights and shadows. You'll fix it in this step.
Add new empty layer on the top of all layers and name it LIGHTS&SHADOWS. Grab the Paint Bucket Tool (G) and pick mid grey color (#808080). Fill the layer with it.
Now you need to change its Blending Mode from Normal to Overlay to blend this new layer with the rest of the layers and make the picture invisible again.

Why have you done something like that? Because now you can use this layer to lighten and darken some parts of the image to make it more dimensional! Simply grab the Brush Tool (B), pick some soft round brush, lower its Opacity on 10% and start painting over the areas that should be lighter. Than use black colored brush for darkening.
Generally you should lighten those parts of mountains which are facing to the light source and darken those on the opposite side. After you're done with mountains move on clouds and ground applying the same principle as before.
On the picture below you can get the exact idea of where you should paint with black and white.

On the following picture you can compare how the photo manipulation looks before and after this step.

Step 9 - Desaturation
In this step you'll start building stronger atmosphere by slightly desaturating your photo manipulation.
Firstly add new adjustment layer Hue/Saturation on the top of all layers. Choose Reds and set the value Saturation on -30. Then choose Yellows and set the value Saturation on -80. This way you desaturate only red and yellow tones and e.g. sky still remains blue/cyan.

To create even more dramatic atmosphere you'll add some dark blue tones to the shadows of the picture. Add new adjustment layer Gradient Map on the top of all layers. In the Gradient Editor in Presets menu choose gradient named Foreground to Transparent and then choose some light cyanish color as you foreground color. Press OK.

To achieve the effect mentioned above change its Blending Mode from Normal to Multiply.
The area of the ground where light from sky hits the ground should remain lighter than the rest of the image. To achieve simply grab the Brush Tool (B), select some soft round brush, set the Opacity on about 40% and pick black color. Click on the layer mask of Gradient Map adjustment layer you've just added and paint black over the parts which should stay lighter. On the picture below these parts are highlighted with red color.
16 comments on “How to Turn an Ordinary Landscape into a Dramatic Moonscape”
Las imagenes para poder seguir el tutorial son muy pequeñas
The images to follow the tutorial are very small
I every time spent my half an hour to read this website's
articles daily along with a cup of coffee.
Excellent site you have here.. It's hard to find good quality writing like yours these days.
I honestly appreciate people like you! Take care!!
really nice and interesting...
Je hezké tady vidět čecha
Amazing. . Very nice, this information most important for me.
Gracias... muy bueno el tutorial,resultado muy bueno.
Sorry but original image was more effective. But I liked the technique. Its useful in many ways!
Thank you!
It was fun creating it!
please i need more of your tutorial to be sent to my email please am need of it i beg you in the name of god
Very good! The technique is applicable to many arraignments I have and will be very useful! I believe this to be an art onto itself. For some very, very, strange reason, there are people, (like my sister-in-law), who believe this is “cheating”. I reply with “Cheating what?!”
I am always left dumbfounded as to what people are thinking when they say something like that. I have asked them if they would own/hang the art if the place in question did exist and was photographed in one shutter release?
They actually say they would!! So what part of “art” don’t they understand? Lol It’s very frustrating to argue such an obvious point but trust me when I say that there are people out there that are very confused when it comes to this kind of work.
Thanks for the tip!
Rich
sorry if I appear stupid, ..how do I download the images ,.. ? anyone ! please, thanks
right click on and save image as
Pekná práca Jarka. Dakujem za tento tutorial a inspiraciu.
Kind of dull tbh
what image size are you using?