

Luminar AI lets you turn your ideas into reality with powerful, intelligent AI. Download the photo editor and see how you can completely transform your photos in a few clicks.
Make photos look wrinkled. In this Photoshop tutorial, you'll learn how to create a wrinkle paper bump map and combine it with several Photoshop filters to make a photo look wrinkled.
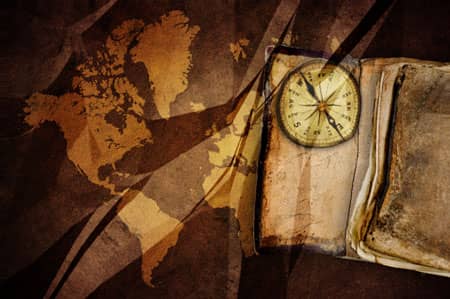
Preview of Final Results
Wrinkled Photo Photoshop Tutorial
Step 1: Open an image into Photoshop
To open an image, choose File> Open. Browse for the image file and click OK.

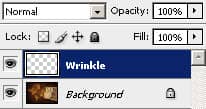
Step 2: Create a new layer
To begin, we'll create a new layer for the wrinkle texture. Click on the New Layer button in the Layers Pallet or choose Layer> New Layer. Rename this layer to "Wrinkle". To rename a layer, simply double click on the layer text and edit.
Step 3: Create the wrinkle texture
Creating the wrinkle texture is easier than you think. To do this, we'll be using the Gradient tool. Select the Gradient tool and copy the settings indicated below:

Using your mouse, randomly click and drag to create a random gradient pattern.

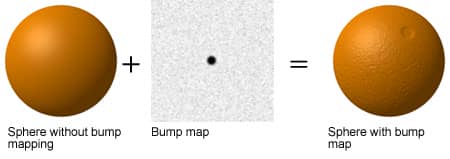
What you just created is a Bump Map. In a bump map, the values of the image indicates the height of the texture. With this data, we can create a texture using the Emboss filter and distort an layer using the Distort filter.
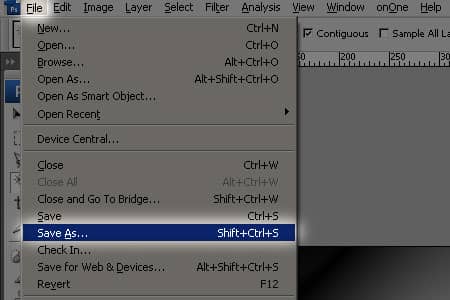
Step 4: Save the image for later
Later in the tutorial, we'll need to distort the photo so that it looks folded. For that step, we'll be using the Distort filter which requires opening a bump map file. Now that we have the texture created, we'll save this bump map we've created for later. Choose File> Save As and save this temporarily on the desktop as a Photoshop document (ex. bump map.psd).
Step 5: Convert the bump map into a texture using Photoshops Emboss filter
Using the Emboss filter, we can convert the bump map into a 3D texture. Choose Filter> Stylize> Emboss. In the Emboss tool, set the amount to height to 1 pixel and amount to 500%. You can adjust the angle to modify the direction of the light to match. Sometimes you need to have the angle match the lighting. For example, if you were to hang this picture on the wall with a light right above the image, you'll need to set the angle to 90º so that it matches the direction of the light.
The texture lacks contrast but we'll fix this in the next steps by increasing the contrast. You may be wondering why we're not fixing this by adjusting the height in the Emboss filter settings. The reason for this is because creases will become blurred as the height is increased. Unless you're trying to make your photo look like it was printed on a piece of fabric, a wrinkled photo won't look very realistic with soft creases.
One comment on “Wrinkled Photo”
thanks this was very helpful :)