
Download Lightroom presets and LUTs, absolutely free. Use the presets to add creativity and style to your photos.

We are going to start on the edges of the face.making short quick strokes taking as a reference the direction of the fur and the color.

Try changing the to lower sizes of the brush to get more detail.Remember to have patience while doing this step.The more hair you paint,will make the blending look better.

If you are using the pen tool in this step,I suggest you stroke different parts of the hair, then duplicate the layers and change their positions slightly to create clusters of hair you can easily move around,copy and paste around the face to speed up the process.

Step 7
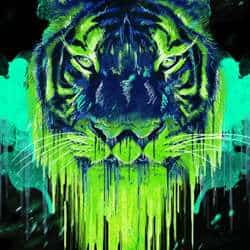
Once you have the edges of the tigers face filled with hair,we are going to start painting the face.First we are going to fill the face and defining it with the colors we sampled and then we are going to add details and accentuating them with another set of contrasting hues. Create a new layer,sample the bright green color and start stroking small indications of fur where the blue color is.

Now select the blue and paint to fill the parts that need more detailing.

You can create new layers for every color or sector of the face you paint to keep things in order.Slowly fill the face with short paint strokes but be sure not to over do it! (We are trying to give it more detail without taking away the main composition of the tigers face).

Pay attention on the direction of the fur,that will help you guide the way you should do the strokes.
Step 8
Now we need a selection of brighter color to paint the accents and detailing on the face.

Create a new layer.Starting with the bright green color,paint over the the darker shade of green to accentuate it.

I want the main focus of the face to be the eyes,so I will especially add more detailing here.

Keep painting more detailing on the face changing the hue of the colors:


Use white to give the accents on the highlights of the image and accentuate the features of the tiger like the eyes and the nose.

Increase the size of the brush by a couple of pixels and paint the whiskers.

To give the finishing touches,I used a light blue shade and using different brush sizes, I scribbled some details along the face.
24 comments on “How to Create a Psychedelic Tiger Illustration in Photoshop”
Half the files are not available anymore and one you have to purchase. If the tutorial is out of date, then remove it. Frustrating!
Sorry for the broken links JRitchie! As you probably know, free resources typically become unavailable over time. You're welcome to let us know in the comments if you would like us to update them.
We try to make everything free, from the tutorial to the resources. Regarding the brushes, it's actually free. You'll need to create an account but the download is free.
I know it's frustrating that free resources are a hassle to deal with, and that's the tradeoff with free vs paid resources. I'm sure you will be grateful for the free content so many people have put out there for you.
WOW just what I was searching foг. Ϲame here Ƅy searching fߋr soccer tricks rainbow
DAAAAAAAAAAMN!!!
yo this is gr8 I learn lots new stuff I've already mastered photo shop and English skills
wow its coollllllllllll ***** more stare
yeah i bet
Wow, these are really creative! They remind me of those Chip Fosse drawings from Overhauling’. Great work!
Es ist sehr schwierig, solche Linien ohne Zeichentablett nur mit der Maus zu malen,
das Tutorial ist total klasse und auch für mich als Noch-Anfänger super, nachzubauen.
Danke vielmals !!!
Wow, it is wonderful tips.
Sir, Please specify the setting for the shape dynamics as brush set darker in the middle and fade in the first and last corner, please also specify setting for shape dynamic of brush tool at the time of creating dripping effect.
Thanks
very nice article
I used this tutorial for a class assignment.
came out great!!
I had a hard time with the dripping effect, but played around with some brushes till I got something realistic!
Thanks so much!
THIS IS THE HARDEST THING IN THE WORLD PLEASE BE MORE HELPFUL. THE PHOTO IS PRETTY
WOA! This is the stuff client are willing to pay for! Awesome and inspiring! One of the best tutorials out there on this site! Thanks for sharing!
im not getting the the melting effect with brush, what brush did you choose?
The psd is only 72dpi...
this ISH is difficult
very very well written tutorial! it's not confusing at all... basic photoshop knowledge is required though.
learnt new techniques..thank you for taking the time to make this !
how do i get the grunge loooook!!!!!!!
Be more specific this is confusing.
i agree
Wooaahhhh this is rad! thanks for the instruction!
its been 11 years since you commented this, think back. did you waste themj