

Download Lightroom presets and LUTs, absolutely free. Use the presets to add creativity and style to your photos.
Create a beautiful text effect and trendy wallpaper on your desktop in cyberpunk style. In this tutorial, we will mainly apply a lot visual effects, adjustment layers and will work with the text. I'll tell you how to create hi-tech shapes, texture of pixellated camouflage, sound wave and much more. And all of effects you can create your own in Photoshop and Illustrator. Tools, blending modes, a little routine, creativity, adventures and an excellent result at the end waiting for you on the pages of of this tutorial. Read this tutorial and see how easy it is!
What you'll be creating
In this tutorial, we will create different effects and working with text. First we create a background, abstract shapes in Adobe Illustrator, create texture of pixellated camouflage and a few more interesting effects. Then we write the text and work with layer masks to transform it. Next we add effects to text. In the final part I will show you how to create a sound wave, and we add a little detail and a little correction. This tutorial focuses more on work with effects and creative approach to ordinary things. And I hope it will be of interesting as for beginners and advanced users. You need to download my cherished created and collected a set of textures and all sorts of useful things, a little logic, good mood and be sure to have Photoshop beginning with CS version.

Tutorial Resources
Step 1
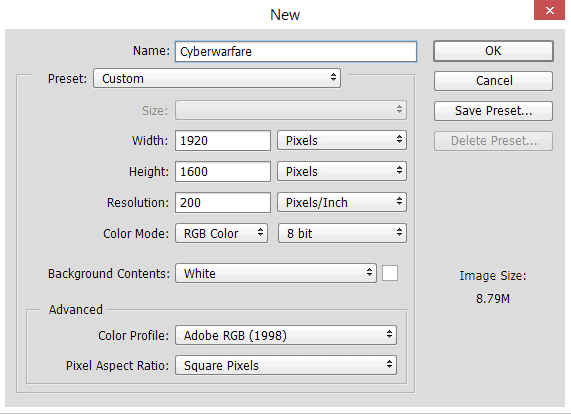
Create a new document via Cmd/Ctrl + N or File > New at 1920 pixels wide and 1200 pixels height, resolution 200 Pixels/Inch. You can change the size of the document specifically for your monitor.
Step 2
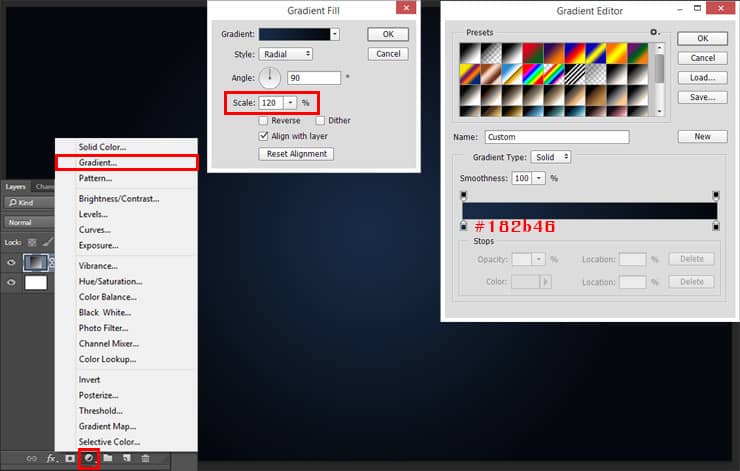
Create gradient fill layer (Layer > New Fill Layer > Gradient... or use "Create new fill or adjustment layer" icon at the bottom of Layer panel). Set default Black & White gradient and change color of left slider to #182b46 and for right set color #000000, Style: Radial, Scale: 120%. It will be the main light spot and focus point.
Step 3
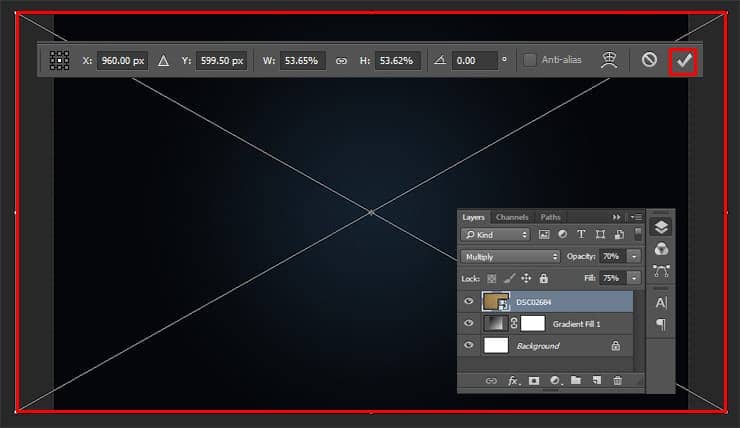
Place cardboard texture into working document via File > Place.../Place Embedded. In Free Transform mode (Cmd/Ctrl +T or Edit > Free Transform) increase the size quite a bit. Hit Enter/Return to apply changes. Change layer Blending Mode to "Multiply" and reduce Opacity to 70%, Fill to 75%.
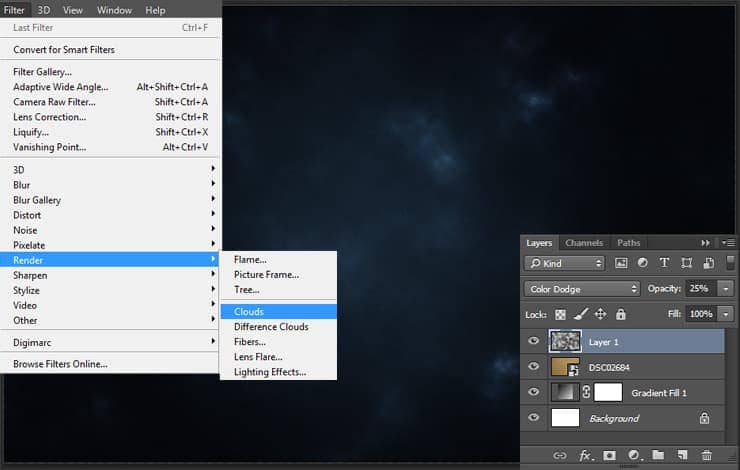
Step 4
To vary the texture and create volume I use cloud layer. Set Foreground/Background colors to default (D), create a new layer (Cmd/Ctrl + Shift + N or use 'Create a new layer" icon at the bottom of layer panel). Go to Filter > Render > Clouds... Change layer Blending Mode to "Color Dodge" and reduce Opacity to 25%.
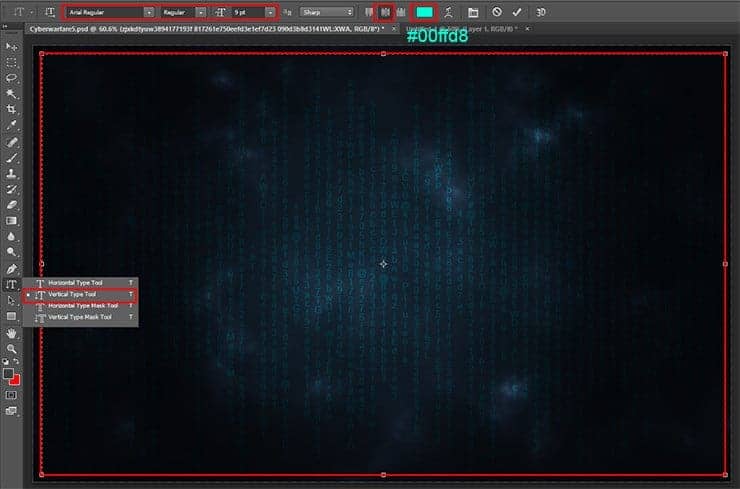
Step 5
Now add some text to the background. We are creating a hacker wallpaper. So take a Vertical Type Tool (T) set font to "Arial Regular" with Font size: 9pt and color #00ffd8 and use "Center text" alignment. Create a text field for a little less than the size of the working field and then the fun starts to enter any text. Suffice it to type letters, symbols and capital letter. Just type something strange with a bunch of different characters, as shown in the image below.
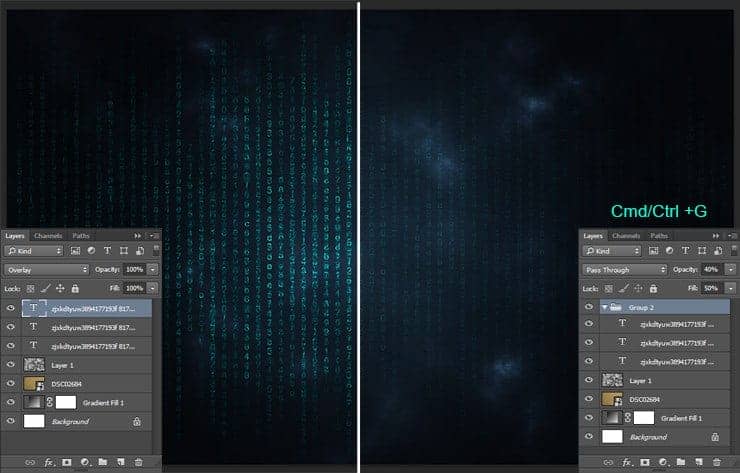
Step 6
Make a two copies of this layer (Cmd/Ctrl + J or Layer > Duplicate layer...). Change some of the text in the copies of the text to be varied. Try to have each letter has been under letter from the previous layers. Change layer Blending Mode of this layers to "Overlay" and group them (Cmd/Ctrl + G). Set for group Opacity: 40%, Fill: 50%.
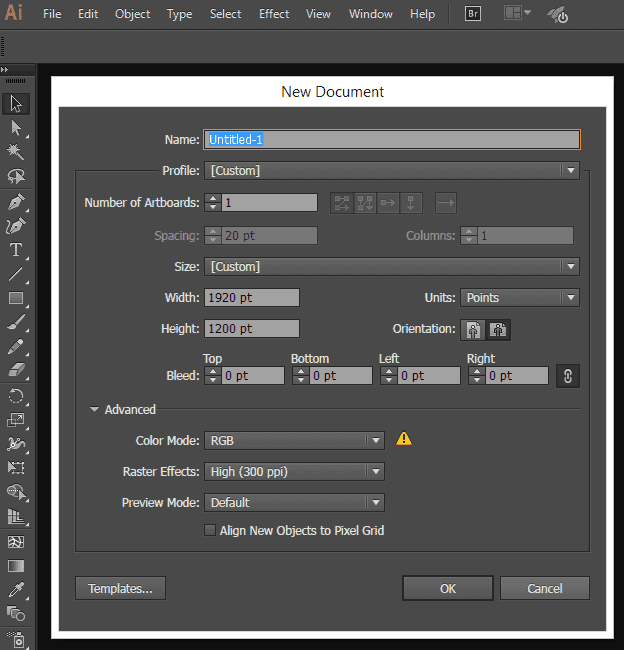
Step 7
Now create texture of pixellated camouflage. I thought it would look interesting and stylish. For create this I used Adobe Illustrator CC. If you can not have Illustrator or do not want to waste time, just use your favorite shape from pack and go to Step 12. In this few steps I told you how to create interesting abstract shapes in Illustrator. Open Adobe Illustrator and create a new document with Width: 1920, Height: 1200, Raster Effects: 300ppi.
Step 8
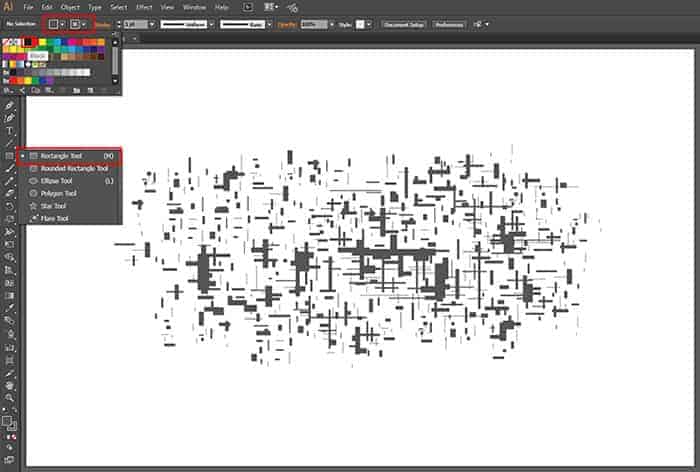
Take a Rectangle Tool (M). Set for Fill and Stroke the same color (in my case is black but you can use any color). Draw rectangles an abstract shape like in image bellow. There are no rules, or exact match. You can create your own version of which will be better than mine. The main thing is the principle.
Step 9
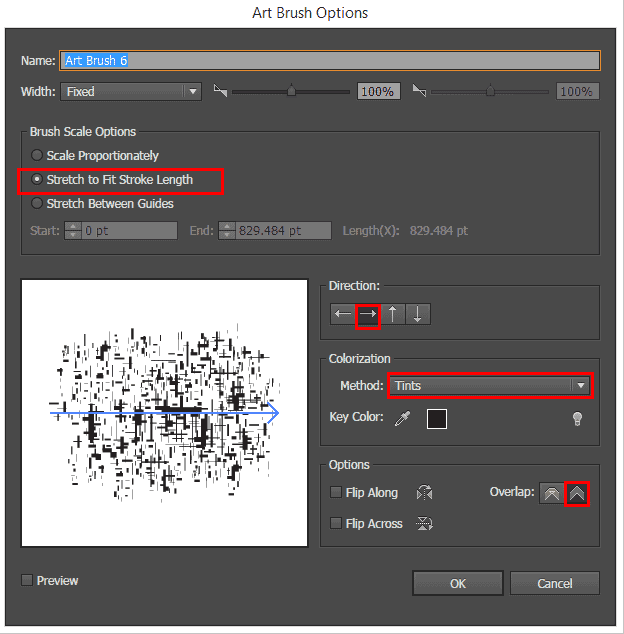
Select all rectangles with Selection Tool (V) make a right click > Group or go to Object > Group. Create a brush from this figure. Go to Brush panel (Window > Brushes) and click on list icon at the bottom of Brush panel. In widow that appear set "Art Brush" and hit OK. Now you need set up you're brush.
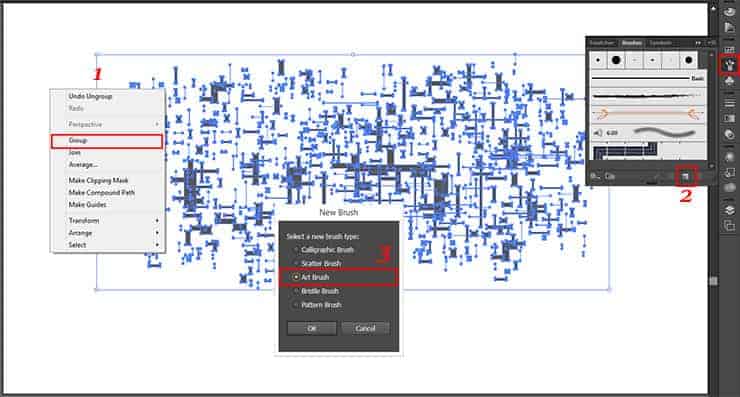
In the settings window, set the following new brush settings - Brush Scale Options: "Stretch to Fit Stroke Length", Direction: "Stroke From Left to Right", Colorization: Tints, Overlap: "Adjust corners and folds to prevent overlaps" and click OK to apply settings.
Step 10
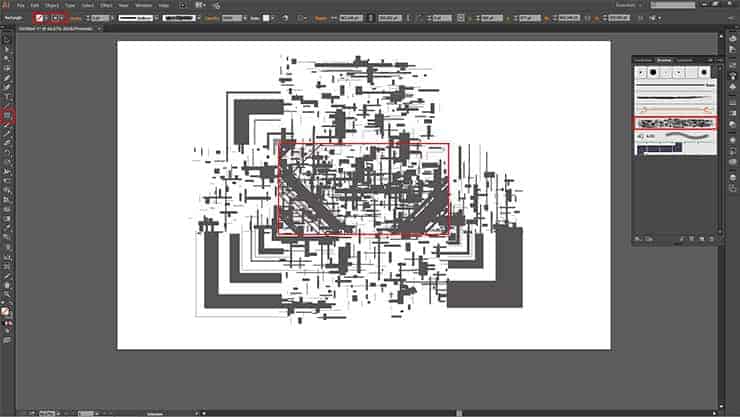
Delete abstract shape and draw rectangle (Rectangle Tool (M)) 514.378 pt Width and 315.584 pt Height. Select rectangle and apply art brush (just click on on the desired brush). Experiment with the size of the rectangle and brush. In exactly this way are created with abstract circles in Hi-Tech form (as you probably guessed the basis is Ellipse Tool (L)). You can also create more brushes and each new brush will give a completely different form.
Step 11
When you're happy with the result and decide to continue photo manipulation with the desired figure copy this shape (Cmd/Ctrl + C or go to Edit > Copy), open Photoshop and paste it (Edit > Paste or Cmd/Ctrl + V) in working document.

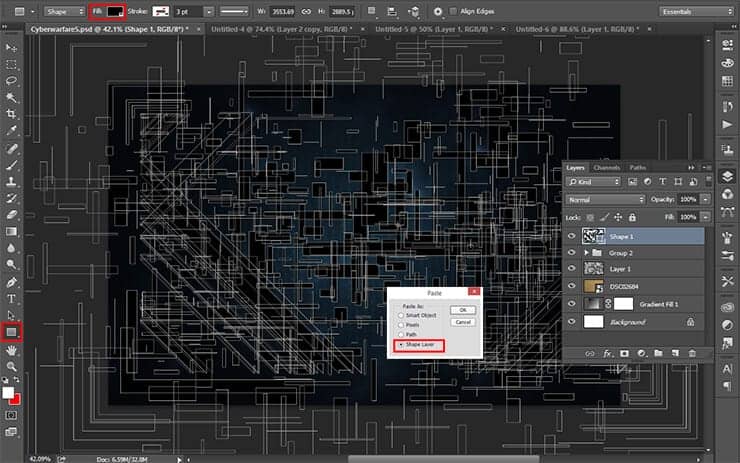
Step 12
To adjust the color and size of the figure, I advise you to paste this shape as "Shape Layer". With Free Transform Tool (Cmd/Ctrl +T or Edit > Free Transform) play around with the size and position of the figure to find interesting piece (I personally only slightly increased the size). Be sure to set Fill and Stroke color to black (you can adjust shape with Rectangle Tool (U)). If you use a shape from my set do not forget to add "Stroke", otherwise you will get a slightly different shape.
Step 13
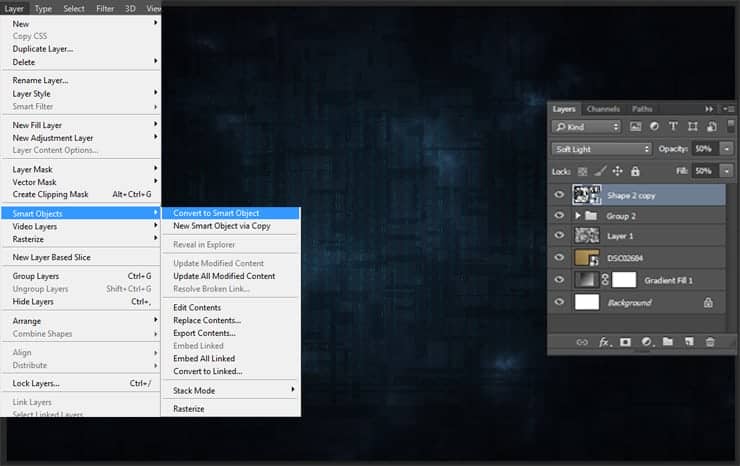
Convert shape to Smart Object (right - click on layer > Convert to Smart Object or go to Layer > Smart Objects > Convert to Smart Object) and Set Blending Mode "Soft Light", Opacity: 50%, Fill: 50%.
Step 14
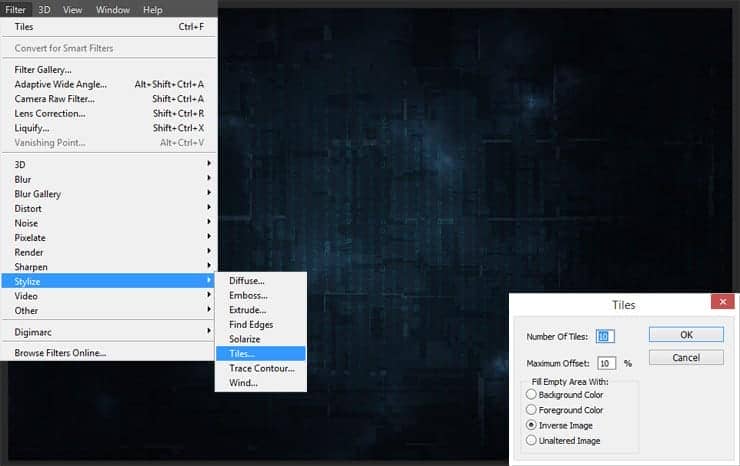
Now play around with filters. First, transform abstract shapes into pixellated camouflage. A little experimenting I chose this option because it supports the atmosphere of the picture. So, go to Filter > Stylize > Tiles. Set Number Of Tiles to 10 and Maximum Offset to 10%, Fill Empty Area With: "Inverse Image". You can also continue playing with filters to find interesting look.
 '
'
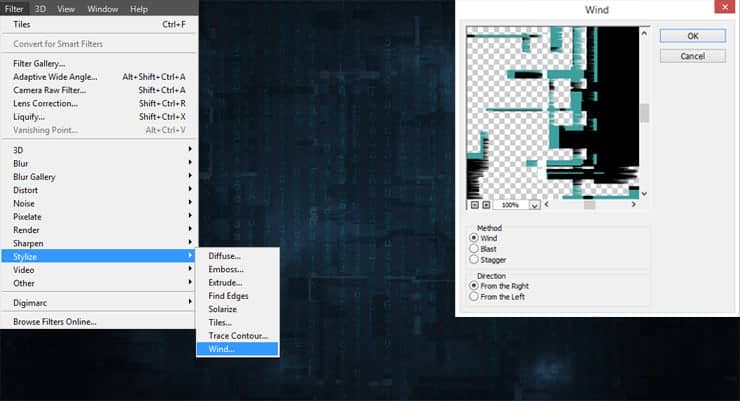
Step 15
To resulting image I decided to add a little texture. Go to Filter > Style > Wind. Set Method to "Wind" and Direction to "From the Right". In my pictures, I use this filter, because it is very well to convey the effect of digital artifacts or something like that. And it looks successfully if you try to apply it correctly :).
Step 16
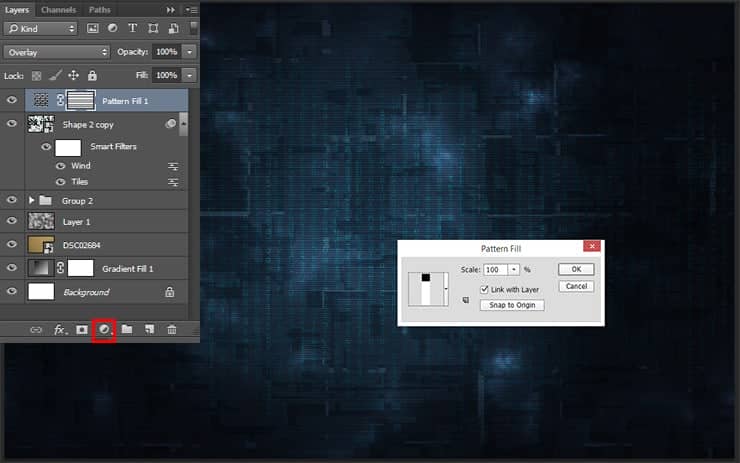
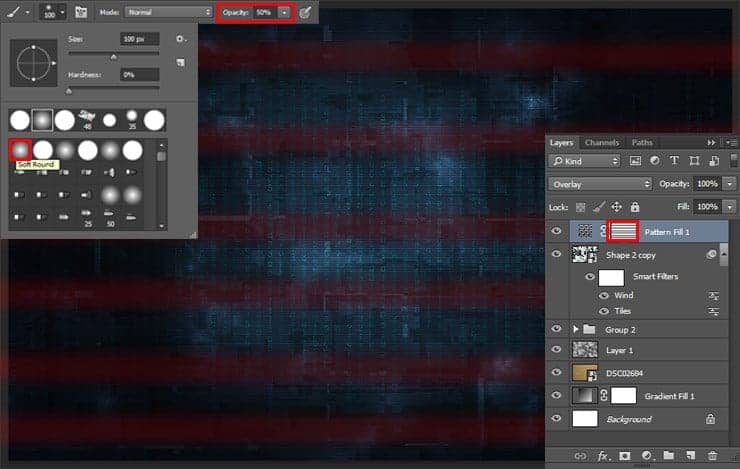
Create a new pattern filled layer (Layer > New Fill Layer > Pattern... or use "Create new fill or adjustment layer" icon at the bottom of Layer panel). Select pattern with horizontal lines, Scale: 100%. Change layer Blending Mode to "Overlay". If you not have this pattern try use something similar from original sets that are in Photoshop (click on Pattern > Settings/Small gear > "Web Patterns").
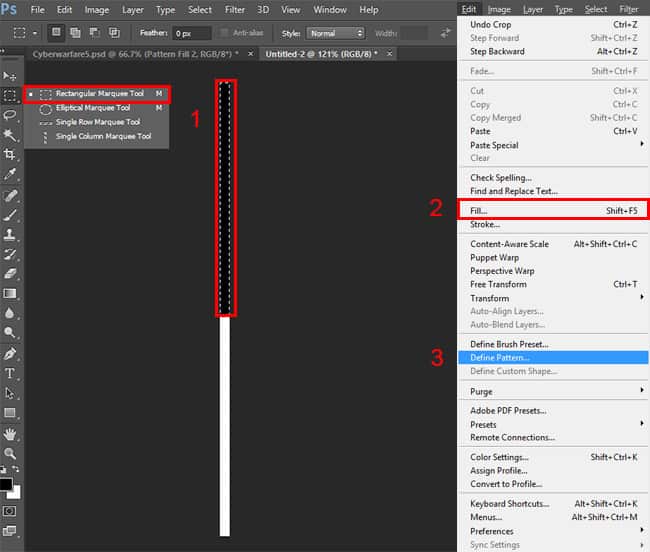
Step 17
If you do not have this pattern you can simply create this. Create a new document with 10 pixels wide and 500 pixels height, resolution 200 Pixels/Inch (If you need vertical lines that change the values of each other). Select about half of the working field with Rectangular Marquee Tool (M) and fill it with black color (Edit > Fill > Color or use D (default colors) and Cmd/Ctrl + Del or Shift + F5). Go to Edit > Define Pattern... Go back to the previous step but now change Scale to 1%.
Step 18
Take a Brush Tool (B) with soft round form, Size: 100px, Opacity: 50% and draw with black color straight horizontal lines on the mask of the adjustment layer (hold Shift key to make straight lines). I like this effect. Reminiscent of noise signal on an old monitor or camera.
Step 19
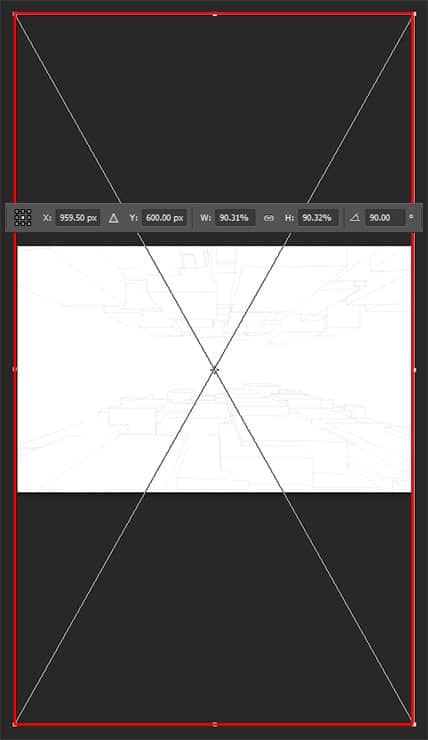
Place another one texture "04" from "Wireframes" folder (File > Place.../Place Embedded). Rotate it on 90 degrees clockwise and increase it's size until texture reaches the edges of the working field. Place the texture so that both figures are symmetrically. Change Blending Mode to "Divide" do not worry that the texture is gone. All right, is just difficult to see.
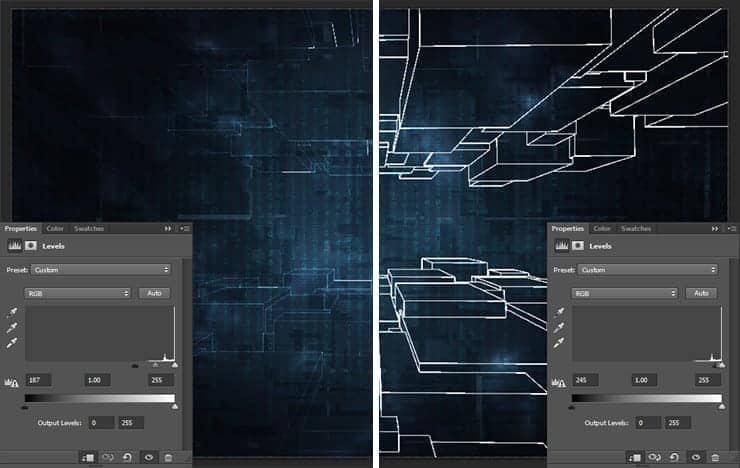
Step 20
Black lines have turned into white. Use adjustment layer "Levels" (Layer > New Adjustment Layer > Levels...) to increase black color in this texture. Set for black slider value 187 and clip this layer to texture. If you want the texture to become more visible, increase the value for blacks.
Step 21
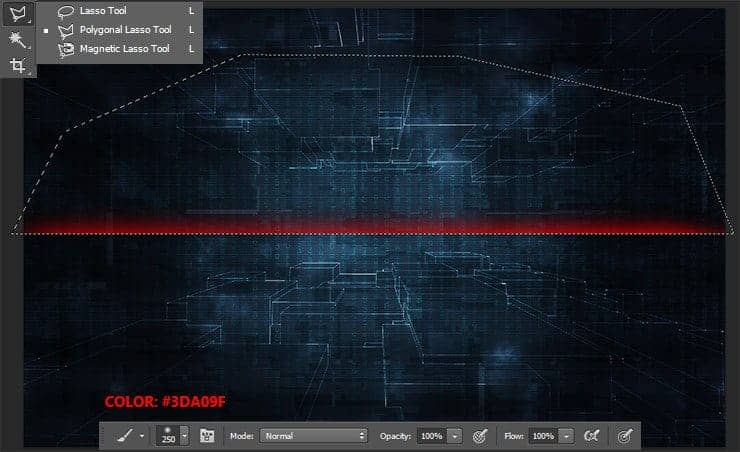
A little more effects and proceed to the text :). Create a new layer (Cmd/Ctrl + Shift + N or use "Create a new layer" icon at the bottom of Layer panel). Take a Polygonal Lasso Tool (L) and select something like a half circle with only perfectly flat base. For flat line hold Shift key. Take a Brush Tool (B) (Soft Round brush, Size: 250px, Opacity: 100%, Color: #3da09f) and use edge of brush, draw a little glow on the smooth side. Use Eraser Tool (E) with soft round form to soft edges.
Step 22
Create a lot of lanes around the image. Set layer Blending Mode to "Color Dodge". Add a layer mask for this layer (click on "Add a layer mask" icon or go to Layer > Layer Mask > Reveal All). Go to Filter > Render > Clouds. This creates a soft texture on the lines.
Step 23
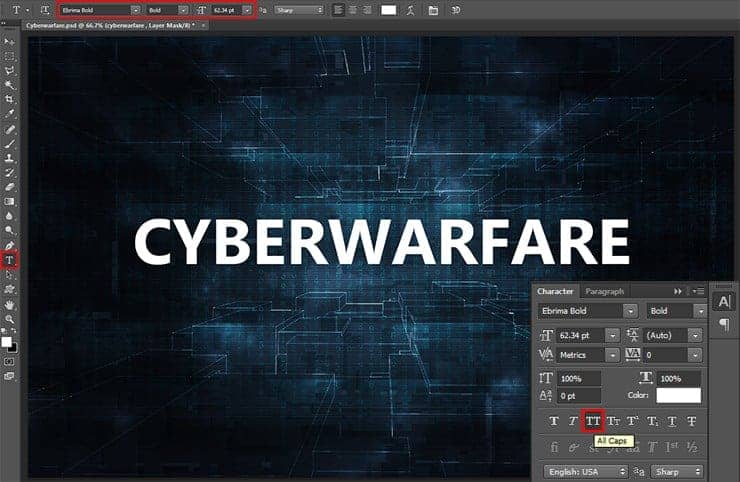
I tell you not only about the creation of the painting but also about the effects. Use them or not you decide. And now text effect! Take a Horizontal Type Tool (T) set font to "Ebrima Bold" (this font should be in your Photoshop) with Font size: 62.34 pt and white color fill. On "Character" tab (Window > Character) set mode "All Caps". Type in any word. In my case it "cyberwarfare" and place it in the center of the image, between two sides of wireframe.
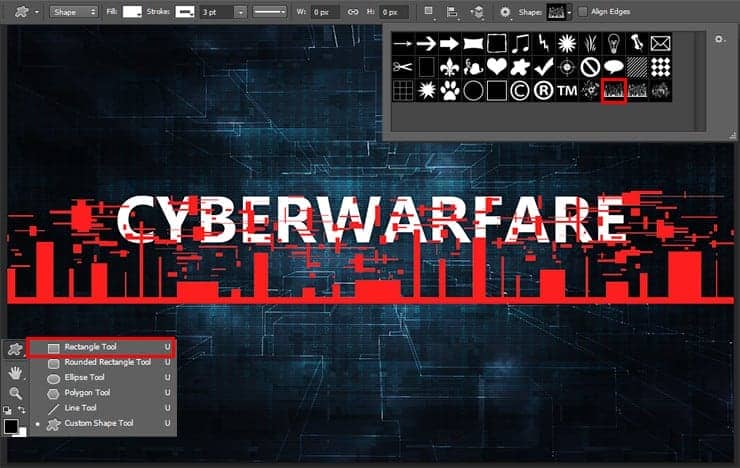
Step 24
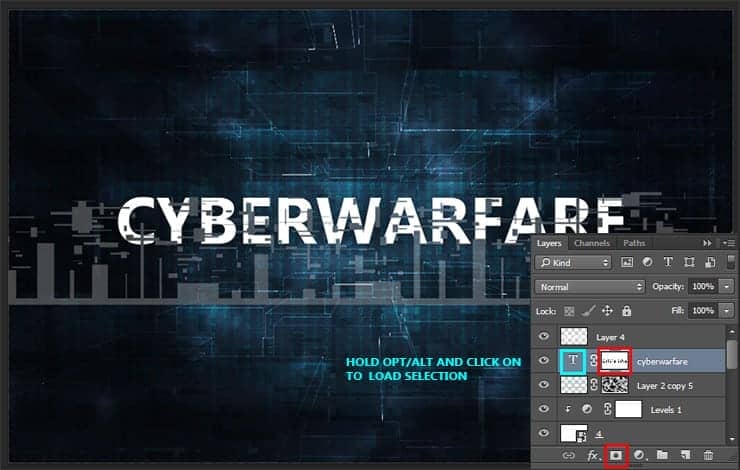
You can go back to steps 7 - 11 and draw new shape or use form pack. So, draw a shape wit Custom Shape Tool (U) (I use "Shape 2"), position it so that the text was readable and recognizable characters. Hold Cmd/Ctrl and click on shape layer thumbnail to make selection.
Step 25
Add an inverted layer mask to Type layer (hold Opt/Alt and click on "Add a layer mask" icon or go to Layer > Layer Mask > Hide Selection). Again create selection, but in this time from text, add a layer mask to abstract shape (normal layer mask, go to Layer > Layer Mask > Reveal Selection).
Step 26
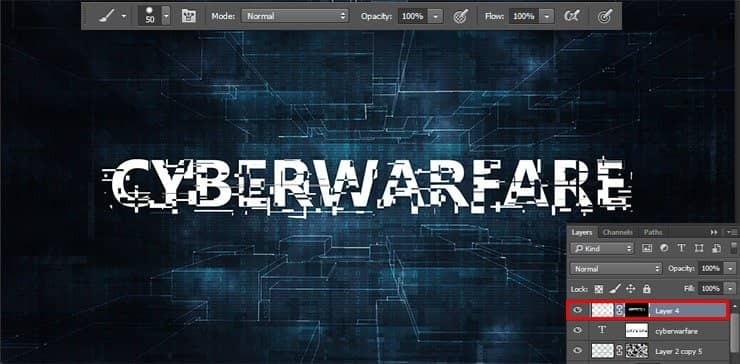
Select type (hold Cmd/Ctrl and click on type layer), inverse selection (Cmd/Ctrl + Shift + I or Select > Inverse). Go to layer mask of shape and with hard round brush (Opacity: 100%, color: black) remove all unnecessary components except details for the text. Also, remove the line within the text (inverse selection again). Generally you have a great opportunity for creativity. Try to be creative :). To deselect image go to Select > Deselect or use Cmd/Ctrl + D.
Step 27
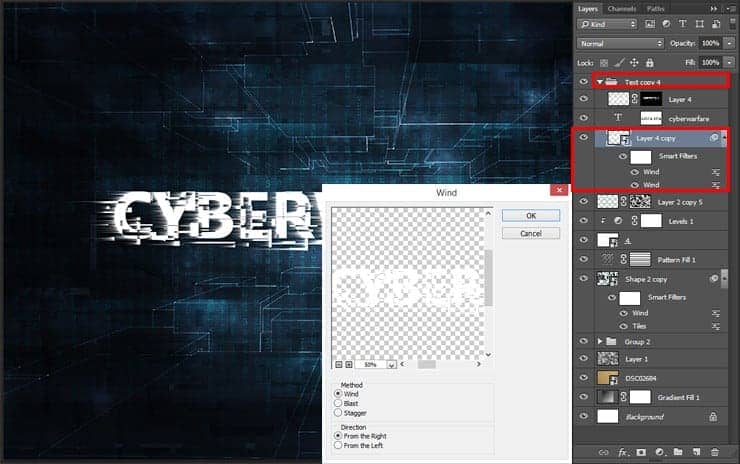
Select both layers, duplicate it (Cmd/Ctrl + J or layer > Duplicate layer...) and merge it into one (Layer > Merge Layers... or Cmd/Ctrl + E). Convert resulting layer to Smart Object (Layer > Smart Objects > Convert to Smart Object). Go to Filter > Stylize > Wind. Set Method to "Wind" and Direction to "From the Right". Apply this filter again (Cmd/Ctrl + F or Filter > Last Filter/Wind). Move this layer under the two text layers and group it all (Cmd/Ctrl + G or use "Create a group" icon at the bottom of Layer panel). Remove Fill to 0%.
Step 28
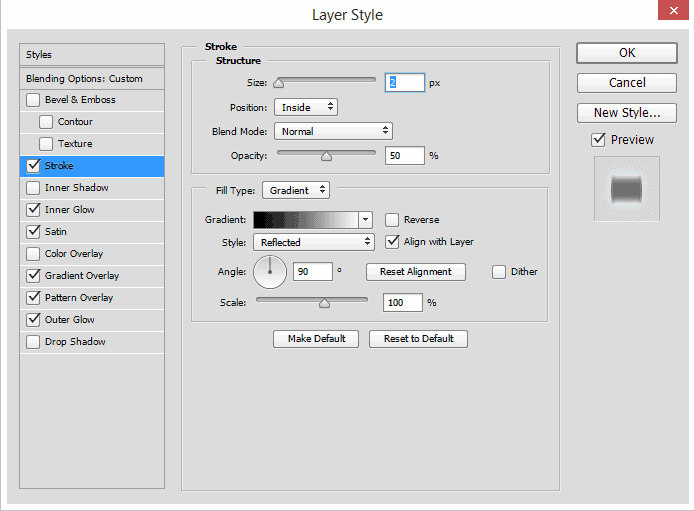
Now move on to the text effect. Double-click on the group (or use "Add a layer style" icon or go to Layer > Layer Style > Stroke...), from drop-down list select "Stroke". In window that appear set Size: 2px, Opacity:50%, Fill Type: Gradient, set black & white gradient with "Reflected" style, Angle: 90 degrees.
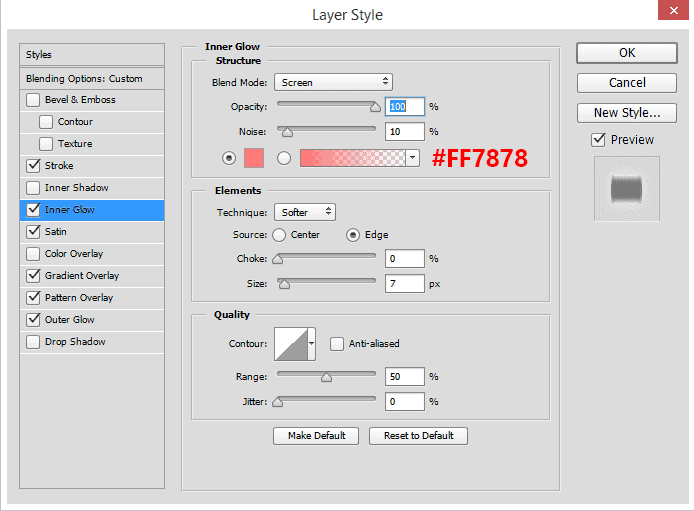
Go next. Add Inner Glow with Opacity: 100%, Noise: 10% and set color #ff7878, Choke: 0%, Size: 7px. This style creates depth and highlights letter.
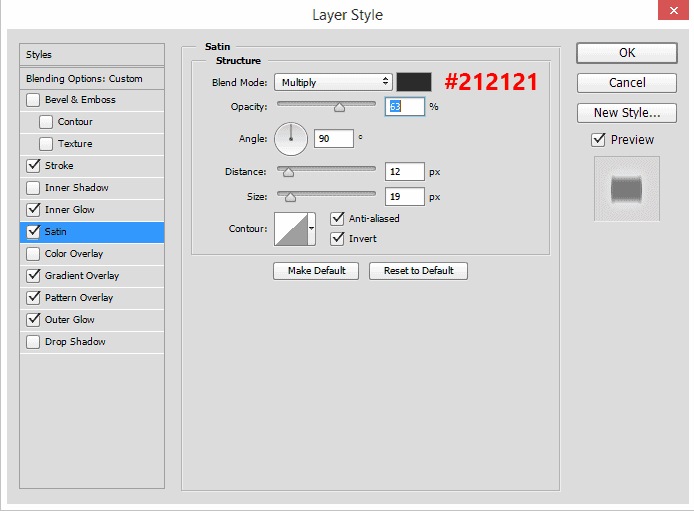
Add Satin style with color #212121, Opacity:63%, Distance: 12px, Size: 19px. Satin on the text gives volume and adds color.
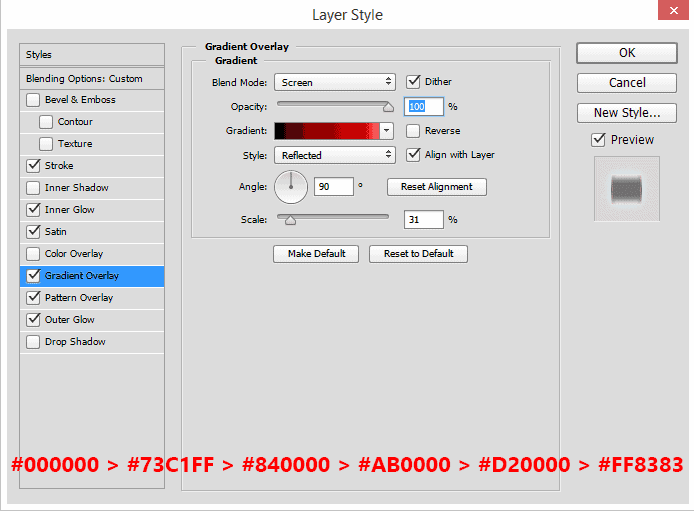
Gradient can create the basic color of the text as a Satin. Set up gradient #000000 > #73c1ff > #840000 > #ab0000 > #d20000 > #ff8383. Set Style: Reflected, Angle: 90 degrees, Scale: 31%, Opacity: 100%.
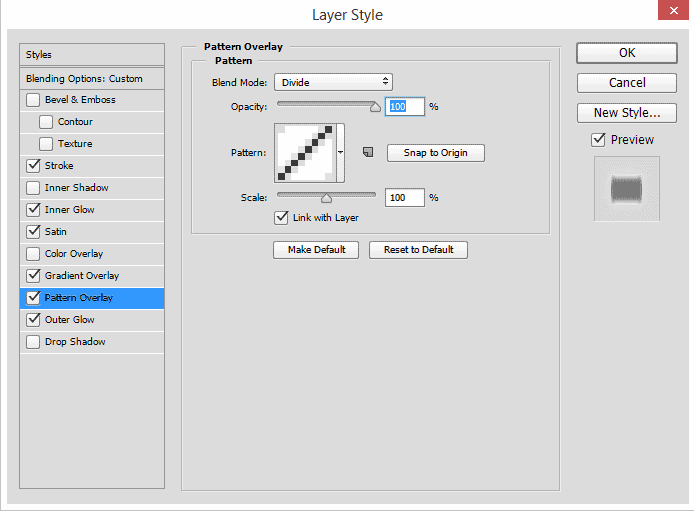
Add a bit of texture. Use a diagonal pattern. If you do not have you can create it or use another from Step 16 or add custom "Web Patterns" from Photoshop (click on Pattern > Small gear > "Web Patterns"). Set Blend Mode to "Divide", Opacity to 100% and go next.
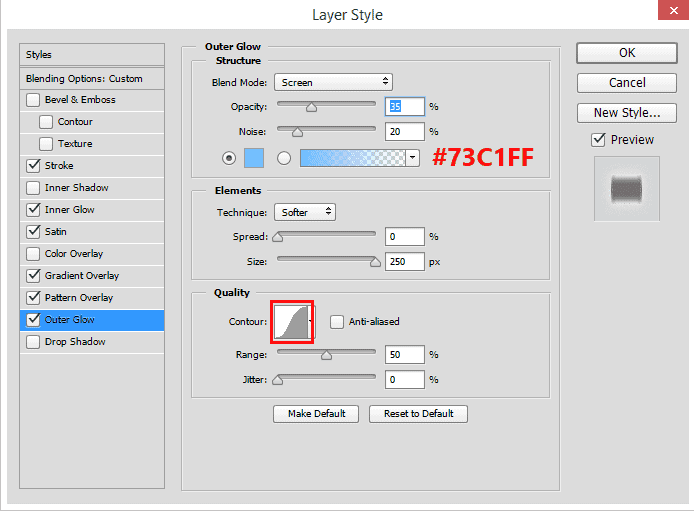
To highlight text in the picture I used "Outer Glow" style with Opacity: 35%, Noise: 20%, Color: #73c1ff, Spread: 0%, Size: 250px. Also change Contour like shown in image below.
Step 29
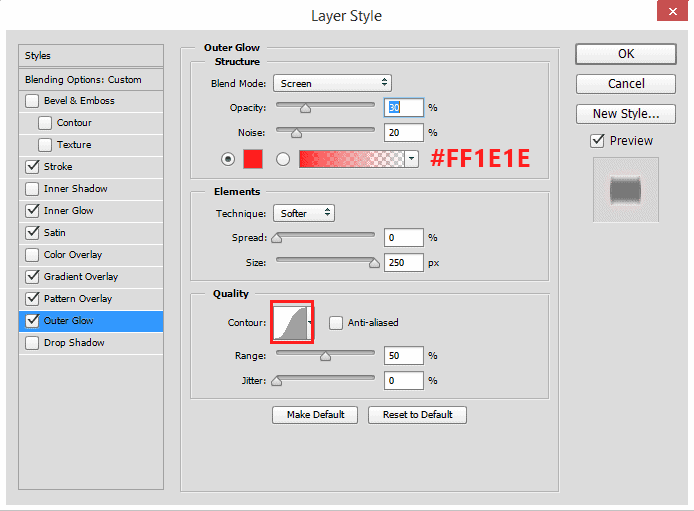
So, duplicate text group (Cmd/Ctrl + J or layer > Duplicate layer...) and change color in style "Outer Glow" to #ff1e1e and reduce Opacity to 30%. On image bellow you can see what happened after the addition of style. The most important thing is set group Fill to 0% and don't use Opacity otherwise it will affect the style.
Step 30
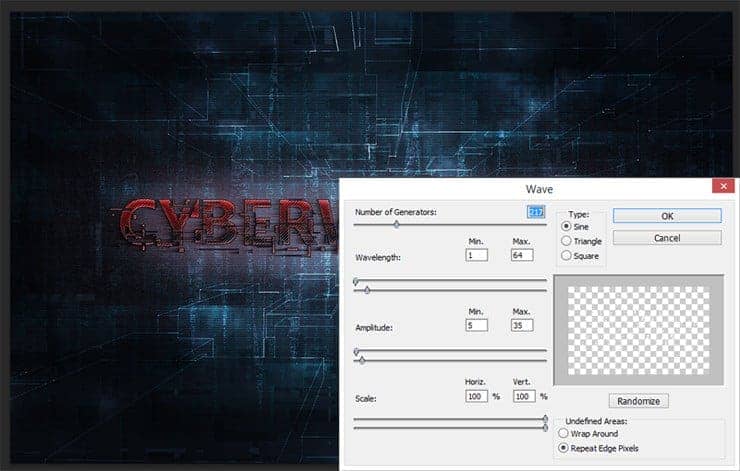
Create a sound wave by using a text. Duplicate any text group (Cmd/Ctrl + J or layer > Duplicate layer...) restore Fill to 100% and remove layer style (just grab "Fx" and drop into a trash). Convert this group to Smart Object (Layer > Smart Objects > Convert to Smart Object). Change layer Blending Mode to "Overlay". Go to Filter > Distort > Wave... Set for Number of Generators: 217 for Wavelength min: 1, max: 64, Amplitude min: 5, max: 35, Scale: 100% for both values and Type: Sine, Checked "Repeat Edge Pixels".
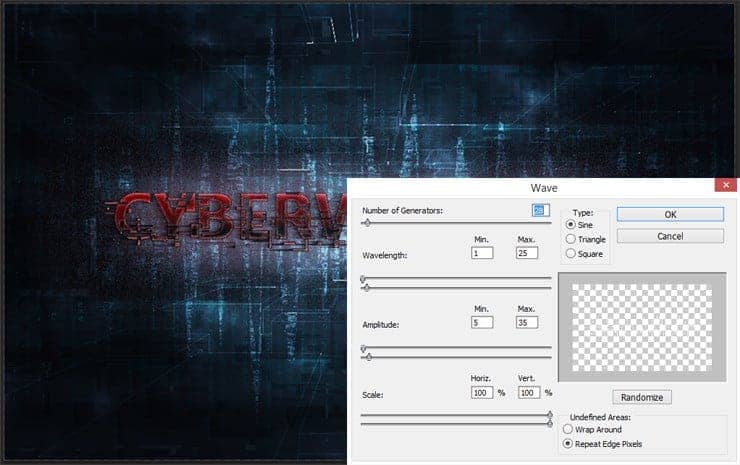
Step 31
Duplicate this layer two times (Cmd/Ctrl + J or layer > Duplicate layer...). For first copy set Fill: 50% and for second change filter settings to Number of Generators: 28, Wavelength min: 1, max: 25, everything else leave as is. This wave will be slightly less than the previous.
Step 32
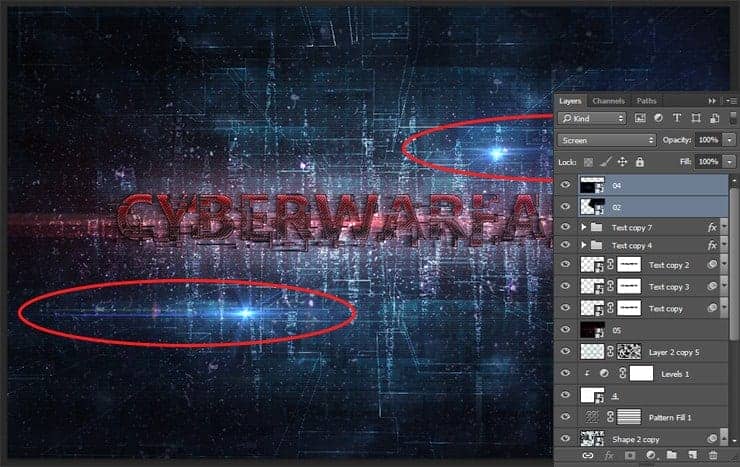
Remains the last detail. In the final part, we add highlights and vignette. First the flares. Place "05" image from "Flares" folder (File > Place.../Place Embedded) under wave layers. Resize it so that the image fit to a workspace. Change for this layer Blending Mode to "Screen".
Step 33
Add two more flare as shown in the image below. The set of images is not very big but you can try to use other flares. Change Blending Mode of both layer to "Screen". You can use adjustment layer "Color Balance" or "Hue/Saturation" to change the color of the flares.
Step 34
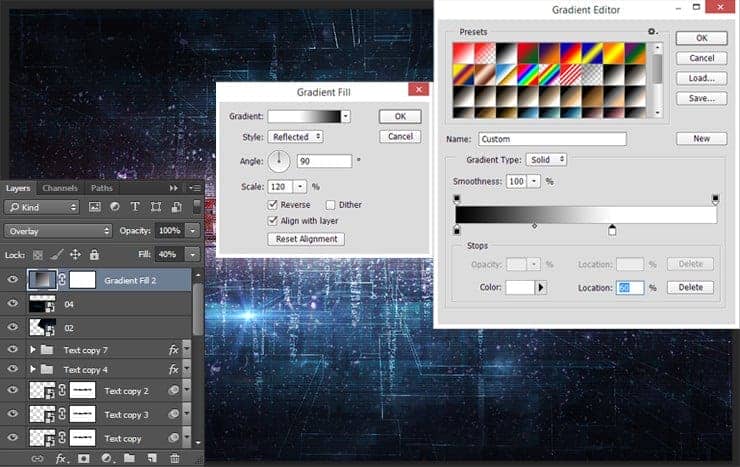
The final layer is a gradient fill layer (Layer > New Fill Layer > Gradient... or use "Create new fill or adjustment layer" icon) with default black & white gradient but shift white slider to Location: 50 - 60% to density gradient and Scale around 120%, Angle: 90, Style: Reflected. To this layer has started to work in the right direction, change Blending Mode to "Overlay" and reduce Fill to 40%.
Step 35
Do not be afraid to experiment and try something new. Here are some options that can be done from this tutorial.


Final Results
That's all! I hope you enjoyed this tutorial and show you something new in Photoshop. Here is my final result. Feel free to show your artwork :)
Download the PSD
Cyber Warfare.zip | 50.7 MB
Tutorial by Maria Semelevich
 Thank you very much for taking the time to study this tutorial! I hope you benefited it! I wish all lucked in your future achievements! If you have questions or need help, please contact me. I look forward to your feedback and creative works! You can contact me by e-mail - [email protected] or Facebook Deviantart Behance. I am open to suggestions and cooperation. With best wishes!
- Maria Semelevich
8 comments on “How to Create a Wallpaper with Technology Text Effect in Photoshop”
this is outdated..the new photoshop is not organised as you describe it
When clicking on download (http://downloads.photoshoptutorials.ws/Cyber Welfare.zip) we get “404 Not Found” :(
Thanks link has been fixed!
A very useful tutorial
I somehow can't submit any tutorials. Tried the Cintact Us section as well but it keeps saying Fatal error etc.,
When clicking on download (http://downloads.photoshoptutorials.ws/Cyber Welfare.zip) we get "404 Not Found" :(
Sorry about that... it is fixed now
A very useful tutorial <3 <3 <3