
Make your artwork look like they're from an alternate universe. These Cyberpunk presets work with Photoshop (via the Camera Raw filter) and Lightroom. Download all 788 presets for 90% off.

Step 11
Now I can begin the detailing process using the Smudge tool. Using the Smudge tool at 20% strength, I smudge the edges of the brush strokes to make the smooth. Then I switch to the burn tool to burn the edges. Once that’s done I switch to the Dodge tool to dodge the highlights.

Here’s what the image looks like so far. I’ve turned on the visibility of the sketch layer to show you how my character has changed while painting.

Step 12
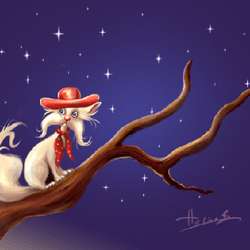
After working on the figure more, I decided to make some changes for the background. I changed the gradient from teal and blue to purple. This makes the cat stand out more. I also enlarged the image size so I can add more detail. My file size is now 3000x1716.

I decided to change the main painting a little bit too. Here you can see that I added a little cowboy hat to the cat. As usual, I created it on a new layer. I also added some stars to the background.

The stars are also on it's own layer. These small touches add a lot more to the image.

Final Results
And here’s the final image. Thank you for reading. I hope you enjoy this detailed making of the whole artwork. I hope you can use some of the techniques here for your own painting. Remember, the only way to become good at painting is to practice!
