
Turn any photo into a dot grid artwork with these Photoshop actions. You'll get great results with dots that change size. They get larger in brighter areas and smaller in darker areas. Free download available.

Step 9 - Duplicate Layer and add Layer Styles
Duplicate your 'Drips' layer three times. On the original layer, makes sure that the 'fill' is at 0% then double click the layer so that the Layer Styles dialog box pops up and apply these settings. For the Inner Shadow I used #22190a.

The color I used for Inner Glow is #855100.

The color I used for Highlight Mode #ffe8b8 and for Shadow Mode #cfb788


The color I used for Satin #633701

Step 10 - 2nd Drips layer
If you've done everything right this is how it should look so far. Go on to your 2nd Drip layer (which should also have a 'Fill' of 0%) and add these layer styles.

color #602e06


Step 11 - 3rd drip layer
Add these effects to your 3rd layer. Inner Shadow #000000


#602e06

Step 12 - Last Drip layer
This is how mine looks at this point. Continue to add these settings to the last drip layer.


Use the photo of water in the beginning of this tutorial for the pattern overlay. Also change the picture of water to black and white before adding it as your pattern.

Step 13 - Highlights
Create a New layer (above your Drip layers) and name this layer 'Highlights'. Grab your Brush Tool and select a soft round brush with a size of 12px and a color of #ec9f04. Then on your 'Highlights' layer brush in some highlights in different areas of the drips.

Step 14 - Blur Highlights
Once you have brushed in some highlights like the image above. Go to Filter > Blur > Gaussian Blur. Once you've done the Gaussian Blur change this layer to 'Soft Light' with an Opacity of 70%

Step 15 - Smudge Highlights
Take your Smudge Tool (size 50px and a Strength of 50%) and smooth out your highlights. So that it looks like the picture below.

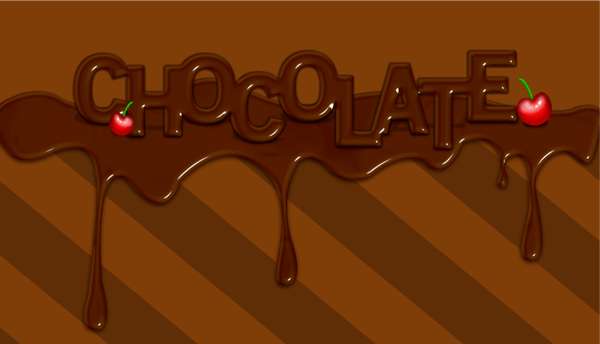
Step 16 - Chocolate Text
We are now done with the chocolate drips! Time to move on to our text effect. The font that I will be using for this tutorial is "Old Sans Black". I attached a link at the beginning of this tutorial for you to download. For my text I typed out each individual letter and line them up so that each letter touched one another. Once you have typed out each letter, rasterize each letter and merge the letter layers. You can name this layer 'Chocolate' or whatever you like.

Step 17 - Chocolate Layer Styles
Duplicate this text layer four times. Make your top 3 'Chocolate' layers invisible by clicking the eye icon next to the layer. On your first 'Chocolate' layer add these Layer Styles. Make sure the Fill on this layer is at 0%. The image below is how your first 'Chocolate' layer should look once you apply the layer styles.
6 comments on “How to Create a Chocolate Text Effect in Photoshop”
aaaaaaaaaaaaahhhhhhhhhhhhhhhhhhhhhhh
no me sale la parte del color donde quedan los reflejos blancos
This is actually excellent ! unique tutorial. I never seen such.
Thank you thank you ! Really thank you for this tutorial !
Wish you all the best for your work in graphic designs . . .
best luck. Thnkies once again.
Thank you. Very delicious!!!
Thank you! Great job
this is brilliant! thankyou sooooo much!