And again, use soft brush to blend the color of the skin.

When adding life to the skin you can realize some of the things you’ve finished before don’t look finished anymore. For example, metal parts should be much more shiny than the skin. Add some light to them with Screen or Linear Light Mode.

Step 17
For now we’ve just use universal lights – it means they don’t depend on the colors of environment. They can’t stay like this, so use warm, red/orange color to put some light on the character again. Vivid Light Mode will be perfect for this.

Step 18
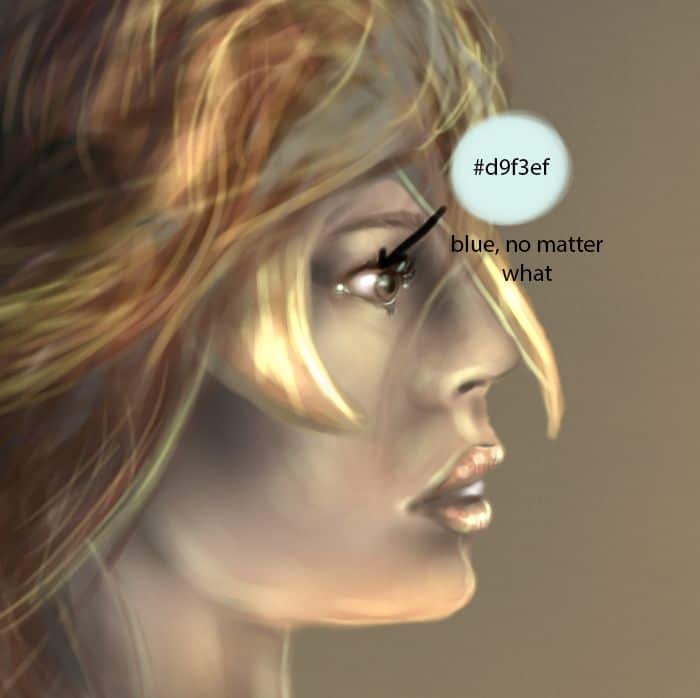
Time to add some details on the face. When it comes to the eye, it’s a good habit to always put blue light on it, using hard brush in Linear Light Mode. Whatever the colors around, I always use blue. Don’t ask me why, it just works

Step 19
There are a lot of “skin brush” packs on the Internet, but if you want to make your own and not to care about any credits, you should be able to do it now. It may look like this below, but I’m sure you can do better. When it comes to the options, the ones from leather brush should work here too.

Use your brush to cover all the skin (light green, Linear Light, very small brush). You may not see the difference, but it’s a detail that looks great when printed.

Step 20
The last thing here will be adding texture to… everything. There’s certainly some dust in the air, so it can’t be smooth. I’ll show you the trick that’s used by the greatest artists: create a new layer on the top and fill it with some dark color. Then go to Filter > Noise > Add Noise.

The options can change something, but it’s all up to your style. Experiment!

Change the layer blending mode to Overlay and lower the Opacity. The grain shouldn’t be visible, but it can’t be invisible either. You need to feel this moment.

Final Results
![final-results[1] final-results[1]](https://cdn.photoshoptutorials.ws/wp-content/uploads/2013/08/finalresults1-1.jpg?strip=all&lossy=1&webp=82&avif=82&w=1920&ssl=1)
Download the PSD
Tutorial by Monika Zagrobelna
10 responses to “Create a Fantasy Warrior Painting From Scratch”
-
Unable to download the “Pose References” file … Please advise. Thanks
-
Doing things like this from scratch really makes you appreciate the work that goes into it.
-
Some Fantastic images here, some really creative, some excellent timing.
-
kaka
-
amazing tutorial. Just bought the graphic tablet, so I was not sure, how to handle no line art, this helped a lot. Thanks
-
I was just looking about that, thanks for worth sharing.
-
haven’t tried it yet but going to in a few days. just want to say thanks for taking your time to do this and looks great I hope to be able to do it to :)
-
why this type brushes not work properly waagraphics.com
-
what brush do you use to scketch ?I’ m super amatuer on this !
-
interesting…i like it
-


 I hope I was able to teach you something and didn’t bore you to death. If you want to see any more tutorials from me, don’t hesitate to contact me through my
Leave a Reply