
Download Lightroom presets and LUTs, absolutely free. Use the presets to add creativity and style to your photos.


Step 6
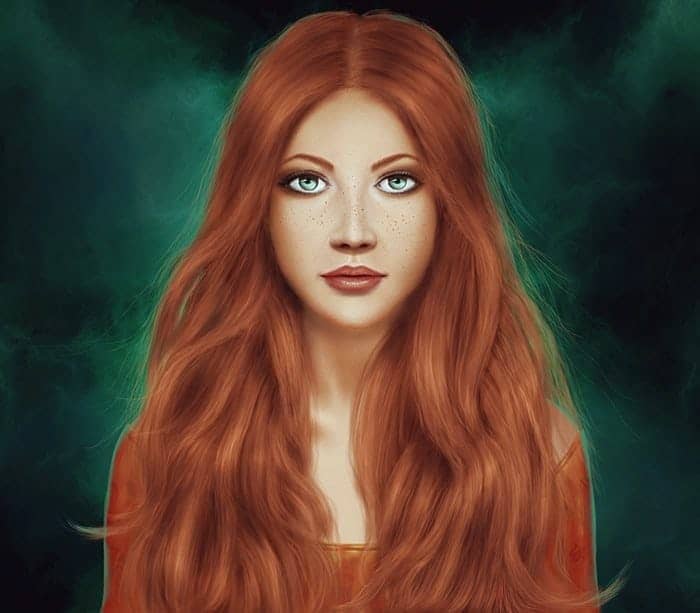
I used a Hue/Saturation adjustment layer with Clipping Mask to lighten the look of the lips. On this layer mask use a soft black brush with a very low opacity to reduce the Hue/Saturation effect :

Step 7
On a new layer I painted the eyebrows shape. I wanted to paint a red hair for the model so I chose a pretty dark red for the eyebrow (#824f3e), remember to make the brow ends faded to create a finer look for the face.

Step 8
On two new layers I used a brush with the color #100d06 to paint under the eyebrows, on the indicated area of the eyes in the step 2. Then I used a layer mask to create the base of the eyes included the irises and eyelids:


I made a new layer under the eyes ones and used a light color for the brush (#d6d3ce) to paint the sclera, remember to lower the brush opacity to make some eyes veins and details inside visible:

Here is the result should be so far:

Step 9
Since this step we'll go for more details. Delete the lines as we don't need them anymore. We'll start from the eyes as it's my favorite part. On a new layer under the sclera one use a soft brush with the color #3d291a to paint around the eyes, especially the eyes end to create more depth for them.

Step 10
Create a new layer and on this use a brush with the color #746f65 to paint inside the irises. Add a mask to this layer and use a black brush to make the pupils and the details inside the irises visible. The pupils should be in the middle of the irises as she is looking straight at us. Also make the top of the irises less visible, less bright as there is the shadow of the eyelids:

Step 11
Make a new layer and use a hard brush with the color #e9e4d7 to paint small lines around the pupils to create more details inside the irises:

I used the same brush but lowered its hardness to 0% to paint under the irises bottom to make them brighter:

On a new layer, use the same brush to paint on the bottom right of the irises to make the light there stronger. Change this layer mode to Overlay 100%:

Step 12
I used a new layer with a hard brush and the color #f3fbfe to make reflection in her eyes. The reflection can be anything so you're free to paint as you see fit.

Step 13
Make a new layer, use a soft brush with the color #beb0a6 to paint more details at the bottom of the eyes:

Step 14
Create a new layer, use a soft brush with the color #593f36 to paint under the eyes and make some wrinkles:

Step 15
On a new layer use a soft brush with a pink color (#6b4541) to make the caruncle at the inner corner of the eyes:

I used a soft brush with the color #2e2c27 to paint more details of the caruncles:

Make a new layer and use a soft brush with the color #efe5e3 to paint highlight on the caruncles and around the eye edges.

Step 16
It's time for the eyebrows. Make a new layer above the eyebrows shape one, use a hard brush with the color #3a200d to paint small hairs following the shape, remember to paint some faded hair outside and above the shape to make the eyebrows more natural:
26 comments on “How to Paint a Woman Portrait from Scratch”
I don't understand step 4 to step 5
I don't use a tab..can I do it on my laptop
AWESOME!
Thanks for sharing your knowledge!
how to brush?
wonderful
it's a pity... the download does no longer exist :(
Link has been fixed. THanks!
omg so cool .. thanks !!
Very simply shykarnaya article helped novices As
thx,thx
this is vey useful Thank you. But please upload tutorial to use properly using brushes
I want your help. I like your side. Your words are interesting. I got here by miksate and I started reading. I became interested in the topic and I am thinking it I could use your texts on my paper, only with the quotation. Please answer, thank you.
I have learned some esseitnal things through your site post. One other subject I would like to express is that there are numerous games on the market designed in particular for toddler age small children. They consist of pattern recognition, colors, pets, and shapes. These generally focus on familiarization as opposed to memorization. This makes little children occupied without feeling like they are studying. Thanks
This is amazingly easy. Even on an iPod. I have done this and even though some of the proportions are wrong( soz I am a perfectionist ease don't take this offensively) it looks amazingly realistic. The eyes colour is awesome as well. When I. First started reading it I thought, ok the eyes are grey. That's interesting. Turns out the eyes were going to be sea green!!
How can I learn this in simple way :/
An interesting dicssusion is worth comment. I believe which you ought to write regarding this subject, it may not be a taboo subject but usually persons are too couple of to chat on such topics. To one more location. Cheers
According to my point of view It's wonderful creation.If you can i would like to know some more tutorials about Painting a Woman Portrait . Thanks :)
wonderful !!!!!
that is good job
Hi Blakred,you can use any Soft Round brush, but make sure its hardness is set to 0%then you can adsjut its size according to the image.and you are done.let me know if you need further assistance.
Very good however I recommend dimming the eyes to add realism
Some of the proportions layout is wrong, like the corners of the mouth should line up directly with the pupils of the eyes, not the inside edge of the irises, to name one, and the distance between the eyes is equal to the size of one eye. The ears, ( if seen ) would top out at the underside of the arch of the yebrows, and the bottom of the lobes would be lined up with the bottom of the nose. The layout compliments and confirms itself when you follow what I have stated. Find a book on how to draw lifelike for further instruction.
Why don't you make a tutorial of your own, a genius of life drawing? =) Show everybody how to do it properly, jealous b..... =)
OMG ur one of my best photo-shopper.. keep on the good work!
Kirby Oliver
do you have tips i can check out for impression brush? i can't figure out how to use it properly.