Download Lightroom presets and LUTs, absolutely free. Use the presets to add creativity and style to your photos.
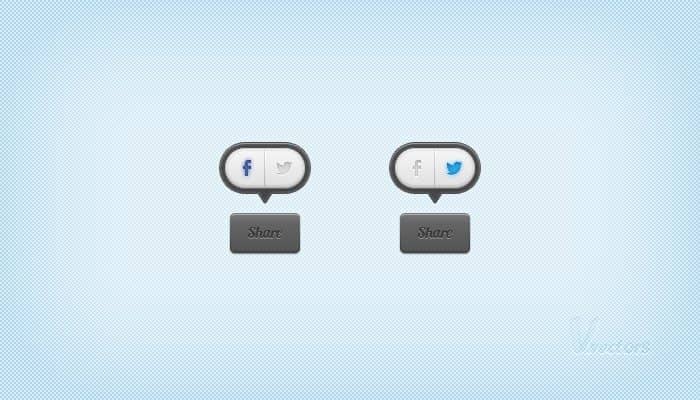
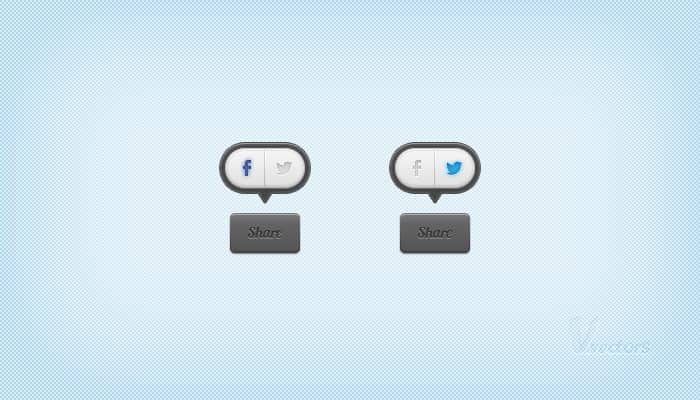
Learn how to create a simple share button in Adobe Photoshop! This is a pretty simple tutorial that will teach you how to create pixel perfect vector shapes and how to easily handle the vector tools in Photoshop. Once you get your starting vector shapes, you will learn how to add the colors using the Layer Style panel. Let's get started!
Preview of Final Results
Download the PSD
[vc_cta_button title="Free Download" href="https://downloads.photoshoptutorials.ws/shareButtons.zip" color="btn" size="btn-large" icon="none" target="_self" position="cta_align_right" call_text="shareButtons.psd" width="1/1" el_position="first last"]
Step 1
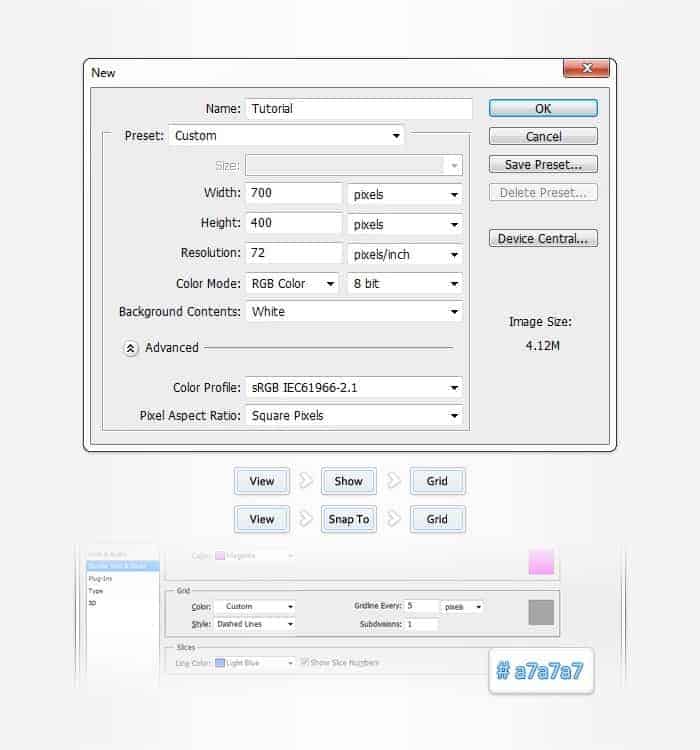
Open Photoshop and hit Control + N to create a new document. Enter all the properties shown in the following image and click OK. Enable the Grid (View > Show > Grid) and the Snap to Grid (View > Snap To > Grid). For starters you will need a grid every 5px. So go to Edit > Preferences > Guides, Grid & Slices and focus on the Grid section. Enter 5 in the Gridline Every box and 1 in the Subdivision box. Also, set the grid color at #a7a7a7. Once you set all these properties click OK. Don't get discouraged by all that grid. It will ease your work later. You should also open the Info panel (Window > Info) for a live preview with the size and position of your shapes.
Step 2
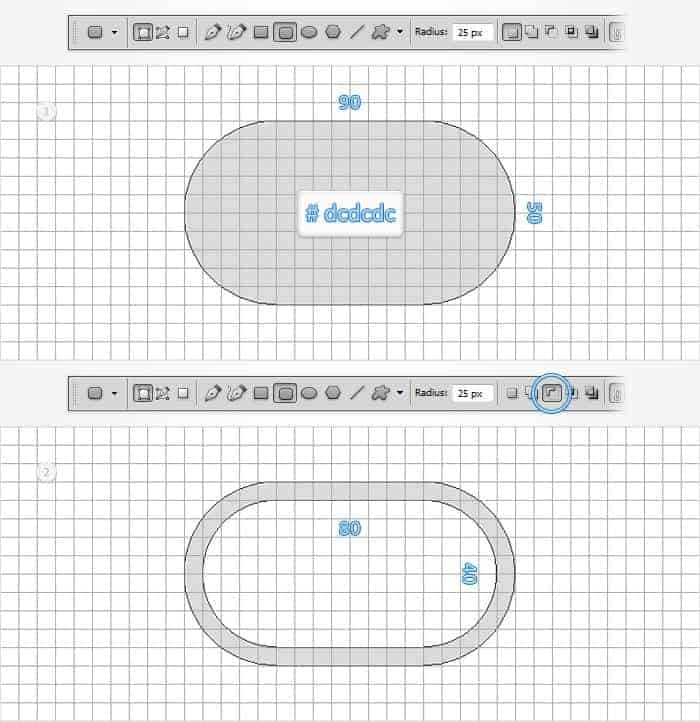
Set the foreground color at #dcdcdc, pick the Rounded Rectangle Tool, focus on the top bar and set the radius at 25px. Create a 90 by 50px vector shape and make sure that it stays selected. Continue with the Rounded Rectangle Tool, check the Subtract button from the top bar and draw an 80 by 40px vector shape as shown in the second image.
Step 3
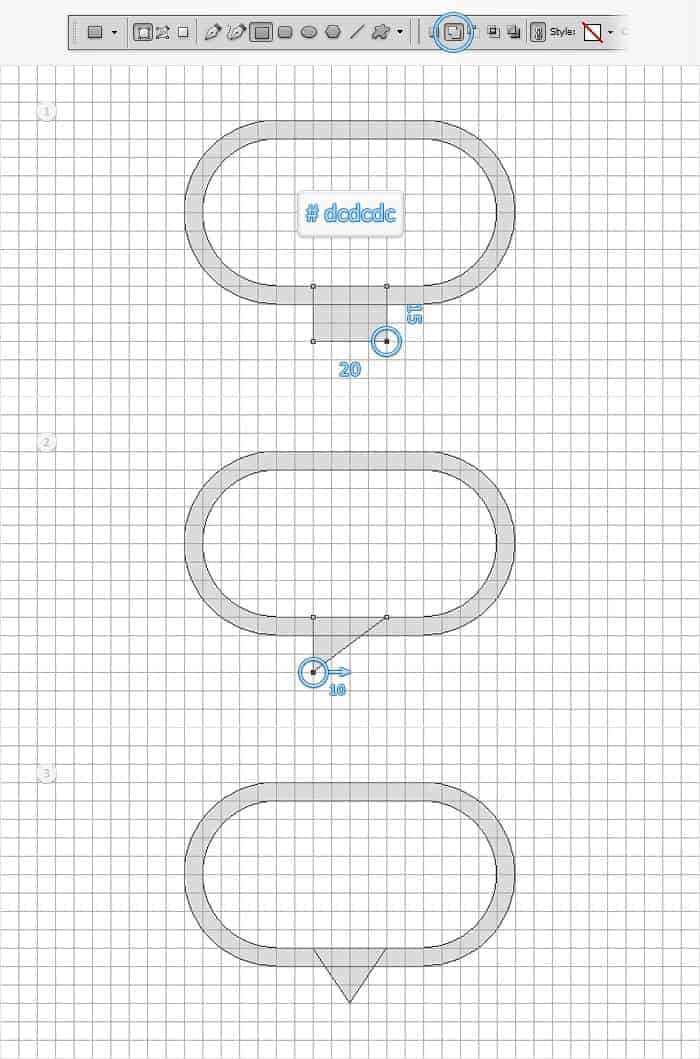
Reselect the vector shape made in the previous step and pick the Rectangle Tool. Check the Add button from the top bar and add a 20 by 15px vector shape as shown in the first image. Focus on this little rectangle, grab the Delete Anchor Point Tool and simply click on the bottom, right anchor point (highlighted in the first image) to remove it. Switch to the Direct Selection Tool, select the other bottom anchor point (highlighted in the second image) and drag it 10px to the right. In the end things should look like in the third image.
Step 4
Focus on the Layers panel and double click on the vector shape made in the previous step to open the Layer Style panel. Activate the Inner Shadow, the Inner Glow, the Gradient Overlay and the Stroke then enter the properties shown in the following images.


Step 5
Set the foreground color at #a1d8ff and pick the Rounded Rectangle Tool. Make sure that the radius is set at 25px, create an 80 by 40px vector shape and place it as shown in the first image. Open the Layer Style window for this new shape and enter the properties shown in the following images.


Step 6
Duplicate the vector shape made in the previous step (Control + J). Focus on the Layers panel, right click on this copy and go to Clear Layer Style. Select this copy, lower its Fill to 0% then open the Layer Style window and enter the properties shown in the following images.


Step 7
Set the foreground color at #dcdcdc, pick the Rounded Rectangle Tool and set the radius is set at 5px. Create a 70 by 40px vector shape and place it as shown in the first image. Open the Layer Style window for this new shape and enter the properties shown in the following images.


Step 8
Using the Type Tool add the "Share" piece of text and place it as shown in the first image. Use the Lobster font with the size set at 15pt and the color at #414141. Open the Layer Style window for this little piece of text and enter the properties shown in the following images.


Step 9
For the following steps you need a grid every 1px. Simply go to Edit > Preferences > Guides, Grid & Slices and enter 1 in the Gridline Every box. Set the foreground color at black, pick the Rectangle Tool, create a 1 by 38px vector shape and place it as shown in the first image. Make a copy of this thin rectangle, move it 1px to the right and replace the black used for the color with a white.

Step 10
Focus on the Layers panel and open the Layer Style window for the black rectangle made in the previous step. Enter the properties shown in the second image and click OK. Move to the white rectangle made in the previous step, open the Layer Style window and enter the properties shown in the third image.


Step 11
Set the foreground color at #4865a7, pick the Rounded Rectangle Tool, set the radius at 3px and create a 9 by 19px vector shape. Make sure that this new shape stays selected and switch to the Rectangle Tool. Check the Subtract button from the top bar and draw a 6 by 16px vector shape as shown in the second image.

Step 12
Reselect the vector shape made in the previous step and continue with the Rectangle Tool. Check the Subtract button from the top bar and draw two, 3px squares as shown in the first image. Get back to the top bar, check the Add button then add an 8 by 3px vector path as shown in the second image.

Step 13
Select the vector shape made in the previous step, place it as shown below then open Layer Style window and enter the properties shown in the following images.


Step 14
For the Twitter logo we'll use a simple png file which you can find here . Open it in Photoshop, hit Control + A to select the entire piece then hit Control + C to copy it.

Step 15
Get back to your main Ps file and hit Control + V to paste that Twitter logo from the previous step. Focus on the Layers panel, right click on this new layer and go to Convert to Smart Object. Make sure that this new smart object is selected and hit Control + T to resize it. Hold the Shift button from your keyboard and resize your Twitter logo as shown in the second image. Open the Layer Style window for this little smart object and enter the properties shown in the following images.


Step 16
Duplicate the vector shape made in the fifth step (Control + J). Focus on the Layers panel, bring this copy to front (Shift + Control + ] ) and clear its layer style. Make sure that the copy is selected, lower its Fill to 0% then open the Layer Style window and enter the properties shown in the following images.


Step 17
Finally, here are the Layer Style properties that you should use for the "hover" instance of the Facebook logo.


Here are the Layer Style properties that you will need for the "hover" instance of the Twitter logo.


Final Results
![shareButton0[1] shareButton0[1]](https://cdn.photoshoptutorials.ws/wp-content/uploads/2013/03/shareButton01.jpg?strip=all&lossy=1&quality=70&webp=70&avif=70&w=1920&ssl=1)
Download the PSD
[vc_cta_button title="Free Download" href="https://downloads.photoshoptutorials.ws/shareButtons.zip" color="btn" size="btn-large" icon="none" target="_self" position="cta_align_right" call_text="shareButtons.psd" width="1/1" el_position="first last"]
14 comments on “Create a Pixel-Perfect Social Icon Using Vectors”
This was a tougher one to follow. However, the end result is perfect! Thanks!
Have nice work ..............go on.
Really great tutorial!
Easy to follow and easy to understand!
Thank you!
Bafta!
it's useful.. but not clear expansion here
Rubbish tutorial. I don't know at which level this tutorial is aimed at, but the author is assuming that anyone having a go at this tutorial knows exactly where all the tools, and facilities, in photoshop are. In short very hard to follow, not very good in fact
I agree, im struggling to understand how they got the second vector shape (subtraction) perfectly centered inside the other vector shape. This is step 1 and 2!
Needs a better breakdown.
No layer styles for this???
Thanks! I might try
Where are Layer Styles settings?
this sux
Thank you very much.
Thx!!!
Thank's a lot for this tutorial. It's very very useful :)
Thank you dear for this wonderful article. I use Pixelmator but this is turning me gung ho for Photoshop.