Make your artwork look like they're from an alternate universe. These Cyberpunk presets work with Photoshop (via the Camera Raw filter) and Lightroom. Download all 788 presets for 90% off.
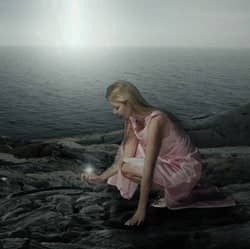
Learn how to create this surreal and dark photo manipulation. This tutorial will show you how to blend images together and transform them to create this image. You’ll also make use of some adjustment layers to complete the image.
Preview of Final Results
![final-results[6] final-results[6]](https://cdn.photoshoptutorials.ws/images/stories/228f99bcad8e_11F95/final-results6.jpg?strip=all&lossy=1&quality=70&webp=70&avif=70&w=1920&ssl=1)
Magical Light Beam Photo Manipulation Photoshop Tutorial
Resources
- Solidified lava - CAStock
- Sea, Greece - evza11
- Sky 17 - sacral-stock
- Lake 62 - raindroppe
- crow 1 - peroni68
- Rock stock PirateLotus-Stock
- Pink Dress 1 Kuoma-stock
- Star Brushes kuschelirmel-stock
Step 1: Create a New Image File
Create a new file with a width of 3500 px and a height of 4500 px at 300 dpi (Dots per Inch). Background Contents should be White.
![1[4] 1[4]](https://cdn.photoshoptutorials.ws/images/stories/228f99bcad8e_11F95/14.jpg?strip=all&lossy=1&quality=70&webp=70&avif=70&w=1920&ssl=1)
Step 2: Create the Background
First off, let's open the Lake 62 in Photoshop. We will be using this stock image so we will need to transfer it to our main canvas. Click the Lake 62 and press V to activate the Move Tool. Left-click the image and drag the image to the main canvas and change layer name to "Background".
![2[4] 2[4]](https://cdn.photoshoptutorials.ws/images/stories/228f99bcad8e_11F95/24.jpg?strip=all&lossy=1&quality=70&webp=70&avif=70&w=1920&ssl=1)
Next, let's open the Solidified lava in Photoshop. We will be using this stock image so we will need to transfer it to our main canvas. Click the Solidified lava and press V to activate the Move Tool. Left-click the image and drag the image to the main canvas and change layer name to "Background 1".
![3[4] 3[4]](https://cdn.photoshoptutorials.ws/images/stories/228f99bcad8e_11F95/34.jpg?strip=all&lossy=1&quality=70&webp=70&avif=70&w=1920&ssl=1)
The result should be similar to this:
![4[4] 4[4]](https://cdn.photoshoptutorials.ws/images/stories/228f99bcad8e_11F95/44.jpg?strip=all&lossy=1&quality=70&webp=70&avif=70&w=1920&ssl=1)
Now,activate pen tool to make a selection around the image after that delete the highlighted area.
![5[4] 5[4]](https://cdn.photoshoptutorials.ws/images/stories/228f99bcad8e_11F95/54.jpg?strip=all&lossy=1&quality=70&webp=70&avif=70&w=1920&ssl=1)
The result should be similar to this:
![6[4] 6[4]](https://cdn.photoshoptutorials.ws/images/stories/228f99bcad8e_11F95/64.jpg?strip=all&lossy=1&quality=70&webp=70&avif=70&w=1920&ssl=1)
Let's start by creating a Hue/Saturation adjustment layer which can be found by pressing on the Create New Fill/Adjustment layer button shown on the layer window Press Alt+left click in between 2 layer's ("background 1" layer and Hue/Saturation) to make a mask.:
When the Hue/Saturation box opens, input the following:
![7[4] 7[4]](https://cdn.photoshoptutorials.ws/images/stories/228f99bcad8e_11F95/74.jpg?strip=all&lossy=1&quality=70&webp=70&avif=70&w=1920&ssl=1)
The result should be similar to this:
![8[4] 8[4]](https://cdn.photoshoptutorials.ws/images/stories/228f99bcad8e_11F95/84.jpg?strip=all&lossy=1&quality=70&webp=70&avif=70&w=1920&ssl=1)
Let's start by creating a Hue/Saturation adjustment layer which can be found by pressing on the Create New Fill/Adjustment layer button shown on the layer window Press Alt+left click in between 2 layer's ("background 1" layer and Hue/Saturation) to make a mask.:
When the Hue/Saturation box opens, input the following:
![9[4] 9[4]](https://cdn.photoshoptutorials.ws/images/stories/228f99bcad8e_11F95/94.jpg?strip=all&lossy=1&quality=70&webp=70&avif=70&w=1920&ssl=1)
The result should be similar to this:
![10[4] 10[4]](https://cdn.photoshoptutorials.ws/images/stories/228f99bcad8e_11F95/104.jpg?strip=all&lossy=1&quality=70&webp=70&avif=70&w=1920&ssl=1)
Now activate Erase tool (E) with these settings Now let's erase :
- Brush size: 400px
- Hardness: 0%
- Opacity: 40%
- Flow: 100%
![11[4] 11[4]](https://cdn.photoshoptutorials.ws/images/stories/228f99bcad8e_11F95/114.jpg?strip=all&lossy=1&quality=70&webp=70&avif=70&w=1920&ssl=1)
The result should be similar to this:
![12[4] 12[4]](https://cdn.photoshoptutorials.ws/images/stories/228f99bcad8e_11F95/124.jpg?strip=all&lossy=1&quality=70&webp=70&avif=70&w=1920&ssl=1)
Now,activate pen tool to make a selection around the image after that delete the highlighted area.


4 comments on “Create this Magical Light Beam Photo Manipulation in Photoshop”
Great tutorials.Simple and straightforward. I've been looking for something like this for a while. Many thanks!Awesome! Excellent tutorial.
Great tutorials.Simple and straightforward. I've been looking for something like this for a while. Many thanks!
Color #fffff is Cyan not White. White is #ffffffff
I liked this tutorial but my student's found it a little difficult to follow as you sometimes call your layers and photos by the wrong name.
There are times when you tell us to work on one layer but you switch to another layer without telling us that the new layer needs to be selected. Otherwise a good tutorial and my students enjoyed it.
110% work, thanx for inspiration and sharing