Make your artwork look like they're from an alternate universe. These Cyberpunk presets work with Photoshop (via the Camera Raw filter) and Lightroom. Download all 788 presets for 90% off.
Many people use complicated methods to erase backgrounds when they can do it much easier with the Background Eraser tool. It creates great results with its automatic edge detection and selection feathering. In this tutorial, you will learn how to use the background eraser tool to erase the sky and replace it with another from a set of realistic sky gradients.
Preview of Final Results

![clip_image002[1] clip_image002[1]](https://cdn.photoshoptutorials.ws/wp-content/uploads/2013/02/clip_image0021-1.jpg?strip=all&lossy=1&quality=70&webp=70&avif=70&resize=675%2C451&ssl=1)
Step 1: Chose an image to work with
Open a photo that you want to extract a background from in Photoshop. In this tutorial I’m going to use a scene of two trees and a blue sky as background, but you can use the same techniques applied here to a variety of images and situations.

Step 2: How the tool works
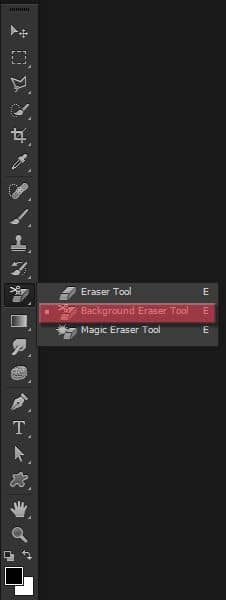
Even though the name says “Background” eraser, this tool can actually be used to erase a lot more than that, and it works more as a “Color” eraser rather than a “Background” eraser. So to start off let’s select the tool. You can use the shortcut Shift+E to cycle through the erasers panel, or you can click on its button on the left panel.

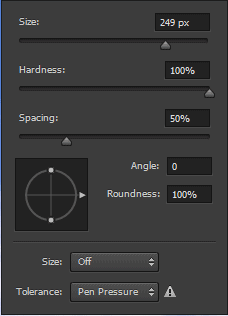
After selecting it, the options on your top panel will change, and your mouse will become a circle with a crosshair in the middle. The crosshair area is where we’re going to select the color that we want to erase, and everything else inside that circle that has that color will be erased. Right click anywhere in your image to open up the brush options for that tool.

Remember to always keep the hardness high because soft edges may leave background artifacts behind. Change the size of the brush as needed, and keep the spacing fairly low (1~50%) so it creates a smooth continually erasing line when you are using the tool.

In the top panel, chose the Sampling Once option, so we will only sample the color once and erase a big part of the image with it. Keep the Limits at Contiguous and the Tolerance at 50% for now.
Step 3: Start erasing
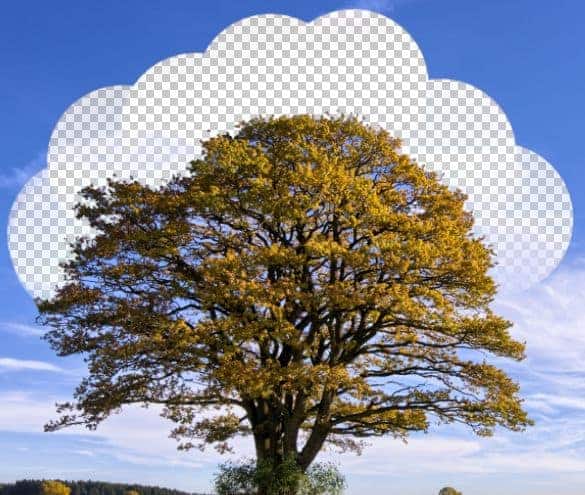
Click in a random part of the sky, hold the left mouse button, and drag the mouse around to erase.

As you can see in the image above, we are not erasing the background between the leafs and branches, but that leads us to the “Limits” option of the Background Eraser Tool. Go to the top panel and change the Limit from Contiguous to Discontiguous. Now do the same thing we did before and let’s see what will be the result.


42 comments on “Quick Tip: Erase Backgrounds Quickly With The Background Eraser Tool”
thanks so much, ít's really thing I find out after ten of years
Thank You
Clear steps to follow. Super helpful!
it is really helpful for me. thanks for the nice tutorial.
Sorry, the background stayed erased - white and wouldn't change.
Could you please explain if possible how to make this gradient workThank you!
How have I lived my whole life without this tool!? Thank you so much for this tutorial!
Ty so much.
An effective result although unconvincing. Why not select a more subtle gradient?
Incredible work man!Thanks for sharing.
Muito bom! Parabéns pela excelente explicação...
thanq
thank you mait for this wonderful tips
it dont work
thumbs up keep posting
Only the erasing is possible and coloring of background is not possible for those whose is new to photoshope. Kindly tell step by step how to fill the background with new color.
:-\
Most useful tutorial I've done in ages. Thanks a Million!
G :)
živo sranje
Tis a very helpful and detailed tutorial
Thanks
Thank you for a great write up! I've searched for months and though there are plenty youtube tutorials but they all come short. In most of those, the tutor assumes that his audience knows where certain options or features are and they are not mentioned or explained.
Every attempt I made following those tutorials left me frustrated because I could not fully follow them, and because they either skip important steps or don't explain them well.
Your explanation of the Sampling and Tolerance did the job
for me! Though I need to practice more, but I'm getting better results than I ever got.
The biggest problem for me is a photo of an older man with
center baldness and the color of the background so close to the color of the hair, so I keep getting the hair removed.
I spent hours on the background eraser, again, when it came
to the part of the hair, though I decreased the size of the eraser to 5 pixels or less, and zoomed in on the photo, I
still can not get a clean background.
Comments are welcomed!
Thank you again!
Jesse T.
thanks man this make my work more easy!! Nice tutorial
it does not work for the PS element 6
Thank you, that was really very helpful...
This is wat I have been looking for thanks a lot
This is awesome!!!
Grate Knowledge in Photoshop
Great Can u Make Video for this?
hvala brate! thank you very much!
why you have boi on your avatar
It doesn't work...Erased background isn't colored, just rest of photography. Is that because of my mistake or there is another problem?
HVALA
Couldn't get the gradient behind the foreground. Please explain how you dropped it in.
Create another layer beneath the tree layer.. Place the gradient on that layer!
Create another layer and place it beneath the original.
Thank you for this well written & well presented tutorial Guilherme Pejon.
How to replace the new gradient in the final step? Could you please explain it step wise since I am new to photoshop.
i was looking for this tutorial,.
thank u
its very useful for me !
Superb job! Thanks for the help, it was very detailed and useful :)
nice tut
susah nya buat photoshop...
Gampang kok