
“Cities were always like people, showing their varying personalities to the traveler. Depending on the city and on the traveler, there might begin a mutual love, or dislike, friendship, or enmity. Where one city will rise a certain individual to glory, it will destroy another who is not suited to its personality. Only through travel can we know where we belong or not, where we are loved, and where we are rejected.” In this Photoshop Tutorial, we will learn how to create Photoshop Manipulation. First added some stock images and blended together with Adjustment layers. Next, add birds, moon, and rays brushes. For the final touch added Camera Raw Filter.
Preview of Final Image

Tutorial Resources
Step 1
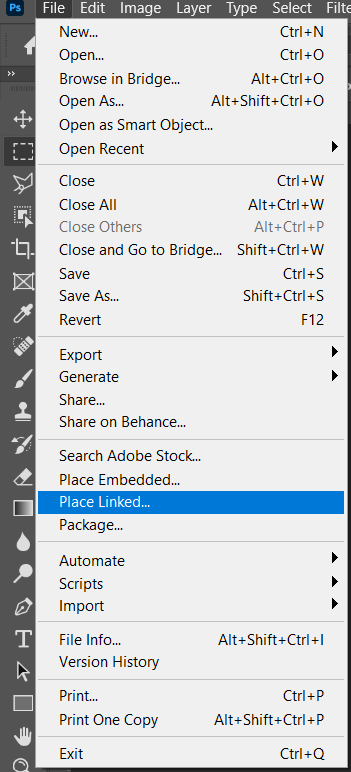
Now, let’s start by creating a new image file, go to the Menu bar and click File > New, and then input the following values on their respective fields
- Preset: Custom
- Width: 3080px
- Height: 3850px
- Resolution: 300px
- Color Mode: RGB Color 8 bit
- Background Contents: Transparent

Step 2
Now, place Clouds Go to File > Place and select Clouds, then place it to our work canvas and position the image with the transform tool (Ctrl / Cmd + T). Hold Alt + Shift and rasterize like the image below. In Photoshop CC only hold Alt to rasterize all sides together.

Step 3
Add Adjustment Layer “Color Balance”

Step 4
Add Adjustment Layer “Hue/Saturation”

Step 5
Add Adjustment Layer “Curves” and press Ctrl/Cmd + I to invert. Then use Brush Tool(B) Soft Round with foreground color white and paint Highlight parts.


Step 6
Add Adjustment Layer “Curves” and press Ctrl/Cmd + I to invert. Then use Brush Tool(B) Soft Round with foreground color white and paint Dark parts.


Step 7
Next, place City Go to File > Place and select city image, then place it to our work canvas and position the image with the transform tool (Ctrl / Cmd + T). Hold Alt + Shift and rasterize like the image below. In Photoshop CC only hold Alt to rasterize all sides together.

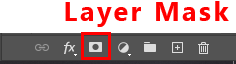
Now create a layer mask and with a soft round brush tool delete the bottom of the image…

Step 8
Add Adjustment Layer “Curves” and press Ctrl/Cmd + I to invert. Then use Brush Tool(B) Soft Round with foreground color white and paint Dark parts.


Step 9
Next, place Mountains Go to File > Place and select mountains, then place it to our work canvas and position the image with the transform tool (Ctrl / Cmd + T). Hold Alt + Shift and rasterize like the image below. In Photoshop CC only hold Alt to rasterize all sides together.
Leave a Reply