Group those layers and rename the Group as “Roots”.
Step 6 – Add a flock of birds
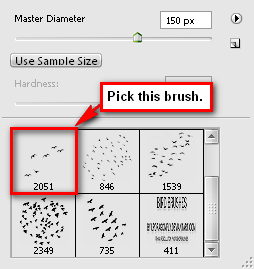
Now to add some color or life, let’s add some birds. Create a new layer and name it “Birds” then open “Bird Brushes” from the Brush tool’s menu.

Use these brush values:
- Brush size: 100px
- Opacity: 100%
- Flow: 100%

Step 7 – Retouch the image
Now let’s enhance the overall image by changing its tones and color. Click on the “Create new fill layer or adjustment layer”.

From the “Create new adjustment layer” button pick Color Balance. When the box pops up input these values respectively:
- +13, 0, –27
- Tone Balance: Midtones
- Preserve Luminosity: Checked

Next, add a solid color and from the “Create new adjustment layer” click on Solid Color from the contextual menu. Input this value when the Color Picker box opens:
- #: 443523
When the color appears on our canvas, change the following settings in the Layer window:
- Blending mode: Soft Light
- Opacity: 40%
Apply another Solid Color on our image and input this value:
- #: f1820b
Then use these settings:
- Blending mode: Soft Light
- Opacity: 15%
Create a Gradient Map from the Adjustment Layer button.

As it appears on our Layer window, change the settings to:
- Blending mode: Luminosity
- Opacity: 100%
Create a Hue/Saturation adjustment layer from the New Adjustment Layer button then set its values to:
- Edit: Master
- Hue: 0
- Saturation: 7
- Lightness: 5
Next, we create a Curves adjustment layer. Then use these values:
- Channel: RGB
- Input: 122
- Output: 134

Create a Brightness/Contrast adjustment layer then input these values:
- Brightness: 4
- Contrast: 10
Step 8 – Make the image look dreamy
Now let’s add a dreamy effect to our scenery. Right click on any layer then press Flatten Image. Then duplicate our image (Ctrl/Cmd + J). While the duplicated layer is selected, go to Filter > Blur > Gaussian Blur and input this value:
- Radius: 16.0

Then press OK. Now on the Layer window, use these settings:
- Blending mode:
- Screen Opacity: 25%
Now, you’d probably notice that the image lacks dark tones, so let’s fix that. Create a Selective Color adjustment layer and then input these values:
- Colors: Blacks
- Cyan: 0
- Magenta: 0
- Yellow: 0
- Black: 5
- Method: Absolute

Now that that’s done, let’s Flatten the image.
Step 9 – Sharpening and saving as PSD
Before anything else, you may want to save it as PSD file so you may edit the image again in the future. After that, let’s sharpen the image. Go to Filter > Sharpen > Smart Sharpen and input these values:
- Amount: 125%
- Radius: 1.0
- Remove: Gaussian Blur
- More Accurate: Checked
Step 10 – Saving the file to TIFF and Jpeg
After you’ve done the sharpening, you may flatten the image by right-clicking on any layer and clicking Flatten Image. You may want to save it as a TIFF file first, which would allow you to do some quick changes to the image, like adjustment layers and fill layers without reducing its quality. You can view cracks in the image through the Histogram. Finally, save it as a .jpeg image.
4 responses to “Create a Floating Island Scene Similar to James Cameron’s Avatar”
-
Great idea!
-
I couldn’t get the bird brushes to download, but I found the artist’s DeviantArt page and some brushes that are similar.
https://www.deviantart.com/ivadesign/art/bird-brushes-116619710
Thank you for the cool tut!-
There’s a bug on the QBrushes website. You have to click on the download link several times in order for the download button to work.
The link was changed to yours since it is more direct and works correctly. Thank you Su!
-
-
half of files doesn’t work


Leave a Reply