Make skin look perfect in one-click with these AI-powered Photoshop actions.
Using Photoshop CS3 or newer
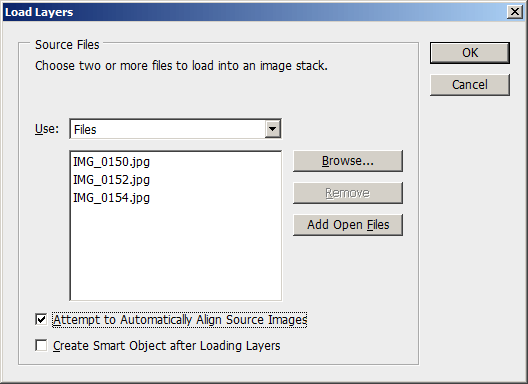
With Photoshop CS3 or newer, you can load images into a document as layers easily with the Load Layers script. Choose File > Scripts > Load Files into Stack. Browse for the three images then click OK. Enable the “Attempt to Automatically Align Source Images” option. With this option enabled, Photoshop will automatically align the layers to compensate for slight movements. This works almost all the time but in case it doesn’t, you can disable it. Because you’ve already aligned your layers, skip the next step (Step 2 – Aligning the layers).
Using Photoshop CS2 or older
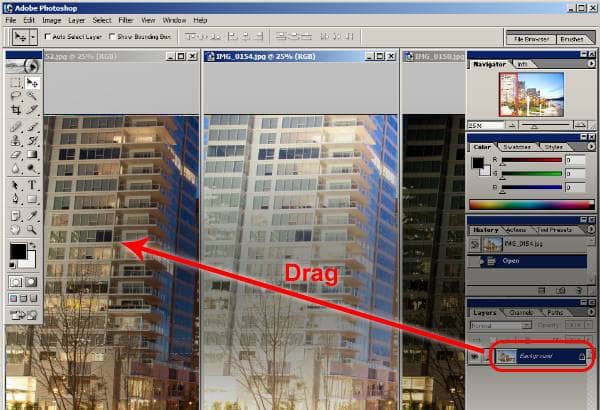
Open all three images into Photoshop. Tile the images so that you can see all three. While holding the Shift key on your keyboard, drag the layer of one document to another. Repeat this with the third image. One of the images should have three layers. Depending on the version of your Photoshop, you may have to reposition the layers so that they look aligned. You can close the other two images.
Step 2 – Aligning the layers
When shooting photos for HDR, many times the photos aren’t perfectly align. Even slight misalignment can cause ghostings/artifacts. Before we proceed, we need to ensure that the layers are properly aligned. If you’ve imported your photos using Photoshop CS3 or newer in the previous step, skip to step 3.
Photoshop CS3 or newer
Photoshop CS3 introduced a new feature called Auto Align Layers. With this command, Photoshop can analyze your layers and automatically align them. Start by selecting all three layers. You can select multiple layers by holding down the Ctrl key on your keyboard.
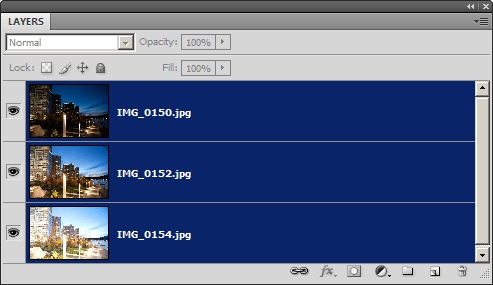
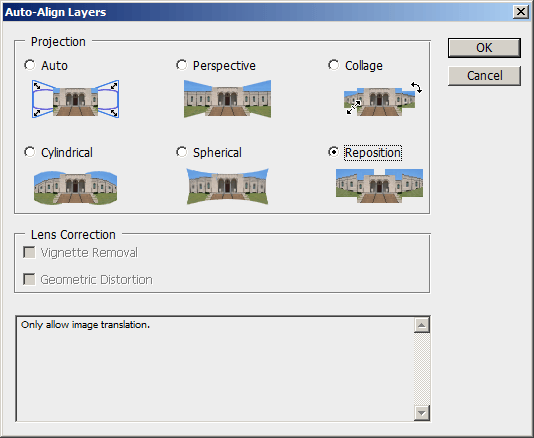
Choose Edit > Auto-Align Layers. Select reposition as the projection method then click OK.
Photoshop CS2 or older
Unfortunately, Photoshop CS2 or older do not have the auto align layers feature. You’ll have to manually align the layers. However, we’ll show you a neat trick to make this fast and easy. Here’s how to align layers manually: Hide the top layer then set the blending mode of the second layer to difference.
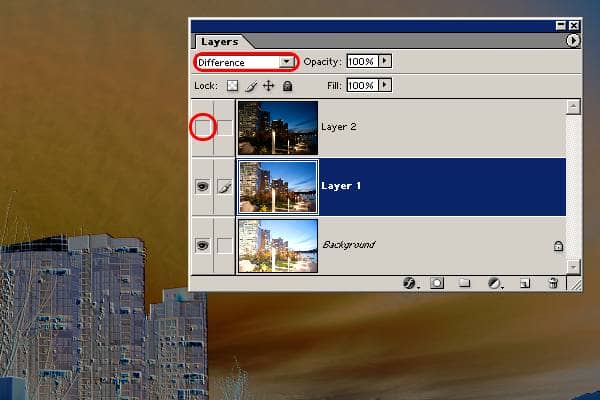
After you change the blending mode to difference, you’ll notice that your image will look inverted and most likely embossed. If there is no embossing, it means that your image is perfectly aligned. If there is embossing, you’ll need to align thelayer. To align the layer, select the Move tool (V) then press the arrow keys on your keyboard to nudge the layer until the embossing effect disappears. Below is an example of the before and after results of nudging.


2 comments on “HDR Tone Mapping with Layers in Photoshop”
Dats brilliant like it!
Nice Blog