

Turn any photo into a dot grid artwork with these Photoshop actions. You'll get great results with dots that change size. They get larger in brighter areas and smaller in darker areas. Free download available.
Learn how Hatice Bayramoglu created this beautiful painting in Photoshop. She will show you her process from sketching to shading using her own technique.
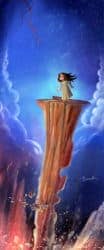
Preview of Final Results

Painting “The Nightmare” Photoshop Tutorial
Resources
- Program: Photoshop CS2
- Digital Painting-Photoshop Tutorials
Step 1 - Concept and arranging the main sketch
I draw a lot of simple sketches on a computer or maybe sometimes on paper. I am going to use an old sketch work of mine. Here is the main sketch work which I draw. If you want, you can use this sketch too.
![nightmare_a_01[4]](https://cdn.photoshoptutorials.ws/wp-content/uploads/migrated-images/02d5471a617b_17F0/nightmare_a_014.jpg?strip=all&lossy=1&quality=70&webp=70&avif=70&w=1920&ssl=1 "nightmare_a_01[4]")
Step 2 – The sketch
Let me show you a screenshot from the main sketch. The first character was a simple sketch for a storybook illustration. I often draw a lot of simple sketches to represent the story, but when I go back to look at it, I realize that I would only use one of the sketches. The sketch used for this tutorial is one that I didn’t use on my other projects.
![nightmare_a_02[4]](https://cdn.photoshoptutorials.ws/wp-content/uploads/migrated-images/02d5471a617b_17F0/nightmare_a_024.jpg?strip=all&lossy=1&quality=70&webp=70&avif=70&w=1920&ssl=1 "nightmare_a_02[4]")
Step 3 - Setting the Canvas
For the final sketch work, Photoshop File size is 900x2158.
Here are the canvas settings:
- Width: 900 pixels
- Height: 2158 pixels
- Resolution: 72 dpi
Start by creating a new document in Photoshop. The resolution can be 72 for now. Of course, later, I need to make it bigger to add painting details. But not now. And of course, any part of this sketch will be in the final image. You need this sketch entirely for reference. So you can delete or hide the sketch layer later.
![nightmare_a_03[4]](https://cdn.photoshoptutorials.ws/wp-content/uploads/migrated-images/02d5471a617b_17F0/nightmare_a_034.jpg?strip=all&lossy=1&quality=70&webp=70&avif=70&w=1920&ssl=1 "nightmare_a_03[4]")
Step 4 - How to choose a brush
I usually start off with a smaller image size then increase it as I add more details. For this illustration, I’m only going to use standard brushes with different pen pressure settings. My brush settings are shown in the image below. There’s a lot of settings you can adjust for your brush in the Brushes palette (Window > Brushes). In the Other Dynamic Settings, I set the control to Pen Pressure. If you are using a pen tablet such as the Wacom, this setting will allow your tablet to be pressure sensitive. Some pen tablets also let you adjust the angle of your stroke.
![nightmare_a_04[4]](https://cdn.photoshoptutorials.ws/wp-content/uploads/migrated-images/02d5471a617b_17F0/nightmare_a_044.jpg?strip=all&lossy=1&quality=70&webp=70&avif=70&w=1920&ssl=1 "nightmare_a_04[4]")
Step 5 – Color palette
The second thing you want to choose is the color scheme. Here are the colors I used for this artwork. You can use the same colors and load them into your Swatches palette (Window > Swatches). If you don’t like the color scheme, you can always change it later. I want my painting to look like a nightmare scene with strange-looking clouds, so I chose dark blue, brown mixed with green, and some lighter shades of blue and purple. The background will be a cold navy blue.
4 comments on “Painting “The Nightmare” in Photoshop”
Thank you very much. It's very useful tut Thank you.
The skies are just wicked right now. I've been glued to my winodw. It's amazing. Yesterday morning, we were graced with clear blue skies and an amazing rainbow which dissapated as soon as I found my camera. Within minutes, the entire cityscape was shrouded in mist. Even when it's ugly out, Taiwan is still so beautiful! I hope you're able to get some good pictures. Stay safe this weekend!
Amazing work and details!
its awesome..it helped me alot...thanku