

Turn any photo into a dot grid artwork with these Photoshop actions. You'll get great results with dots that change size. They get larger in brighter areas and smaller in darker areas. Free download available.
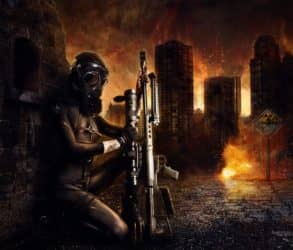
Learn how to create this amazing photo manipulation by Andrea García! This tutorial starts by compositing the city landscape using several stock photos then moves on to adding fire and flame. After that, you’ll learn how to add a gas mask to a model and finish up with a warm color effect and a few additional details.
Preview of Final Results

Tutorial Resources
- Wall – Faestock
- Model – mjranum-stock
- City – joanielynn
- Mask - Valentinakallias
Bullets - August-girl(Alternative)- Radioactive sign - Fantasystock
- Sign Stick - Wolfc-stock
- Sky - Somadjinn
- Crack Brushes - Funerals0ng
- Fire - Creativenature-stock
- Fire II - Noobist
- Explotion - Joeycool10
- Sign Fire - Meihua-stock
- Wall Texture - Falln-stock
- Radioactive symbol - Johanvts
Step 1 - Size
Go to the menu File – Open. The file has to be Width200px. Height 1700px.

Step 2 - Base
You have to star with a base image, this is the one is going to be at the bottom of everything, you can use a texture and add a Gaussian blur (Filter –Blur – Gaussian blur) to have something like this:

Step 3 - Wall
Let’s start with the wall, place the image of the street and add a layer mask, You can find the layer mask option at the bottom of the layers menu.

Step 4 - Hide
Paint over the layer mask with the black brush until you have something like this, remember to make the edges of the wall, don’t worry if is not perfect is just to have the idea.

Step 5 - City
Open the image of the city and place it like this:

Step 6 - Blending
Repeat the process you did before, create a layer mask and hide everything except the buildings, you can make the selection with lasso tool and then pass the black brush to hide the undesired parts.

Step 7 - Multiply
Change layer mode from normal to the option multiply.

Step 8 - Sky
Place (Menu File – Place) the image of the sky above the other images.

Step 9 – Soft Light
Change layer mode to soft light.

Step 10 – Dark
In a new layer ( Ctrl+Shift+N) Pick a soft round brush (black) and paint around the buildings and sky, all the upper part of the image, use the layer in soft light mode. You can set the opacity of the brush to pen pressure if you have a tablet, if you don’t you can use 40% of opacity.

Step 11 -Fire
Like you did before place the layer of the fire

Then change the layer mode to soft light and change the opacity to: 60% and the fill to 50%.

Step 12 – Gaussian Blur
You can add some Gaussian blur to this image, because right now this layer is going to create the lighting of the flames, So go to Filter- Blur- Gaussian Blur.

Apply 50px of radius.

Step 13 – More Fire
Now add more fire, place another image of the fire and add a layer mask like you did before, so you can hide the edges and make a better blending of the image.
9 comments on “Create a Fiery City War Scene in Photoshop”
I just review your every single blog post related photoshop work..and it was awesome..will be back to read this blog soon.
This is really fantastic. The unlimited access makes it even better
please give me a link to YT video for that work
This is a decent tutorial, but be mindful of the perspective on the buildings in the background. It is way off as the picture you pulled it from was taken from atop another building, but the camera in the collage is at ground level. Just an FYI.
Its awsome!
Hi
Im realy Like this
why you not attach pdf file ( this Learn in PDF ) for easear learn and download that ? if that happens its will be perfect
sorry for My bad english :)
easear = easier ;)
no commet? very good!!
DRTFIPHGFFLKJH]HG