

Make your artwork look like they're from an alternate universe. These Cyberpunk presets work with Photoshop (via the Camera Raw filter) and Lightroom. Download all 788 presets for 90% off.

Step 37
I used a Hue/Saturation adjustment layer to change this light color:

Step 38
Add a Levels adjustment layer to this light layer to reduce the light area a little. Erase the center of it (on the model arm):

Step 39
Open the light 2 image. As it has a transparent background so simply drag it onto the raising arm of the model using the Move Tool. Change this layer mode to Screen 100%:

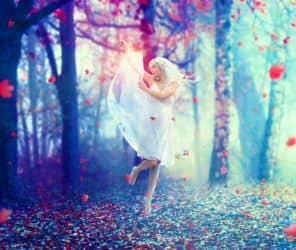
Step 40
Open the leaves images pack. Choose the leaves you like to add to the scene, around the model, try to achieve a random effect. Here is my result:

Step 41
Add some bigger leaves to the edges of the picture and apply Gassian Blur with 8 px to them:
Step 42
Make the leaves layers selected and press Cmd/Ctrl+G to create a group for them. Change the mode of this group from Pass Through (default group mode) to Normal 100%. Add a Hue/Saturation adjustment layer to the top of the layers within this group to match their color with the leaves of the background and on the ground:


Step 43
I used Curves to brighten the leaves:

On this Curves layer mask use a soft black brush to erase the leaves on the left to keep them darker than the ones on the right:

Step 44
Right click the leaves group, choose Duplicate Group. Right click it, choose Merge Group and we have a new layer with the leaves selection. Turn off this layer.

Step 45
Make a new layer on the top. Hold down the Cmd/Ctrl key while clicking the leaves selection thumbnail layer to load its selection:

Use a soft brush with the color #a2ced7 to create more light and dreamy effect for them. Change the mode to Hard Light 100%:

Step 46
It's time for coloring the scene. Create a Gradient Map adjustment layer on the top:

Change the mode of this layer to Soft Light 100% and use a soft black brush to erase the effect on the left side:

Step 47
I used Curves to add some light yellow to the scene:


Step 48
Increase the scene saturation with a Hue/Saturation adjustment layer:

On this layer mask use a soft black brush to erase the model legs, arms, head and the ground:

Step 49
Enhance the color and light of the scene with Vibrance:

Here is the result on its layer mask and on the picture:
24 comments on “Create a Photo Manipulation of an Emotional Dancer in a Forest”
ok
The color choices are spectacular!! Great JOB!
NICE AND GREATE TUTORIAL
NICE GREAT EXPLAINE THE TUTORIAL
I'm only new to composites and just came across this by a fluke. Just what I was looking for to learn and practice.
Thanks so much...
hi!could you tell me how to extract a model from its original photo?
I like this because it shows skills and it shows emotion
very good!
It's my creation http://j-p-g.net/if/2015/08/13/0540766001439480057.jpg
Thanks for this divine lesson.It's a miracle
The most amazing lesson!!!!! better seen.Thank you for this fab ripping tutorial
Amazing Tip i like your steps
Thank!!!
Thanks. Your tutorial is great as well as the other is. Keep going. But you didn't say how you removed the model from it's original background!!!!
Amazing. . Very nice,
A very smart approach to explain the things, Ilike your step by step tutorial.
Thank you for this great achievement and tutorial that I had fun to be completed in 2 different versions:
http://cartes-mireilled.eklablog.com/photomontage-scene-de-foret-en-automne-a109215440
Emotional model and emotional background scenery very pretty with tutorial.
Wow , very inspiring Shows that I still have a long way to go Thanks though for sharing your brilliant work
very good
I will use this one for my girl photo.
Beautiful work. Thanks so much for sharing.
I am highly inspired by your tutorials.As a learner,I found it very helpful.Thank you very much.
Looks like something I should try now. Thank you for the step by step Tutorial. I’ve book marked your post. :) Keep Going!!!
thanks for your tutorial, I really learned a lot