

Turn any photo into a dot grid artwork with these Photoshop actions. You'll get great results with dots that change size. They get larger in brighter areas and smaller in darker areas. Free download available.
![img(201)[3]](https://cdn.photoshoptutorials.ws/6a20526f3a0d_12CCA/img2013.jpg?strip=all&lossy=1&quality=70&webp=70&avif=70&w=1920&ssl=1 "img(201)[3]")
Increase contrast using Curves.
![img(202)[3]](https://cdn.photoshoptutorials.ws/6a20526f3a0d_12CCA/img2023.jpg?strip=all&lossy=1&quality=70&webp=70&avif=70&w=1920&ssl=1 "img(202)[3]")
Ctrl+Click on the channel. Click on the RGB composite channel. Press Ctrl+J to separate the selection.
![img(203)[3]](https://cdn.photoshoptutorials.ws/6a20526f3a0d_12CCA/img2033.jpg?strip=all&lossy=1&quality=70&webp=70&avif=70&w=1920&ssl=1 "img(203)[3]")
Drop the sky into the composition.
![img(204)[3]](https://cdn.photoshoptutorials.ws/6a20526f3a0d_12CCA/img2043.jpg?strip=all&lossy=1&quality=70&webp=70&avif=70&w=1920&ssl=1 "img(204)[3]")
![img(205)[3]](https://cdn.photoshoptutorials.ws/6a20526f3a0d_12CCA/img2053.jpg?strip=all&lossy=1&quality=70&webp=70&avif=70&w=1920&ssl=1 "img(205)[3]")
Resize it vertically. Duplicate the layer and place above everything. Reduce the opacity if it is too dark or duplicate the layer if it is too light.
![img(206)[3]](https://cdn.photoshoptutorials.ws/6a20526f3a0d_12CCA/img2063.jpg?strip=all&lossy=1&quality=70&webp=70&avif=70&w=1920&ssl=1 "img(206)[3]")
Now introduce some shadows to the composition. Use a soft brush.
![img(207)[3]](https://cdn.photoshoptutorials.ws/6a20526f3a0d_12CCA/img2073.jpg?strip=all&lossy=1&quality=70&webp=70&avif=70&w=1920&ssl=1 "img(207)[3]")
Duplicate the building. Click on the base layer and press Ctrl+Shift+C to copy. Since it is far away in the distance it becomes less contrast. Lot of atmosphere involves. Use color correction tools to make it mix well in to the atmosphere.
![img(208)[3]](https://cdn.photoshoptutorials.ws/6a20526f3a0d_12CCA/img2083.jpg?strip=all&lossy=1&quality=70&webp=70&avif=70&w=1920&ssl=1 "img(208)[3]")
Here I Added one more floating rock. I copied the middle rock and edited it. I painted mountain range in the distance on the horizon line.
![img(209)[3]](https://cdn.photoshoptutorials.ws/6a20526f3a0d_12CCA/img2093.jpg?strip=all&lossy=1&quality=70&webp=70&avif=70&w=1920&ssl=1 "img(209)[3]")
Add a flock of bird using bird brushes.
![img(210)[3]](https://cdn.photoshoptutorials.ws/6a20526f3a0d_12CCA/img2103.jpg?strip=all&lossy=1&quality=70&webp=70&avif=70&w=1920&ssl=1 "img(210)[3]")
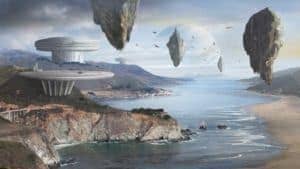
Add a Levels Adjustment Layer at the very top in the layer stack. Adjust the mid tones. It affects the document as a whole. I am satisfied with the result. And it is time to wrap up things. Take a look at the final result.
![img(211)[3]](https://cdn.photoshoptutorials.ws/6a20526f3a0d_12CCA/img2113.jpg?strip=all&lossy=1&quality=70&webp=70&avif=70&w=1920&ssl=1 "img(211)[3]")
Final Results
And that's pretty much it. You can achieve great results by combining photos and paintig and taking it further by putting the tips and concepts into practice. Take a look at the final image.
![final-results[7]](https://cdn.photoshoptutorials.ws/6a20526f3a0d_12CCA/final-results7.jpg?strip=all&lossy=1&quality=70&webp=70&avif=70&w=1920&ssl=1 "final-results[7]")
Authors Comment
![profile[3]](https://cdn.photoshoptutorials.ws/6a20526f3a0d_12CCA/profile3.jpg?strip=all&lossy=1&quality=70&webp=70&avif=70&resize=125%2C125&ssl=1 "profile[3]") I am a Graphic Designer and a wannabe VFX artist. Thanks for following this tutorial. Hope you learned something and had fun reading this tutorial.
I am a Graphic Designer and a wannabe VFX artist. Thanks for following this tutorial. Hope you learned something and had fun reading this tutorial.
- niranth
3 comments on “How to Create an Amazing Futuristic Matte Painting in Photoshop”
bhai or koie matte painting ka file send kar
its gud
its gggg,ooo,dddd.THANK U.