
Make your artwork look like they're from an alternate universe. These Cyberpunk presets work with Photoshop (via the Camera Raw filter) and Lightroom. Download all 788 presets for 90% off.
![image011[4]](https://cdn.photoshoptutorials.ws/images/stories/b4481e59d74b_10CA/image0114.png?strip=all&lossy=1&quality=70&webp=70&avif=70&w=1920&ssl=1 "image011[4]")
After that, click on the "Sea" layer and go to Image > Adjustments > Brightness/Contrast and input the following:
- Brightness: -25
- Contrast: 0
![image012[4]](https://cdn.photoshoptutorials.ws/images/stories/b4481e59d74b_10CA/image0124.png?strip=all&lossy=1&quality=70&webp=70&avif=70&w=1920&ssl=1 "image012[4]")
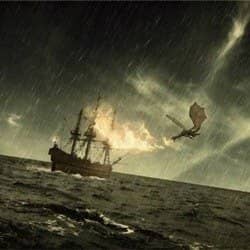
The result will be similar to this image:
![image013[4]](https://cdn.photoshoptutorials.ws/images/stories/b4481e59d74b_10CA/image0134.png?strip=all&lossy=1&quality=70&webp=70&avif=70&w=1920&ssl=1 "image013[4]")
Now that that's done, let's now open "Sky III" by nestrstock.
Activate the Rectangular Marquee Tool (M) and select the sky. See image below:
![image014[4]](https://cdn.photoshoptutorials.ws/images/stories/b4481e59d74b_10CA/image0144.png?strip=all&lossy=1&quality=70&webp=70&avif=70&w=1920&ssl=1 "image014[4]")
When you're done, activate the Move tool (V) and drag the selected part of "Sky III" to our canvas. On the layer window, position this layer under the "sea" layer so that the "sea" layer would appear in front. Once done, rename the layer to "sky". See the image below:
![image015[4]](https://cdn.photoshoptutorials.ws/images/stories/b4481e59d74b_10CA/image0154.png?strip=all&lossy=1&quality=70&webp=70&avif=70&w=1920&ssl=1 "image015[4]")
Position the "sky" as shown on the image below:
![image016[4]](https://cdn.photoshoptutorials.ws/images/stories/b4481e59d74b_10CA/image0164.png?strip=all&lossy=1&quality=70&webp=70&avif=70&w=1920&ssl=1 "image016[4]")
The result is as follows:
![image017[4]](https://cdn.photoshoptutorials.ws/images/stories/b4481e59d74b_10CA/image0174.png?strip=all&lossy=1&quality=70&webp=70&avif=70&w=1920&ssl=1 "image017[4]")
After this, we will need to flip our "Sky" image horizontally for composition purposes. To flip an image horizontally, simply activate the Transform tool (Ctrl + T) and right click on the canvas to bring up the contextual menu; pick Flip Horizontal.
![image018[4]](https://cdn.photoshoptutorials.ws/images/stories/b4481e59d74b_10CA/image0184.png?strip=all&lossy=1&quality=70&webp=70&avif=70&w=1920&ssl=1 "image018[4]")
The result:
![image019[4]](https://cdn.photoshoptutorials.ws/images/stories/b4481e59d74b_10CA/image0194.png?strip=all&lossy=1&quality=70&webp=70&avif=70&w=1920&ssl=1 "image019[4]")
For composition purposes, we will transform our sky layer so that the beautiful parts of the sky would be seen. To do that, select the "sky" layer once again and activate the Transform tool (Ctrl + T) and follow the instructions shown on the image below:
![image020[4]](https://cdn.photoshoptutorials.ws/images/stories/b4481e59d74b_10CA/image0204.png?strip=all&lossy=1&quality=70&webp=70&avif=70&w=1920&ssl=1 "image020[4]")
![image021[4]](https://cdn.photoshoptutorials.ws/images/stories/b4481e59d74b_10CA/image0214.png?strip=all&lossy=1&quality=70&webp=70&avif=70&w=1920&ssl=1 "image021[4]")
After that, we're going to transform it once more, and again, for composition's sake. This time, we're going to resize the sky for the viewer to see bluest part of the sky and to make our image appear more minimal.
To start, click on the "sky" layer and then activate the Transform tool (Ctrl + T). See more steps on the images below:
![image022[4]](https://cdn.photoshoptutorials.ws/images/stories/b4481e59d74b_10CA/image0224.png?strip=all&lossy=1&quality=70&webp=70&avif=70&w=1920&ssl=1 "image022[4]")
![image023[4]](https://cdn.photoshoptutorials.ws/images/stories/b4481e59d74b_10CA/image0234.png?strip=all&lossy=1&quality=70&webp=70&avif=70&w=1920&ssl=1 "image023[4]")
The result:
![image024[4]](https://cdn.photoshoptutorials.ws/images/stories/b4481e59d74b_10CA/image0244.png?strip=all&lossy=1&quality=70&webp=70&avif=70&w=1920&ssl=1 "image024[4]")
Once you're done with that, activate the Transform tool once again and rotate the image as seen below:
![image025[4]](https://cdn.photoshoptutorials.ws/images/stories/b4481e59d74b_10CA/image0254.png?strip=all&lossy=1&quality=70&webp=70&avif=70&w=1920&ssl=1 "image025[4]")
The result should be similar to this:
![image026[4]](https://cdn.photoshoptutorials.ws/images/stories/b4481e59d74b_10CA/image0264.png?strip=all&lossy=1&quality=70&webp=70&avif=70&w=1920&ssl=1 "image026[4]")
Now, we're going to create the light on the horizon. To start, let's create a new layer by pressing Ctrl/Cmd + Shift + N on your keyboard. When the New Layer box opens, type: "Light 1" as its name. Next, position this layer between the "Sea" and "sky" layer. Once you've done that, activate the Brush tool (B) and input the following settings:
- Brush size: 500px
- Hardness: 0%
- Opacity: 15%
- Flow: 100%
- #: fff9c7
To input those settings, first press B on your keyboard to activate the Brush tool (B) and input all the settings mentioned above on their respective places on the Options window (Shown below). See image below:
9 comments on “How to Create an Out of This World, Medieval-Fantasy Themed Photo Manipulation”
omg thnaks ur a genius!
The url for the dragon stuff no longer exists...
Hey,
None of the resource links work for me...
Please upload the rest files somewhere else that we can also use it.
very appealing and outstanding
Maybe this http://browse.deviantart.com/art/E-S-Dragon-III-Sky-145874452
or this
http://th04.deviantart.net/fs11/PRE/i/2006/170/d/3/Dragon_Stock_T1P1_by_Shoofly_Stock.jpg
Outstanding piece of work :) Thank you for this tutorial :)
hi
the dragon stock is missing.. can sombody give me the other working ling for this stock?
here is my picture, thankyou for this great tutorial. greetings from indonesia
thankyou, very useful tutorial. kewl.