Luminar AI lets you turn your ideas into reality with powerful, intelligent AI. Download the photo editor and see how you can completely transform your photos in a few clicks.
The giant panda's distinct black-and-white markings have two functions: camouflage and communication. Most of the panda - its face, neck, belly, rump - is white to help it hide in snowy habitats. The arms and legs are black, helping it to hide in shade. In this Photoshop tutorial, we learn how to create a photo manipulation scene of a panda while making it look real. We use a lot of Adjustment Layer like Gradient Map and Curves, combine several stock images, and finally use Camera Raw Filter.
Preview of Final Image

Tutorial Resources
Step 1
Now, let’s start by creating a new image file, go to the Menu bar and click File > New, and then input the following values on their respective fields
- Preset: Custom
- Width: 3580px
- Height: 4475px
- Resolution: 300px
- Color Mode: RGB Color 8 bit
- Background Contents: Transparent

Step 2
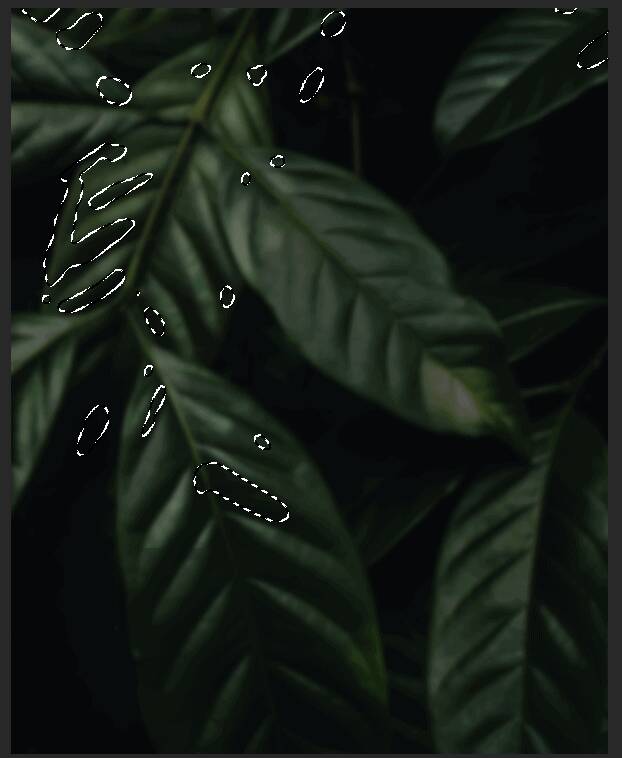
Next, go to open Background photo. Go to File > Open and select Background. After you open the image, use Rectangular Marquee Tool(M).

After the selection area has been created, simply copy (Ctrl / Cmd + C) and Paste (Ctrl / Cmd + V) it to our work canvas. Then position the image with the transform tool (Ctrl / Cmd + T). Hold Alt + Shift and rasterize like the image below. In Photoshop CC only hold Alt to rasterize all sides together. Right-click and select “Convert to Smart Object”.

Then go to Filter > Blur > Gaussian Blur and set Radius to 13.9px.

Step 3
Add Adjustment Layer "Levels"

Step 4
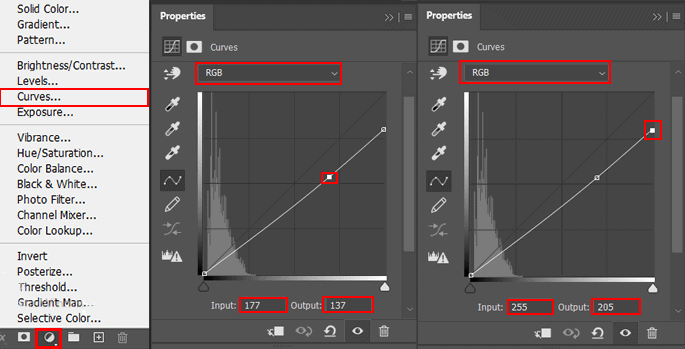
Add Adjustment Layer “Curves” and press Ctrl/Cmd + I to invert. Then use Brush Tool(B) Soft Round with foreground color white and paint on Highlight parts.


Step 5
Add Adjustment Layer “Curves” and press Ctrl/Cmd + I to invert. Then use Brush Tool(B) Soft Round with foreground color white and paint on Dark parts.
Step 6
Next we will open Panda. After you open the image, use Quick Selection Tool(W) and start selecting the animal. After the selection area has been created, simply copy (Ctrl / Cmd + C) and Paste (Ctrl / Cmd + V) it to our work canvas. Then position the image with the transform tool (Ctrl / Cmd + T). Hold Alt + Shift and resterize like image below. In Photoshop CC only hold Alt to resterize al sides together.


Step 7
Add Adjustment Layer "Levels"

Step 8
Add Adjustment Layer "Curves" and press Ctrl/Cmd + I to invert and use Brush Tool(B) Soft Round with foreground color white and paint the dark parts on Panda.


Step 9
Add Adjustment Layer "Curves" and press Ctrl/Cmd + I to invert and use Brush Tool(B) Soft Round with foreground color white and paint the highlights parts on Panda.


Step 10
Add Adjustment Layer "Color Balance"

Step 11
Next, start creating a new layer and use Brush Tool(B) Soft Round with foreground color Gray #808080 and start painting the eyes. Blend mode change to Color Dodge.


Step 12
Next we will open Bamboo. After you open the image, use Quick Selection Tool(W) and start selecting. After the selection area has been created, simply copy (Ctrl / Cmd + C) and Paste (Ctrl / Cmd + V) it to our work canvas. Then position the image with the transform tool (Ctrl / Cmd + T). Hold Alt + Shift and resterize like image below. In Photoshop CC only hold Alt to resterize al sides together. Then convert it to "Smart Object" and go to Filter > Blur > Gaussian Blur and set radius to 62px.


Step 13
Add Adjustment Layer "Hue/Saturation"

Step 14
In this step repeat the same process as in previous step...

Step 15
Add Adjustment Layer "Hue/Saturation"


Step 15
Create a new layer and change Blend mode to Soft Light then use a Brush Tool(B) Soft Round with foreground color white and Size to max(5000px). Then paint to left corner. Opacity set to 80%.


Step 16
Next, we will open Butterfly. After you open the image, use Lasso Tool(L) and start selecting butterfly. After the selection area has been created, simply copy (Ctrl / Cmd + C) and Paste (Ctrl / Cmd + V) it to our work canvas. Then position the image with the transform tool (Ctrl / Cmd + T). Hold Alt + Shift and resterize like image below. In Photoshop CC only hold Alt to resterize al sides together.


Step 17
Add Adjustment Layer "Hue/Saturation"

Step 18
Now in this step we will make a glow effect. First create a new layer and Blend mode change to Linear Dodge(Add) with Opacity 30%. Next Use Brush Tool(B) Soft Round with foreground color green #32bd1b and paint on Butterfly.

Create another layer and change blend mode to Soft Light with Opacity 80% and use Brush Tool(B) Soft Round with foreground color green #2eaf1a and paint on Butterfly. Look at Final results


Step 19
Next, create a new layer and change Blend mode to Soft Light with Opacity 80% then use a Brush Tool(B) Soft Round with foreground color white and Size to max(5000px). Then paint to left.


Step 20
Now, go to File > Open and select Leaves. Now that we have opened we need to remove the background, the easiest way to do that is Color Range. Go to Select > Color Range and with the pointer click on white color on image, Fuzzines set to 40 then press OK.


Now press Ctrl/Cmd + Shift + I to invert the selectioin and click on layes mask icon.


Step 21
After the selection area has been created, simply copy (Ctrl / Cmd + C) and Paste (Ctrl / Cmd + V) it to our work canvas. Then position the image with the transform tool (Ctrl / Cmd + T). Hold Alt + Shift and resterize and Rotate like image below. In Photoshop CC only hold Alt to resterize al sides together.

Then go to Filter > Blur > Gaussian Blur set radius to 70px.


Step 22
Add Adjustment Layer "Hue/Saturation"

Step 23
Let”s add some light, first use Polygonal Lasso Tool(L) and make selection form left corner. Then click on adjustment layer icon and select Curves. Go to Filter > Blur > Gaussian Blur and set Radius to 200px. Opacity set to 60%.


Step 24
Next, create another Polygonal Lasso selection then add adjustment layer curves and go to Filter > Blur > Gaussian Blur and set Radiuss 200px. Opacity set to 32%.


Step 25
Create the last Polygonal Lasso selection and Add Adjustment Layer “Curves” then go to Filter > Blur > Gaussian Blur and set Radius to 200px. Opacity set to 24%.


Select all three Adjustment layers and put in all in group, press Ctrl/Cmd + G and change opacity of group to 90%.

Step 26
Next, add some fire particles, After you open the image, use Rectangular Marquee Tool(M). With the Rectangular Marquee tool, drag over the area you want to select. Hold down Shift as you drag to constrain the marquee to(release the mouse button before you release Shift to keep the selection shape constrained).

After the selection area has been created, simply copy (Ctrl / Cmd + C) and Paste (Ctrl / Cmd + V) it to our work canvas. Then position the image with the transform tool (Ctrl / Cmd + T). Hold Alt + Shift and resterize like image below. In Photoshop CC only hold Alt to resterize al sides together.

Blend mode change from Normal to Screen
Step 27
Add Adjustment Layer "Hue/Saturation"

Step 28
Open another fire particles, After you open the image, use Rectangular Marquee Tool(M). With the Rectangular Marquee tool, drag over the area you want to select. Hold down Shift as you drag to constrain the marquee to(release the mouse button before you release Shift to keep the selection shape constrained).

After the selection area has been created, simply copy (Ctrl / Cmd + C) and Paste (Ctrl / Cmd + V) it to our work canvas. Then position the image with the transform tool (Ctrl / Cmd + T). Hold Alt + Shift and resterize like image below. In Photoshop CC only hold Alt to resterize al sides together.

Blend mode set to Screen.
Step 29
Add Adjustment Layer "Hue/Saturation"

Step 30
Next, create a new layer then use a Brush Tool(B) with foreground color Green #439f4f and in Starry Night folder select Starrysky select and paint particles at the bottom of the image.


Step 31
Add Adjustment Layer "Gradient Map" and set Blend mode to Soft Light with Opacity to 23%.

Step 32
Add Adjustment Layer "Gradient Map" and set blend mode to Soft Light with Opacity to 30%.

Step 33
Add Adjustment Layer "Selective Color"

Step 34
Add Adjustment Layer "Gradient Map" Blend mode change to Hue with Opacity 20%.

Step 35
Add last Adjustment Layer "Gradient Map" and reduce opacity to 20%.

Step 36
When we finished all this, now merge all layers to one. Slecet the last layer and hold CTRL/CMD + SHIFT + ALT + E. Now we have a final layer, right click on mouse and select Convert to Smart Object. Then go to Filter > Camera RAW Filter. At its most basic, the Photoshop Camera Raw filter allows you to use the functions of the ACR interface at any time within Photoshop. This allows you to make any adjustments within ACR at any time during your workflow instead of just limiting its usage to the raw processing stage.While it would be possible to import your working file into Lightroom to make the same sets of adjustments, doing this in Photoshop saves you from that cumbersome step. It allows you the use of these tools without any extra effort.

Step 37
Now in Camera Raw Filter, set the Value: Basic
- Exposure: -0.25
- Highlights: -37
- Shadows: -13
- Whites: -33
- Blacks: -18
- Dehaze: +4

Tone Curve
- Highlights: -16
- Lights: +5

When we finish in Camera Raw select the layer and press Ctrl/Cmd + I to invert and use Brush Tool(B) Soft Round with foreground color white and paint the highlights parts on Panda.


Step 38
Again merge all layers to one. Select the last layer and hold CTRL/CMD + SHIFT + ALT + E. Open Camera Raw filter and set the value Basic
- Temperature: -1
- Tint: -8
- Exposure: -0.35
- Contrast: +2
- Shadows: +3
- Blacks: -5
- Texture: +13
- Clarity: +11
- Dehaze: -3

Sharpening
- Amount: 93
- Radius: 2.2
- Detail: 68
- Masking: 53
- Luminance: 12
- Luminance Detail: 50

HSL Adjustments
- Greens: +4
- Aquas: -8
- Blues: -15

- Oranges: -2
- Yellows: -63
- Greens: -8
- Aquas: -10
- Blues: -16

- Reds: +15
- Oranges: -3
- Yellows: +24
- Greens: +3
- Aquas: -35
- Blues: -38
- Purples: -1

Split Toning
- Hue: 95
- Saturation: 7
- Shadows
- Hue: 81
- Saturation:3

Post Crop Vignetting
- Amount: -16
- Midpoint: 50
- Feather: 50

Calibration
Green Primary
- Hue: -8
- Saturation: -3

Radial Filter
- Exposure: +0.10
- Highlights: +32
- Shadows: +10
- Whites: +20
- Dehaze: -3

And finally, everything should look like this.

Final Results