
“We may never find a way to live in suburbia with deer as we do with raccoons, say, or squirrels. So for this reason, it’s very important that we make sure always to save enough wild or open land so that they can live in their normal manner.” In this Photoshop tutorial, we will learn how to create a surreal image with Deer and Man. First, we created a background photo, then changed some colors. Next, added the man and deer and combine them in one photo. Next, added rays brushes and adjustment layers. For the final touch added Camera Raw Filter.
Preview of Final Image

Tutorial Resources
Step 1
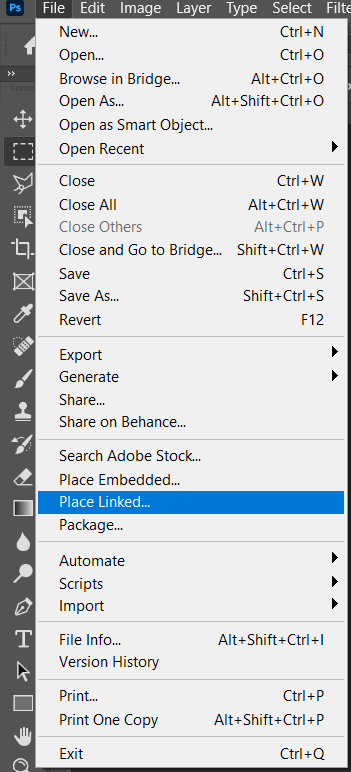
Now, let’s start by creating a new image file, go to the Menu bar and click File > New, and then input the following values on their respective fields
- Preset: Custom
- Width: 2242px
- Height: 2989px
- Resolution: 300px
- Color Mode: RGB Color 8 bit
- Background Contents: Transparent

Step 2
Now, place Background Go to File > Place and select Background Then place it to our work canvas and position the image with the transform tool (Ctrl / Cmd + T). Hold Alt + Shift and rasterize like the image below. In Photoshop CC only hold Alt to rasterize all sides together.

Now go to Filter > Blur > Gaussian Blur and set the radius to 5px.


Step 3
Add Adjustment Layer “Selective Color”

Step 4
Add Adjustment Layer “Hue/Saturation”

Step 5
Add Adjustment Layer “Curves” and press Ctrl/Cmd + I to invert. Then use Brush Tool(B) Soft Round with foreground color white and paint dark parts.


Step 6
Add Adjustment Layer “Curves” and press Ctrl/Cmd + I to invert. Then use Brush Tool(B) Soft Round with foreground color white and paint highlight parts.


Step 7
Next, we will open the Man image. After you open the image, use Quick Selection Tool(W) and start selecting the suit. After the selection area has been created, simply copy (Ctrl / Cmd + C) and Paste (Ctrl / Cmd + V) it to our work canvas. Then position the image with the transform tool (Ctrl / Cmd + T). Hold Alt + Shift and resterize like image below. In Photoshop CC only hold Alt to resterize al sides together.


Step 8
Add Adjustment Layer “Curves”

Step 9
Add Adjustment Layer “Curves” and press Ctrl/Cmd + I to invert. Then use Brush Tool(B) Soft Round with foreground color white and paint highlight parts.
Leave a Reply