Make your artwork look like they're from an alternate universe. These Cyberpunk presets work with Photoshop (via the Camera Raw filter) and Lightroom. Download all 788 presets for 90% off.
Simply go to Filter>Liquify and use the Forward Warp tool to start moving pixels around. Of course, what you do depends on your image. Here, a quick tuck to the underarm bulge and the angle of the waistline, is all that's needed.

6. Beautiful eyes
Most photographers will agree that  the eyes are the principal part of any portrait, so it pays to make a few subtle improvements to give them extra sparkle.
Here, we'll concentrate on the essentials of eye enhancement, but if you want to take it further you can do a lot more - change the colour, add a catchlight, apply makeup, even make them larger. It can be useful to think of an eye as a set of four elements: pupil, iris, whites and lashes. Each element requires a different set of tools. I want to boost the tones inside the iris, darken the pupil and iris rim, lighten the whites and sharpen the lashes. Subtlety is key here, so don't be afraid to lower the layer Opacity of any effect to tone it down.

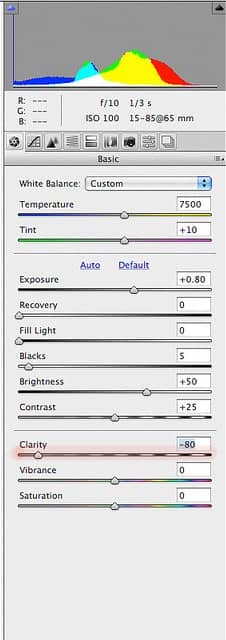
7. Clarity Skin Smoothing
You may think of Camera Raw (plugin for Photoshop) as merely a Raw converter for your camera files, or a place to make a few tonal tweaks before opening your image into Photoshop. But delve a little deeper and you'll find a host of incredibly useful tools and settings.
One such setting is the Clarity slider. When dragged to a positive value, the Clarity slider increases midtone contrast, which can be great for teasing out detail in your images. But drag it to a negative value, and you'll get a wonderful softening effect that works brilliantly over skin. There's a Clarity slider in the Basic Panel, but crucially, you can also use it in conjunction with the Adjustment Brush (which is another ACR gem) to confine the softening effect just to the skin.

8. Crop in and tilt
It's best to get composition right in-camera, but when it comes to photographing people you're often working with moving targets, which can make framing slightly more tricky. You're also usually trying to coax an expression or reaction out of your subject, which means concentrating on what is or isn't included in the frame may slip down the list of priorities. Luckily, with modern sensors being the size they are, we can get away with a bit of post-capture cropping in Photoshop.


8 comments on “10 Tips and Tricks for Retouching in Photoshop”
Really outstanding. I'm glad to be here and I'm really happy to place this as a resource like it. Once again very helpful.
Great Job! Nice tips as well.thanks
Good read.
Very creative and useful tips....
Very creative tutorial........
Good tips to follow and get results.Thank you.Can learn some new tricks.
Nice tips as well.
Very nice tutorial. I usually try and do these minor things myself, but often times end up messing with the photo more than a couple of times.