for (RLevel = 0; RLevel <= 255; RLevel ++) { if (docRef_1.channels["Red"].histogram[RLevel]) { break; } }
This block of code is a ‘for’ loop, what line 1 does is says to start RLevel at 0 and keep looping around while RLevel is still smaller or equal to 255 and also to increment RLevel by 1 each time it loops around. The part which says RLevel ++ means increment RLevel by 1.
The part inside this loop is an ‘if’ statement and it will execute the command inside the curly brackets only if the statement within the normal brackets is true. Lets look at the statement within the normal brackets, its telling Photoshop to get the red channel in document one then getting the histogram array. The histogram that we looked at didn’t look like a row of boxes but in fact it is, for each each output value horizontally from zero to 255 is a corresponding vertical value. In the histogram we looked at there was only one output value which didn’t correspond to a non-zero value so RLevel can be thought of as the output value. since we haven’t included anything else in the brackets like an equals sign or a greater than sign then it will automatically only return true if the value returned from the histogram is non-zero and since there is only one non-zero value then this will be the R value. The command to execute if this is true is the break command, this will stop the loop so we won’t go round again after we find the correct value. the two closing curly brackets are just to close the ‘for’ loop and the ‘if’ statement.

{articlead}
Step 8:
Below I have included the full code up to this point, including the G and B value checks:
preferences.rulerUnits = Units.PIXELS; displayDialogs = DialogModes.NO

open(File(openDialog())); var docRef_1 = activeDocument; docRef_1.backgroundLayer.duplicate(); var white = new SolidColor(); white.rgb["hexValue"] = "ffffff" var black = new SolidColor(); black.rgb["hexValue"] = "000000" foregroundColor = black; backgroundColor = white; docRef_1.selection.selectAll(); docRef_1.selection.fill(white); docRef_1.selection.deselect(); docRef_1.layers[0].duplicate(); docRef_1.activeLayer = docRef_1.layers[0]; docRef_1.activeLayer.applyAverage(); for (RLevel = 0; RLevel <= 255; RLevel ++) { if (docRef_1.channels["Red"].histogram[RLevel]) { break; } } for (GLevel = 0; GLevel <= 255; GLevel ++) { if (docRef_1.channels["Green"].histogram[GLevel]) { break; } } for (BLevel = 0; BLevel <= 255; BLevel ++) { if (docRef_1.channels["Blue"].histogram[BLevel]) { break; } }
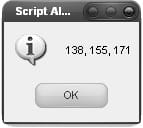
Now we are going to check to se if these last bits of code actually work, to do this we will use an alert box and make it display the RGB values. Insert this code below the rest of your code:
alert(RLevel + ", " + GLevel + ", " + BLevel)
The alert box should contain the RGB values check these by double clicking on the foreground color then using the eyedropper. If the colors match then delete this alert box code and move on, if they don’t match or it’s not working just copy and paste the full code above and try again.

Step 9:
From now on I won’t go into much detail as most of the things coming up have been covered already. Now depending on the average color we want to edit it in different ways. The way we will edit it is fill this layer with a solid color change its blending mode to color. The color of this layer will depend on the average color; if the average color is mostly blue we will use the color yellow, mostly green we will use magenta and mostly red we will use cyan. I’m going to show a long way of doing this just to demonstrate some extra commands. In this step we will get the RGB values for this color. The code for this is:
One response to “Manipulate an Image with Scripting”
-
confused


Leave a Reply