Luminar AI lets you turn your ideas into reality with powerful, intelligent AI. Download the photo editor and see how you can completely transform your photos in a few clicks.
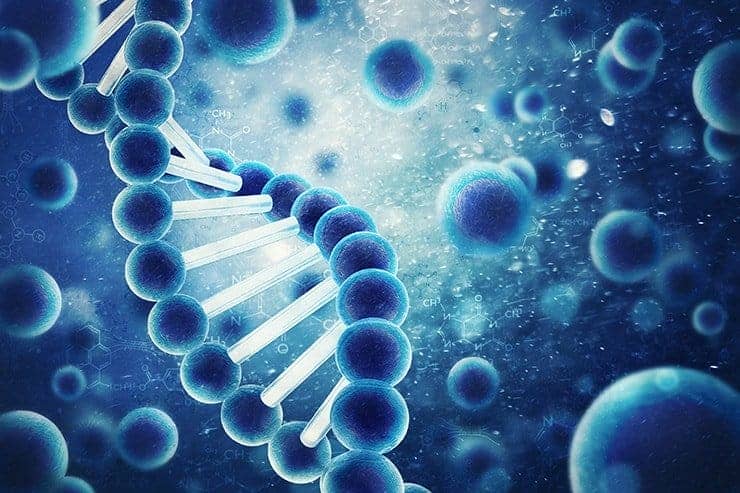
Today I will show you how to create an amazing piece of life under a microscope :) and using only three resource! In this tutorial I'll show how to transform 3D in a realistic DNA and create a whole picture of it. We pay attention to blending modes and work with a variety of tools and effects. I want to show you one of the creative solutions both in the establishment and in the decision. We will start to create this photo manipulation by transforming DNA. In this section you will learn about working with blending modes and adjustment layers. Then begin to create photo manipulation. In this part, we will work with a variety of tools and create a Bokeh brush. The final picture is to add adjustment layers and effects. You need any version of Photoshop and any knowledge.
Tutorial Resources
Step 1
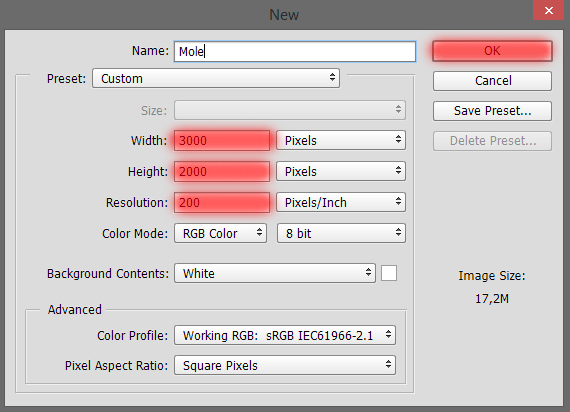
Create a new document. Go to File > New or the short key Cmd /Ctrl+ N. A blank document with size of 2000 pixels wide and 3000 pixels high, resolution 200 Pixels/Inch.
Step 2
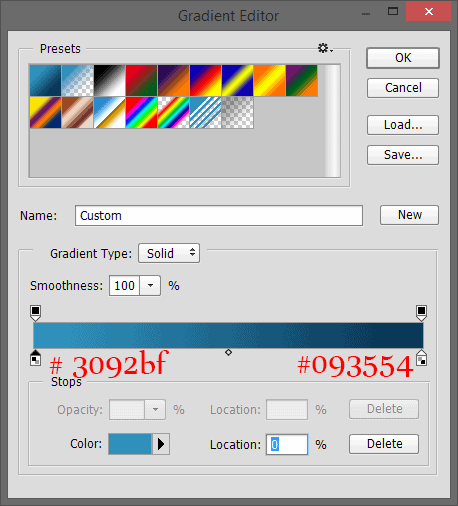
We did not immediately proceed to manipulation. First we will create a new kind of DNA and first need to prepare the background. Take a Gradient Tool (G) and set following settings: Form: "Foreground to Background", Method: Radial, Opacity: 40%, Foreground color: # 3092bf and Background color # 093554.

Step 3
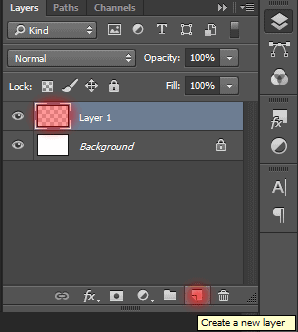
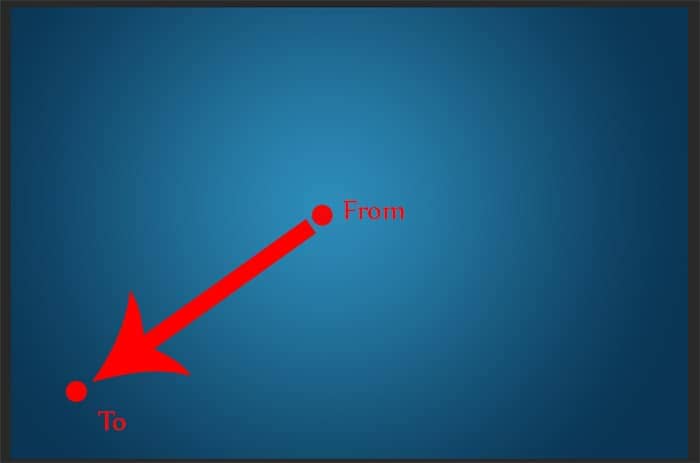
Create a New layer (Layer > New > Layer or Cmd/Ctrl+ Shift + N or use icon on Layer panel). Draw the gradient as shown in the image below.
Step 4
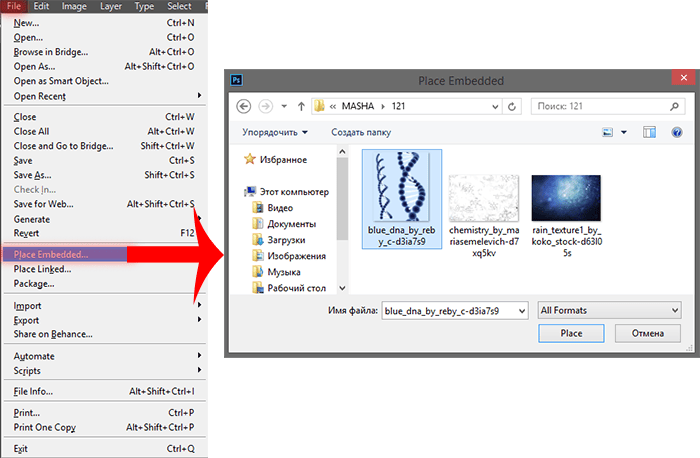
We now proceed to the DNA itself. Go to File > Place (Place Embedded) and select the image "blue_dna_by_reby_c-d3ia7s9".
Step 5
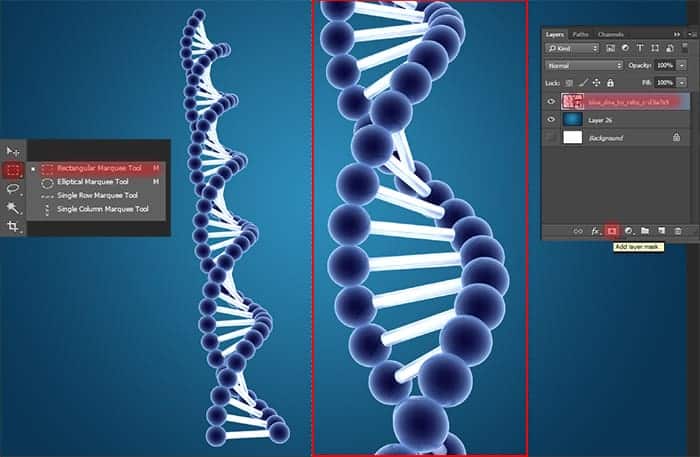
Use a Rectangular Marquee Tool (M) to select a big DNA. Then add a Layer mask to remove small DNA.
Step 6
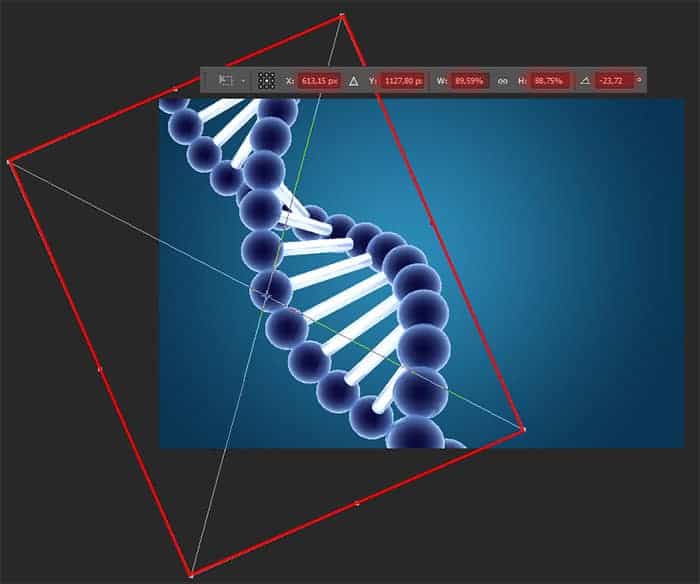
Use the Free Transform tool (Ctrl/Cmd+T or Edit > Free Transform) to resize the layer like shown in the image below.
Step 7
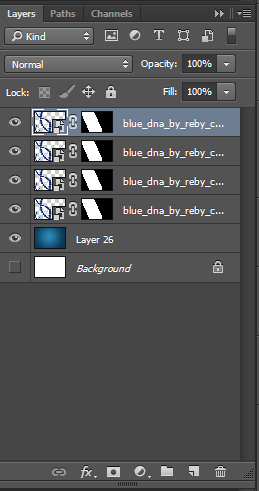
We shall now proceed to the most interesting. We will take the usual 3D and turn it into a real and live macromolecule! To do this, we need to Duplicate a DNA layer (Cmd/Ctrl+ J or Layer > Duplicate Layer) 4 times.
Step 8
Now we will apply a variety of effects from the upper layer to the DNA to the last. Let's start from the upper layer and work our way to the last (it is desirable not to change the sequence). For the first layer, add several artistic filters to make the outer shell of the DNA. Go to Filter > Filter Gallery...
Step 9
So, add the first filter "Dry Brush" in folder "Artistic". Set the settings like shown in the image below and add a new effect layer. This effect layer make texture on DNA.

Step 10
Add a second filter "Accented Edges" in folder "Brush Strokes". Set the settings and add a new effect layer. This layer mare more detailed and deep texture.

Step 11
And the last filter is "Bass relief" in folder "Sketch" Set the settings and press Ok to apply filters. This filter will make the molecule in the form of bas-relief, but do not worry, we will not leave it like this.

Step 12
Change Blending mode to "Linear Burn", set Opacity: 46%. Linear Burn mode, the brightness of the original image is reduced by the amount of darkness (brightness deviation from white) image correction. In terms of the curves - a shift in the curve on the value of the correction image of darkness.


Step 13
Therefore, the image looks a bit dark, but add to it adjustment layer "Curves" (Layer > New Adjustment Layer > Curves... or click on Adjustment Layer icon on Layer panel). Set values to each point as shown in the image below. This layer, we lighten the image, while maintaining its texture.
Set this layer as Clipping mask (click on Curves layer RMB and select "Create Clipping Mask" or use Option/Alt+ Cmd/Ctrl + G or click on the icon of a square with an arrow, as shown in the previous image).

Step 14
Now, proceed to next layer with DNA. For it, set a Blending mode "Darker Color". Similar to Blending mode "Darken" (Compares two source values and replaces light pixels values of the dark), except that it works on all layers at once, instead of one. When you mix the two layers will remain visible only dark pixels. In our case, this layer will be the basis for the centers in every sphere of DNA.


Step 15
Now, for the remaining two layers DNA, set a Blending mode "Luminosity" and Opacity: 50%. This Blending mode opposed to "Color". Combines Luminance (light) of the upper layer and Hue (color) and Saturation (color variations) of the lower layer. It turns out that glow, which we did in the previous two layers amplify and create one almost transparent distance between the center of the molecule and the glow edge. Because blue background and the previous layer (which just increased the dark areas in the center), the center of our molecules have become smoother and more expressed.


Step 16
Now we are a bit remove the previous effect. Because a strong contrast of center and edge does not look of realistic. Besides it is necessary to reduce the center. To do this I use adjustment layer "Hue/Saturation" (Layer > New Adjustment Layer > Hue/Saturation...). This layer should be above two "Luminosity" layers of DNA and set Opacity: 25%. Set the settings like shown in the image below.


Select Brush Tool (B) with settings Size: 80px, Hardness: 100%, Opacity: 100%. On a mask of adjustment layer "Hue/Saturation" remove effect from rod of DNA.


Look at my result. In my opinion looks good. I will integrate all segments of DNA into one group (Cmd/Ctrl + G or Layer > Group Layers).

Step 17
Begin to create texture on DNA and work on them of realistic. The first thing we will revise a little brightness, contrast of the entire molecule and dark portions of DNA. Add the first adjustment layer "Brightness/Contrast" (Layer > New Adjustment Layer > Brightness/Contrast.... Increase brightness and reduce the contrast as shown in the image below. Be sure to apply this layer as Clipping mask (Option/Alt+ Cmd/Ctrl + G).

Next adjustment layer is "Selective Color" . We need only black colors to lighten up a little center of the spheres.

Step 18
Now you can apply a texture. We do it by means of Photoshop. Create a new layer (Cmd/Ctrl+ Shift+ N), press D then X to set Background color on black and use Cmd/Ctrl + Del to fill it black color.

Add to this layer a filter "Clouds" (Filter > Render > Clouds). This will be the basis of our texture. Convert this layer for Smart Filters (Filter > Convert for Smart Filters).

Step 19
Now add filters, go to Filter > Filter Gallery. So, add the first filter "Dry Brush" in folder "Artistic". This filter will help to soften the texture, which will make the best overlay of the next filter. Set the settings like shown in the image below and don't forget add a new effect layer.

But this filter does all the texture. Select filter "Accented Edges" in folder "Brush Strokes". Set the settings and press Ok.

Change a Blending mode to "Soft Light" and set Opacity: 70%. Make this layer as Clipping Mask (Option/Alt+ Cmd/Ctrl + G).

Step 20
There is not much to brighten dark areas of the molecule, to balance it out a little color. Create a New layer (Layer > New > Layer or Cmd/Ctrl+ Shift + N) with such settings: Mode: Overlay, set check box on "Fill with Overlay-neutral color (50% gray)". To Brightening applied only to select DNA (hold Cmd/Ctrl, ckick on any DNA layer). Take a Dodge Tool (O) with there settings: Size: 175px, Exposure: 30%, Range: Midtones.


Draw light on DNA as shown in image. Try do not make strong light on edge of DNA because it will look realistic. Just a little bit, to give the effect of light. To deselect use Cmd/Ctrl+ D or go to Select > Deselect.

Step 21
DNA are ready and you can start create a picture. First, we need will integrate all the layers into a single molecule, because if we change the background and add other effects of its form to be constantly changing, and we need it in this form. Select all DNA layers and Background, go to Layer > Merge Layers or use Cmd/Ctrl+ E or click RMB on any layer and in list, select Merge Layers.


Use Magic Wand Tool (W) to select background. Hold Shift to add other parts to selection. Inverse selection (Shift+ Cmd/Ctrl + I), then add a layer mask to remove background.

Step 22
Now add a new background. Go to File > Place, select image "rain_texture1_by_koko_stock-d63l05s". Texture layer must be under a layer of DNA. Use Free Transform Tool (Cmd/Ctrl + T) to resize layer as shown in image.

Step 23
Now create a floating molecules. First we need to duplicate one fragment of DNA chains. Use Elliptical Marquee Tool (M) to select one molecule as shown in image. Red dot shows where you need to start to give off the molecule. Try to not add background into selection. Use Cmd/Ctrl+ J or Layer > Duplicate to duplicate fragment (Be sure to select the layer with the DNA).

Step 24
First we will create the molecule in background. It would be a bit tedious process, because you need to duplicate the molecules change their size and siting in the working document :). To quickly duplicate use Move Tool (V), hold Option/Alt and move molecule in the right place. Use Free Transform tool (Ctrl/Cmd+T or Edit > Free Transform) to change the size of the molecules, turn their bright side to the bright spot on the texture and are placed them in unusual places. So you will be able to achieve realistic and add dynamics to the picture. Hold Shift+ Option/Alt to proportional transformation.

Now merge all the layers of background molecules in a single layer (Layer > Merge Layers or Cmd/Ctrl+ E), but leave at least one layer of a molecule because it is useful to us later.

Convert this layer for Smart Filters (Filter > Convert for Smart Filters) and add filter "Gaussian Blur" (Filter > Blur > Gaussian Blur...). Set Radius: 25px. So we can create a volume for the image.

Step 25
Necessary to impose light and shadow. Although the molecule and blurred, but is and why they should match the lighting. Create a New Overlay-neutral layer (Layer > New > Layer or Cmd/Ctrl+ Shift + N). Use Dodge Tool (O) and Burn Tool (O) with there settings: Size: 175px, Exposure: 30%, Range: Midtones. Apply light and shadow relative bright spot on the texture (light source). In image green is light, red is a shadow and set this layer as clipping mask (Option/Alt+ Cmd/Ctrl + G).

Group all layers (Cmd/Ctrl + G), name it "Background", then move the layers with the DNA and one molecule outside a group.

Step 26
Now create a molecule of the first plan. Repeat steps 24-25 and position of the molecule as shown in image. Do not leave the layer with the molecule and for "Gaussian Blur" change Radius to 9.0px.


Step 27
Let's create a depth of field for molecules. Take a Brush Tool (B) with Size: 200px, Hardness: 0%, Opacity: 40%. Remove the on filter mask of a blur effect from the illuminated parts of the molecules, but not from all.

Need a little darken molecules that are located near the edges of the image. Create a new layer (Cmd/Ctrl+ Shift + N) above the Overlay-neutral layer, set it as clipping mask (Option/Alt+ Cmd/Ctrl + G). Use Brush Tool (B) from the previous point, draw darkness as shown in image. Set Opacity for this layer to 54%

Step 28
For now work with molecules is completed and you come back to the creation of a background. Place file "chemistry_by_mariasemelevich-d7xq5kv" (File > Place (Place Embedded)) in group "Background". Set Blending mode to "Overlay" and Opacity: 70%. To make this texture white, add adjustment layer "Invert" (Layer > New Adjustment Layer > Invert...).

Duplicate this texture twice (Cmd/Ctrl+ J) without adjustment layer and move it above adjustment layer "Invert". Reduce the size of both layers (Ctrl/Cmd+ T) and position them as shown in image below. I merged the two layers in one (Cmd/Ctrl + E) and set the Blending mode "Overlay".

Step 29
Now I'll create a texture on the molecules to create the effect of movement and space. Create a new layer (Cmd/Ctrl+ Shift + N), fill it black color (Cmd/Ctrl + Del). Go to Filter > Noise > Add Noise... and set following settings; Amount: 25%, Distribution: Gaussian and set checkbox on "Monochromatic".

Increase texture proportionally to 200% (Cmd/Ctrl+ T), so that the noise particles become more and convert it for Smart Filters.

Create the effect of motion of these particles. Go to filter > Blur > Motion blur... Set Angle: 31, Distance: 19px. Set Blending mode "Screen" and Opacity: 65 %.

Step 30
Now reduce the noise density of the particles and change their color. At first, change the color. Add adjustment layer "Hue/Saturation" (Layer > New Adjustment Layer > Hue/Saturation...). This layer we will paint the noise that he did not stand out of the picture and reduce the brightness. Be sure that set chekbox "Colorize".

Next adjustment layer is "Levels" (Layer > New Adjustment Layer > Levels...). This layer, we remove the black and gray of the texture and increase the amount of white noise to transform in flying pieces and had a clearer form.

Here's my result. You should get something like that.

Step 31
Now proceed to draw part of this tutorial. Now we will create a Bokeh brush. Go to tab "Brush" on right panel. Set following settings on each tab. As bases, use hard brush. First, we need to increase the distance between the brush to circles were not crowded. Then change the value of the allowable size of the brush has become diverse in size.

On the next tab, you do spread to the brush was not a single line, and be as small cloud. The final tab, we change the value of the permissible opacity to each circle had a different meaning transparency. So it will be a little volumetric. Save this brush by clicking on icon "Create new brush" in lower right corner.

Step 32
Now draw a Bokeh diagonal line in lower right corner on a new layer. Use color # 57d4f3. Do not bokeh strongly dense.

Now a little effects. Convert this layer for Smart Filters and add filter Gaussian Blur (Filter > Blur > Gaussian Blur...). Set Radius: 7.0px.

Add a style "Outer Glow" (Layer > Layer Style > Outer Glow... or use icon on Layer panel). In the window that appears, set the color # 69c6ff, Opacity: 61%, Spread: 0%, Size: 38px. Set o this layer Blending mode "Soft Light".


Step 33
Now on the two new layers I drew bokeh on center of the image. For the first layer Blending mode "Soft Light", use brush, created in Step 31 with there settings: Size: 6px, Opacity: 40%, Color: white. Draw on almost the entire image except the edges.

For the second layer Blending mode "Soft Light", Opacity: 52%. Settings for Brush: Size: 20px, Opacity: 55%, Color: white. Draw along the DNA and a little bit in the center of the picture.

Step 34
All done! Since we finished painting and now it is necessary to add only two adjustment layers to make the image colors more rich and interesting visual effects. First adjustment layer is "Color Lookup" (Layer > New Adjustment Layer > Color Lookup...). In Properties, set checkbox on 3DLUT file and select "FoggyNight.3DL". Set Opacity: 70%. The image will appear with a little gray tint, but it's in our favor.

Use Brush tool (B) (Size: Opacity: 100%, Hardness: 0%) to remove effect from center of image and the illuminated side of the molecules, on mask of this adjustment layer.

Step 35
The next adjustment layer will be the same "Color Lookup" but we change 3DLUT file on "filmstock_50.3dl". Set Opacity: 61% for this adjustment layer.

And it's the last thing we do. Picture is done! You can try to experiment with color and with all that you want. After all, you are an artist! Go for it!
Final Results

Tutorial by Maria Semelevich
Thank you very much for taking the time to study this tutorial! I hope you benefited it! I wish all lucked in your future achievements! I thank the authors of resources for their excellent work and good quality! Thank you very much! If you have questions or need help, please contact me. I look forward to your feedback and creative works! You can contact me by e-mail - [email protected] or Facebook Deviantart Behance. I am open to suggestions and cooperation! With best wishes! - Maria Semelevich.
8 comments on “Create This Abstract Medical Image of DNA with Photoshop”
no
It's a good thing that some images come with what's written... Too many mistakes from picture to writting...
Even the size of the doc is wrongly written..... That's just poorly written Tut....
some pic is not found, please repair it, thank you!
Nice one
What is RMB?
This is the right mouse button.
thx!
I'd like to learn more same techniques)
Arne Zou, na das ist ja was für uns.^^