Turn any photo into a dot grid artwork with these Photoshop actions. You'll get great results with dots that change size. They get larger in brighter areas and smaller in darker areas. Free download available.
Learn how to start from scratch and draw your own guitar icon in Photoshop. This tutorial will show you how to create your own wood texture and create a guitar using the basic tools in Photoshop.
I would like to thank Luca Vlad for collaborating with me in creating this tutorial!
Step 1 - Create a new document
Start by creating a new image (Ctrl+N or File > New). We created a new 800x800 image.
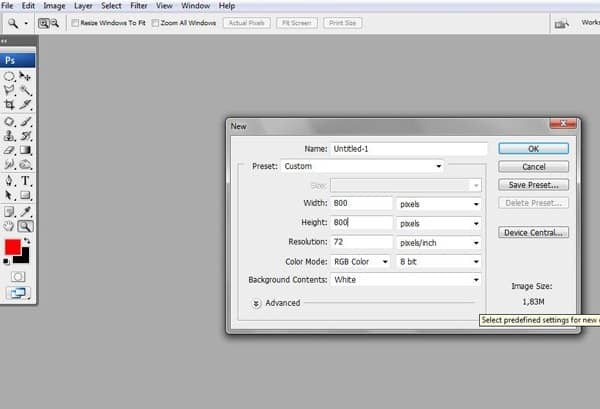
Step 2
To begin, we’ll create the shape of the guitar. Use the Pen tool (P) to create the shape like shown below. Create the same shape for the shadow but use a darker brown. At the top and bottom of the side, use the Burn tool (O) to add shadows like shown in the image below.
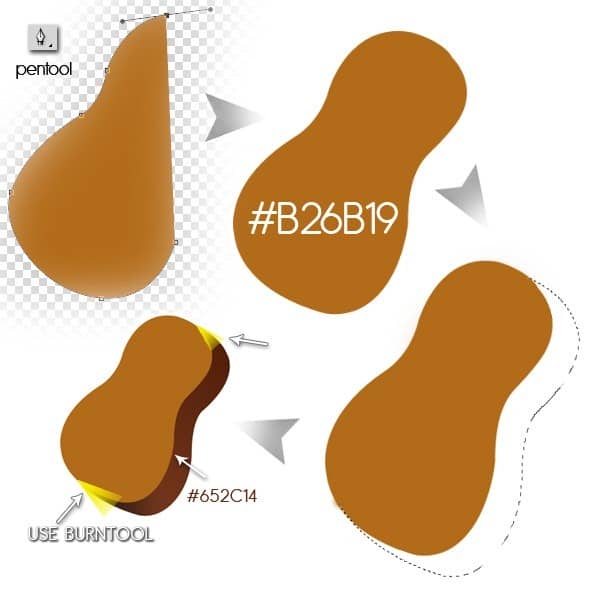
TIP: Use ALT + click on last pen tool point to make it more easier to use
Step 3 – Creating the Wood Texture
Now we’ll create the wood texture. To create this wood texture from scratch, start by creating a new layer. Change the foreground color to #A83E0D then use the Fill tool (Edit > Fill) to fill the layer with the foreground color. Use the Add Noise filter (Filter > Noise > Add Noise) to add a little bit of monochromatic noise. Finish it off by applying a Motion Blur (Filter > Blur > Motion Blur) by 40 pixels at 90° angle. To enhance the texture, duplicate the layer (Ctrl+J or Layer > Duplicate), change the blend mode of the new layer to Soft Light, then merge down (Ctrl+E or Layer > Merge Down).
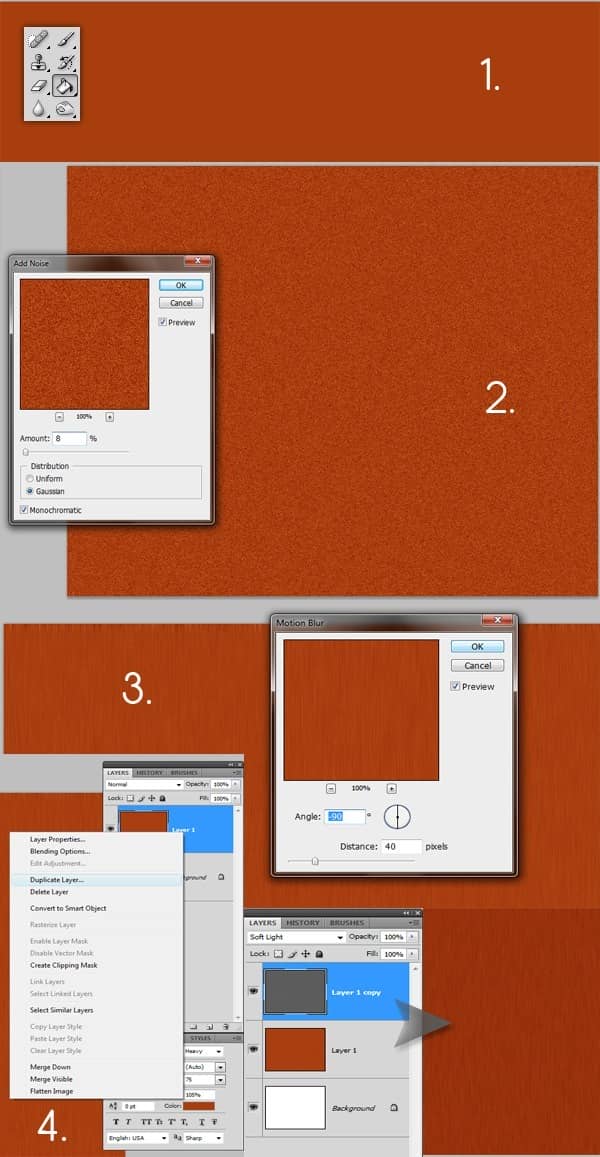
Step 4 – Texture, Light, and Shadows.
Put the wooden texture over the guitar then select the guitar again with the Magic Wand tool (W). Inverse the selection (Shift+Ctrl+I or Select > Modify > Inverse) then press delete on your keyboard to delete the selected area. Use the Burn tool again to add shadows to the middle then switch to the Dodge tool to lighten the parts shown in the image below.
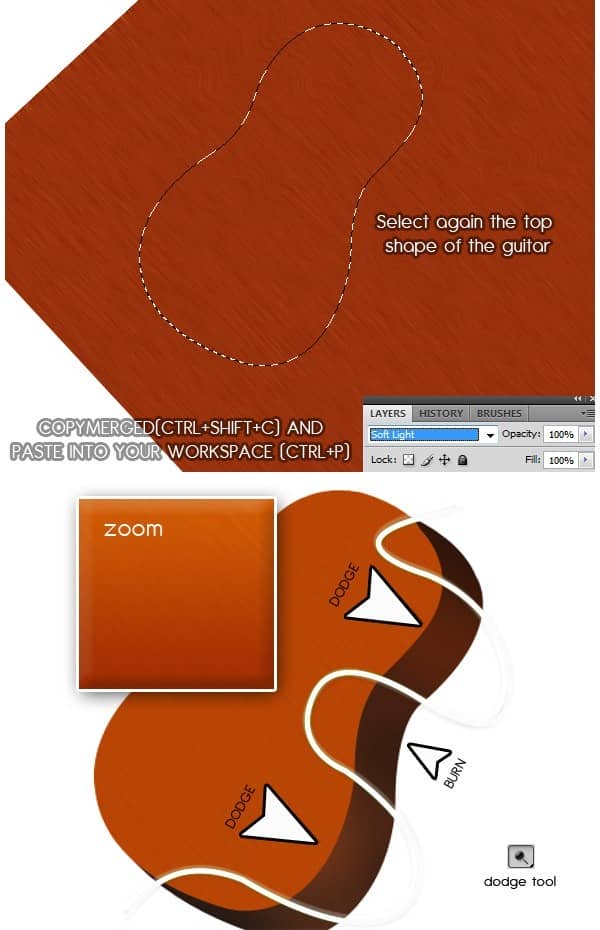
Step 5
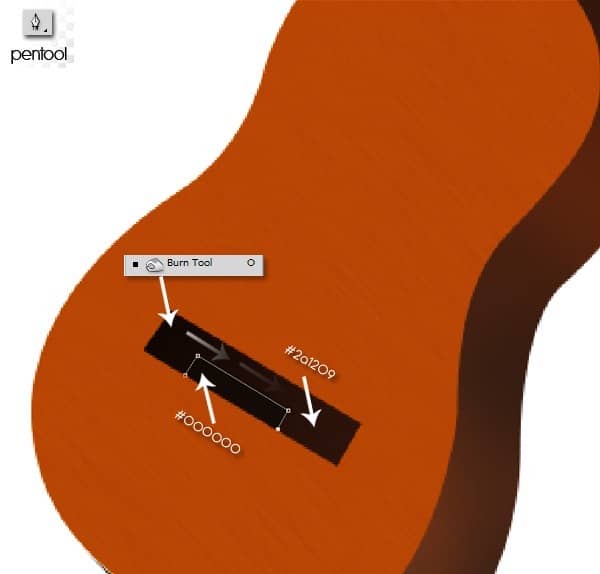
Use the Pen tool to create the rectangle like shown in the image below. Start by creating the bigger rectangle with the color #2A1209 then create the smaller one with black. Switch to the Burn tool then paint around the left side to make it darker.
Pay attention how the layers are placed (one over another).
Step 6
Draw some dots in the smaller black box using the Brush tool. Set the brush size to 4px and hardness to 70%. Set the foreground color to #622E19 then paint the dots into the smaller black box. Use the Polygonal Lasso tool to draw a rectangle like shown in the image below then fill it with white.

Step 7
Now we will make the rosette. Create a new layer then select the Elipse tool (U) and draw an oval about the size of the one shown in the image below. We will work on the perspective/angle of the oval later. Fill this oval with dark red then go to Layer > Layer Style > Stroke. Create an inner stroke with a darker red (#652100) like shown in the image below. Duplicate the layer then make it smaller using the Free Transform tool (Edit > Transform > Free Transform). Scale the circle smaller by holding the Alt + Shift key while dragging one of the corner points. Fill this layer with a beige color. Remove the stroke on this layer by right clicking on the layer then selecting clear layer style. Do this one more time for the black hole. Duplicate the layer (Ctrl+J or Layer > Duplicate) with the beige circle then use the Free Transform tool (Edit > Transform > Free Transform) to reduce the size of the circle. Fill this circle with black. Select all three of these oval layers then go to Edit > Transform > Free Transform to adjust the perspective. You can hold down the Ctrl button while dragging one of the corner points to adjust only one point at a time.

Step 8 – Create the guitar neck
Create a shape using the Pen tool (P) like shown in the image below. Fill this shape with #532315. Use the Burn tool (O) to burn around the top of the neck to make it darker. Create the strings using the Pen tool (P).

Step 9 – Create the headstock
To create the headstock, follow the image below. Use the Marquee tool to create a selection of the headstock then use the Burn tool (O) to burn the bottom area. The rest of the instructions are shown in the image below.


Step 10 – Create the reflection
Use the Magic Wand tool (W) to create a selection of the front area of the guitar. Zoom out (Ctrl+-). While holding down the Alt key, use the Elliptical Marquee tool (M) to create a big oval so that a portion of the curve covers the guitar area. This will create the curved edge shown in the image below. Select the Gradient tool (G) and create a gradient from white to transparent like shown in the image below.

Select the Brush tool then set the size to around 3 pixels. Switch to the Pen tool (P) then create a line on the border of the bottom right corner of the guitar. Set the foreground color to white then, in the Paths palette (Window > Paths), right click on the path then select Stroke Path. Set the tool to Brush then click OK. Reduce the opacity so that it looks like the image below (bottom left area). Now create a selection like shown in the image below (top left area) and fill it with white. Select the Eraser tool (E) and set the brush size to around 50 px and hardness to 0. Erase the right edge of the selection so that it fades gradually from transparent to white. Repeat this process with the middle and top right sides of the guitar. Finish it off by creating a shadow. To do this, select the Elliptical Marquee tool (M) and create an oval like shown in the image below (top middle area). Feather the selection (Select > Modify > Feather) by around 10 pixels then use the Gradient tool (G) to create a black to transparent gradient.

Final Result


Download the PSD
Chitara.zip | 1 MB
2 comments on “How to Create a Beautiful Guitar Icon in Photoshop”
good
good bro