Design a Blue Jean Pocket Cover in Photoshop

Design a Blue Jean Pocket Cover in Photoshop

Learn how to create a Jean Pocket with the help of patterns and an extensive use of the Pen Tool. You’ll learn how to create stitching, apply fabric textures, and create beautiful fabric letterings.


Preview of Final Results
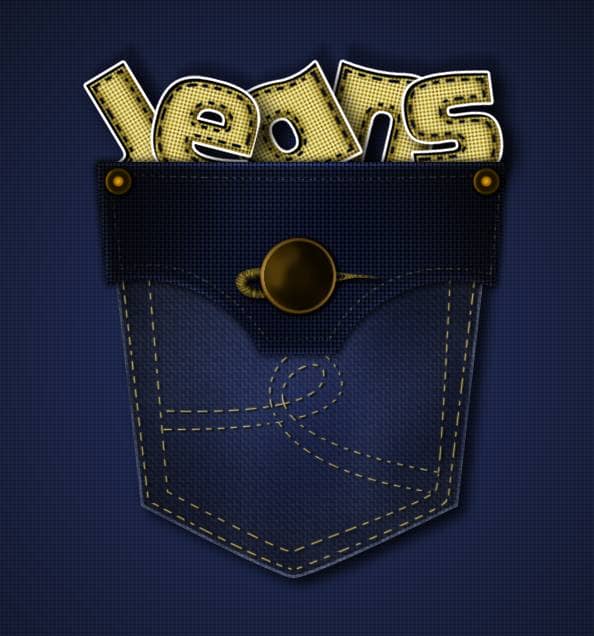
final-results

Design a Blue Jean Pocket Cover Photoshop Tutorial


Resources


Step 1 - Create a New Document

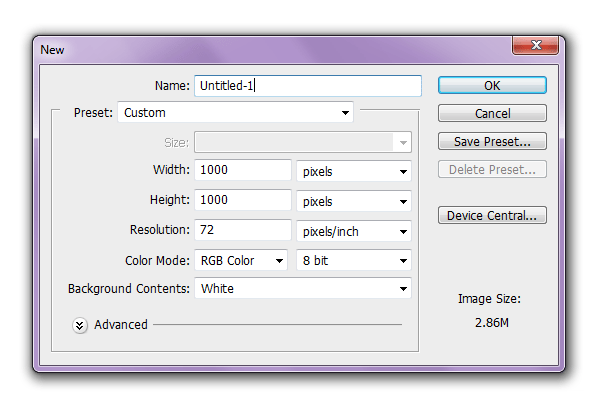
Choose File > New or press Ctrl/Command + N. The size of my canvas is 1000px (width) x 1000px (height) but choose any size you wish.
step-001

Step 2 - Background

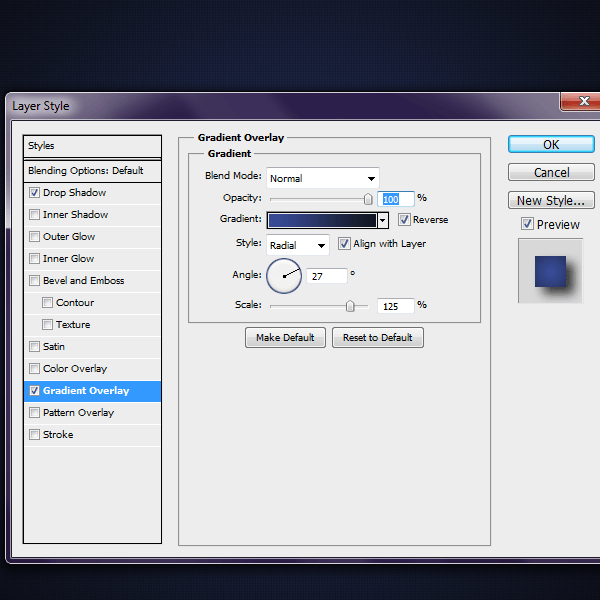
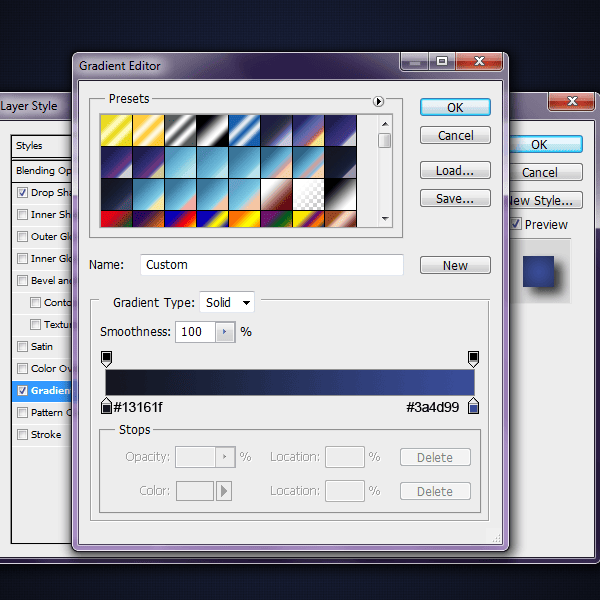
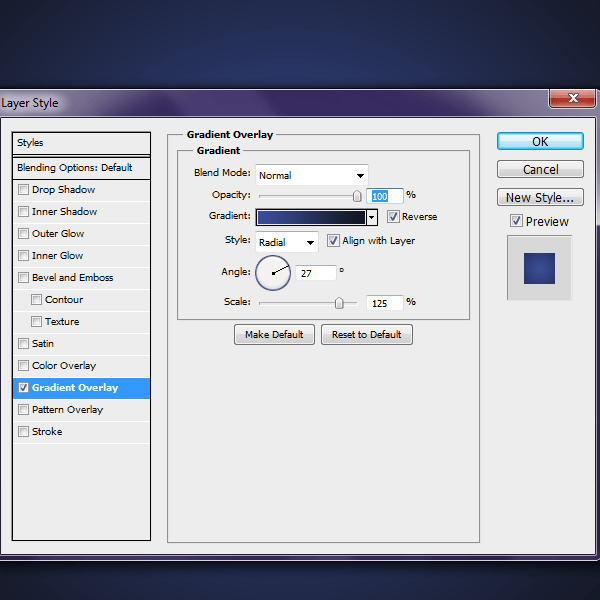
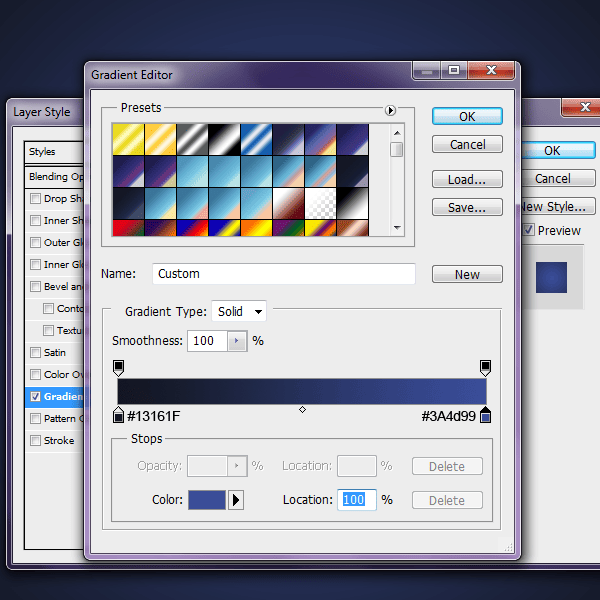
On your first layer rename it to 'Background' and then apply this Gradient Overlay by double clicking this layer
step-002
step-002a

Step 3 - Add the Pattern

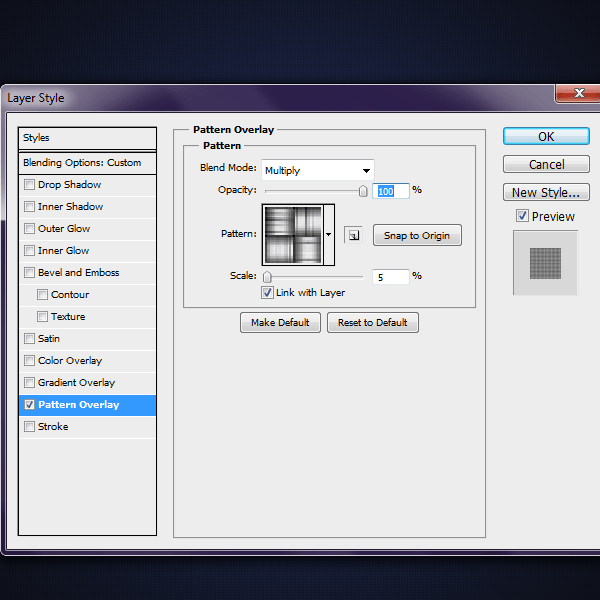
Create a New layer and name it 'Pattern.' Grab your paint bucket tool and fill this layer with white #ffffff. Make sure the 'Fill' is at 0% and add this layer style.
step-003

Step 4 - Pocket

Create a New layer and name it 'Pocket.' Grab your pen tool and make the shape of a pocket. Right click and then click on 'Make Selection', click ok.

step-004

Step 5 - Fill the Pocket

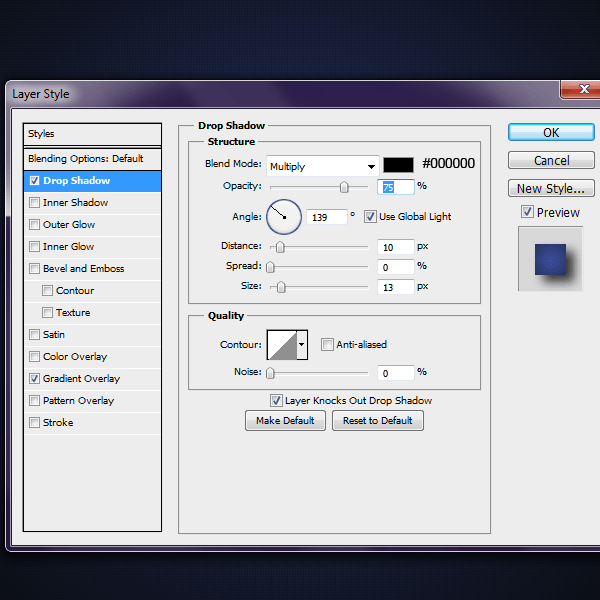
Fill this pocket with #ffffff. Once you have done this duplicate this layer. On the first 'Pocket' pocket layer add these layer styles. First up, the Drop Shadow.

step-005

Drop Shadow

step-005a

Gradient Overlay

step-005b
step-005c

Step 6 - Pocket Pattern

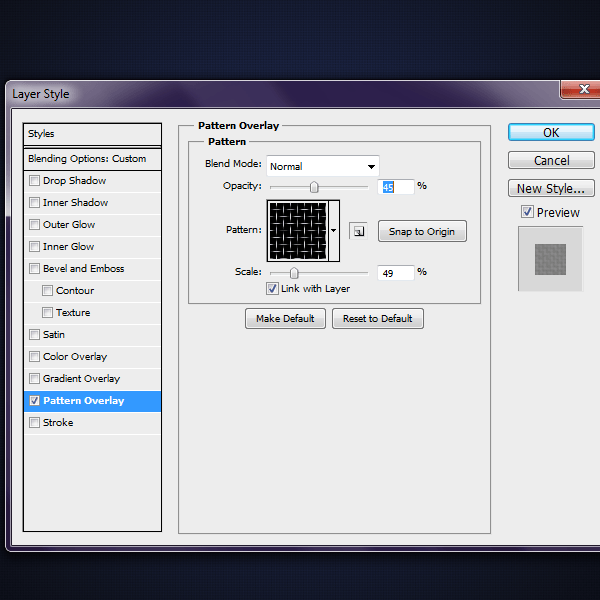
Now on your 'Pocket Copy' layer add this pattern
step-006


Step 7

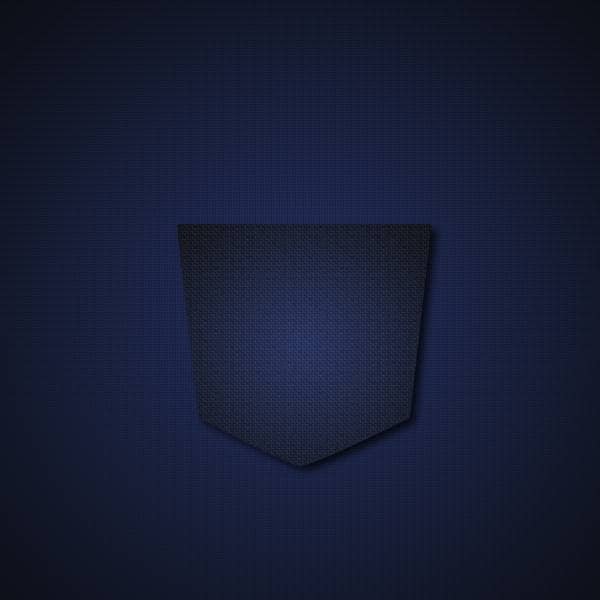
This is how it should look so far.
step-007

Step 8 - Stitching

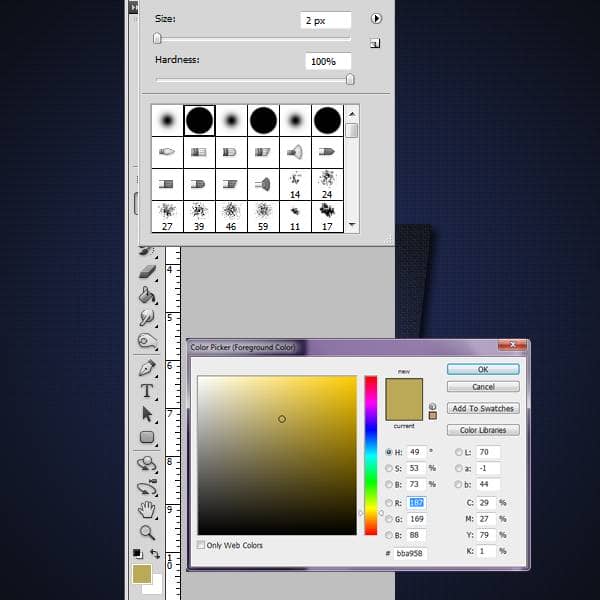
Before you grab your pen tool, make sure your paint brush is set to 2px hard round brush and the color is set to #bba958.
step-008

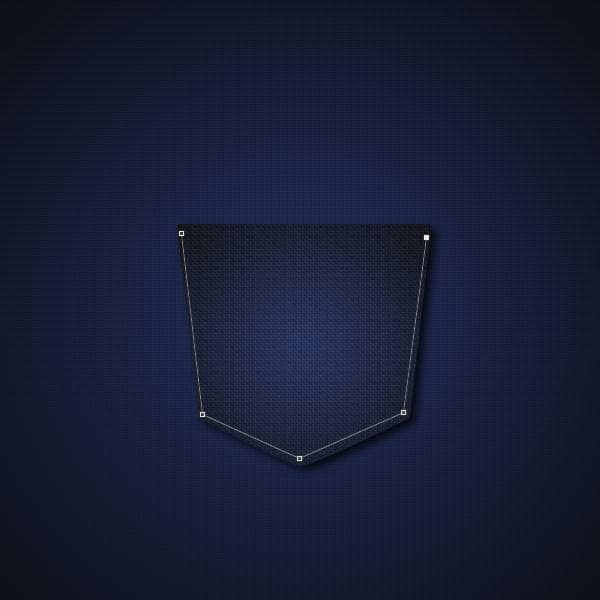
Create a New layer and call it 'Stitching.' Grab your pen tool and make a shape like the one below.
step-008a

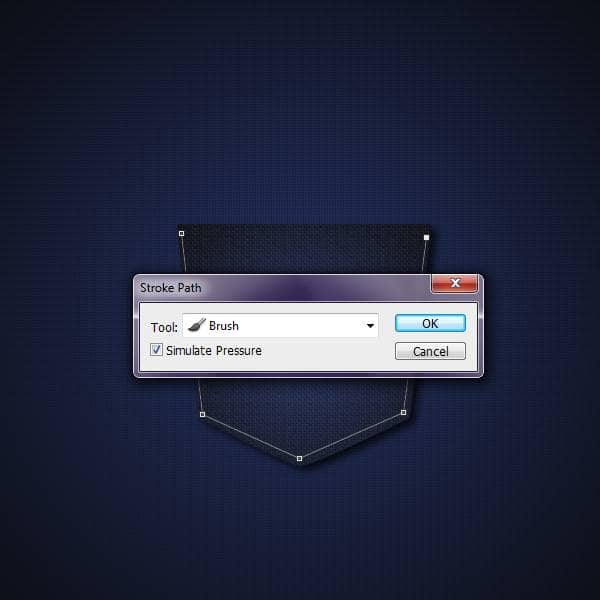
Right click on the path and select 'Stroke Path,' make sure that the 'Simulate Pressure' box is checked.
step-008b

Step 9 - Stitching Effect

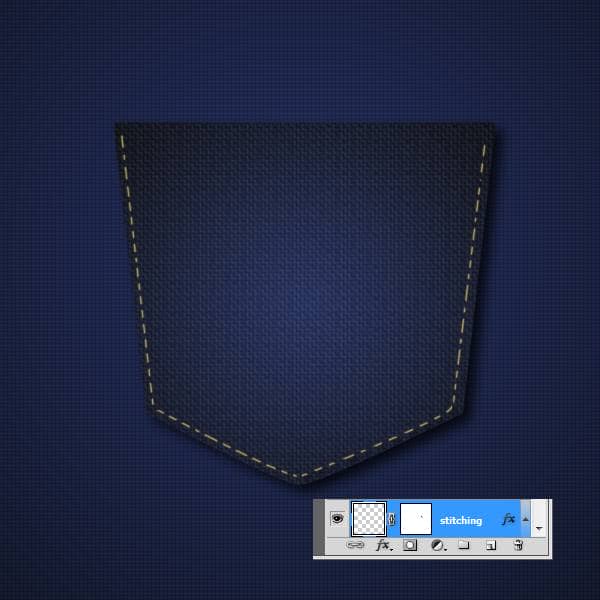
While your 'Stitching' layer is selected, click on the Add layer Mask button (the icon with the circle inside a box). On the mask layer, start to erase parts of the line to get the stitching effect. Note: I used a 5px hard round brush for this.
step-009

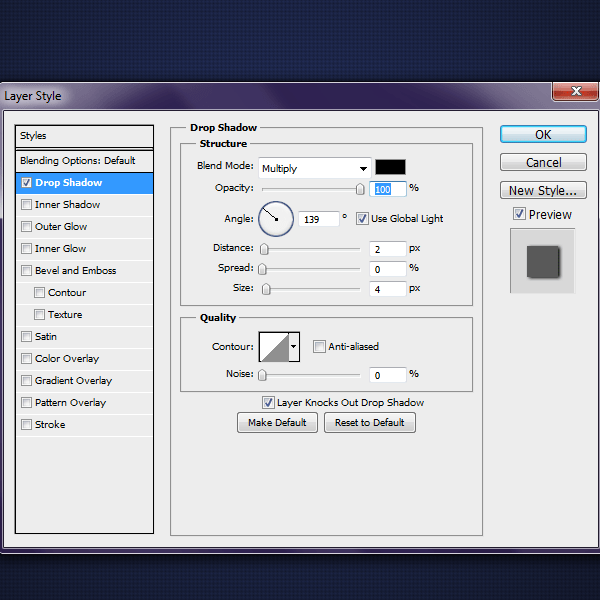
Step 10 - Add Drop Shadow

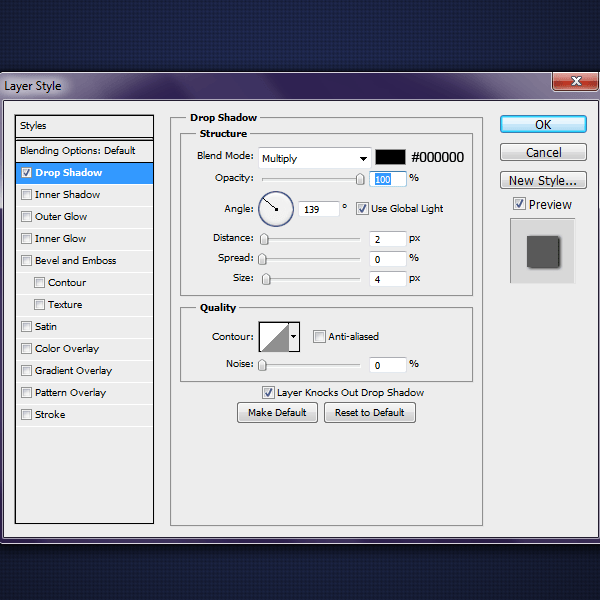
On the 'Stitching' layer add these settings for the Drop Shadow.
step-0010

Step 11 - 2nd stitching layer

Repeat the previous steps to create another stitching layer like the one below. You can name this layer 'Inside Stitching.'
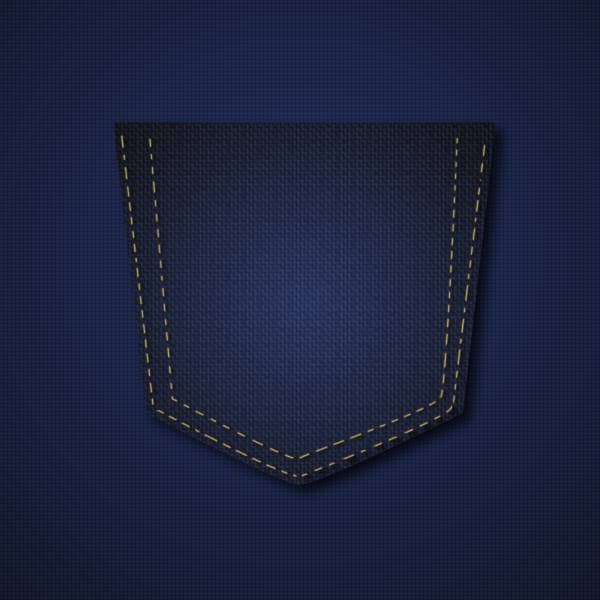
step-0011

Don't forget to add the Drop Shadow

step-0011a

Step 12 - Texture

Create a new layer and name it 'Texture'. On this layer we will give the jeans more of a dengy feel to them. Grab your paint brush tool and set it to a 104 px soft round brush and a Flow of 43%, color black #000000. Make marks like the image below. Set this layer to 'Soft Light' with an Opacity of 50%.

step-0012

Step 13 - Blur Texture

On your 'Texture' layer go to Filter > Blur > Motion Blur and apply these settings.

step-0013

Step 14 - Smudge Texture

To give it more of a random effect grab your smudge tool (40px soft round brush, Strength: 50%) and spread the texture around a bit, so that it looks like the image below. Erase the parts that go outside of the pocket.

step-0014


Step 15 - Pocket Flap

Create a new layer and name it 'Flap'. Grab your pen tool and make a shape like the one below make sure to fill it with #ffffff. Duplicate this layer.

step-0015
step-0015a

Step 16 - Apply these settings

On your first 'Flap' layer apply these settings.

step-0016

Bevel and Emboss

step-0016a

Gradient Overlay

step-0016b

Step 17 - 2nd Flap Layer

On your 'Flap Copy' layer add these layer styles starting with the Drop Shadow.

step-0017

Pattern Overlay

step-0017a

Step 18 - Flap Texture

Your image should now look like the image below. Now lets add some texture to the flap. Create a new layer and name it 'Flap Texture'. Select a 77px soft round brush with a Flow of 50% #000000. Make some random marks on the flap.

step-0018

Also change this layer to 'Soft Light' with an Opacity of 50%. Erase the parts that go off of the flap. Use the Smudge Tool if need be.

step-0018a
step-0018b

Step 19 - Flap Stitching

Make a new layer and name it 'Flap Stitching.' On the 'Flap Copy' layer make that layer a selection by clicking the little box of the image while pressing 'ctrl.' Once you have done this Select > Modify > Contract 10px

step-0019
step-0019a

On the 'Flap Stitching' layer go to Edit > Stroke 1px #bba958 Inside

step-0019b


Step 20 - Flap Stitching effect

On this 'Flap Stitching' layer add a layer mask and erase until it looks like the image below. Note: I used a 5px hard round brush

step-0020

Change this layer to 'Color Dodge'

step-0020a

Step 21 - Small Buttons

Click on the folder icon to 'Create a New Group'. Name this folder 'Small Button.' Create a New layer inside of this folder name it 'Circle' or whatever you like. Grab your Elliptical Marquee Tool and make a circle like the size below and fill it with any color (we will change the color later).

step-0021

Step 22 - Circle layer styles

Add these settings to the 'Circle' layer. Drop Shadow

step-0022

Gradient Overlay

step-0022a
step-0022b

Step 23 - Highlight

Create a New layer and name it 'Circle Highlight'. Grab your Paint Brush Tool (5px soft round brush, #ffffff) and paint a highlight around the edge of the circle, like the image below.

step-0023

Change this layer to 'Overlay'

step-0023a

Step 24

Create a New layer and name it 'Inner Circle'. Grab your Elliptical Tool and make a circle and fill it with #795404

step-0024

Step 25

Next we are going to add another highlight on top of the 'Inner Circle'. Make a new layer (name it 'Highlight Inner Circle') and grab your Paint Brush tool (9px, soft round brush #ffffff) and place a dot on top of the inner circle.

step-0025

Change this layer to Overlay.

step-0025a

Step 26 - Duplicate Group

Take this 'Small Button' group and duplicate it. Move the 2nd 'Small Button' group to the other side of the flap like the image below

step-0026


Step 27 - Flap Opening

Now we are going to make an opening where the button goes through. Create a New layer and name it 'Opening.' Grab your Pen tool and make a shape like the image below.

step-0027

Step 28 - Fill Opening

Right click on the shape you just create and then click on 'Make Selection' click 'ok.' Fill this selection with #bba958

step-0028

Step 29

While the selection is still activated contract it. Select > Modify > Contract by 7px

step-0029

Press the "Delete" key

step-0029a

Step 30

Grab your Burn tool and burn the areas I circled in the image below. Note: 12px Brush, Midtones, Exposure: 100%

step-0030

Step 31 - Drop Shadow

Add the Drop Shadow

step-0031

Step 32 - Weaving Texture

Create a New layer and name it 'Weaving'. Create small lines across the opening. I used a 2px hard round brush #000000

step-0032

Change this layer to Soft Light.

step-0032a

Step 33 - Button

Create a New Layer, name it 'Button'. Grab your Elliptical Tool and make a circle. Fill it with #1c1202

step-0033

Step 34 - Stroke

Add a Gradient Stroke to this 'Button' layer.

step-0034
step-0034a

Add a Drop Shadow

step-0034b


Step 35

So far, this is how your button should look.

step-0035

Step 36

Now we will enhance the button a little bit mare to make it more believable. Create a New Layer and grab your 32px Paint Brush #000000 and paint around the edges. Erase the parts of the brush that goes outside of the button.

step-0036

Change the Opacity of this layer to 35%

step-0036a

Step 37 - Button shine

Now we will add some shine to the button. Create a New layer and add grab your Paint Brush tool (25px soft round brush #ffffff) and brush it in like the image below.

step-0037

Change this layer to Soft Light

step-0037a

Step 38 - Text

Now we are finished with the pocket for now. Next, we will go on to the text effect. Grab your text tool and type out whatever you want it to say, but for this tutorial I will use the word 'Jeans.' I'm using the font 'Ackbar' 183pt, and a color of #bba958. Note: It would be best for you to type out each letter in its own layer.

step-0038

Step 39 - Layer Styles.

Add these layer styles to each of the layers. Once you have applied the layer styles to one of the layers then you can just 'copy and paste' the layer styles onto the other letters. First up, Inner Shadow

step-0039

Bevel and Emboss

step-0039a

Satin

step-0039b

Pattern Overlay

step-0039c

Stroke

step-0039d


Step 40 - Dot Pattern

While your text layer is selected go to Select > load Selection. Then Select > Modify > Contract 6px

step-0040

Step 41 - Dots

While the selection is still active create a new layer, name it 'Dots'. On this Dot layer go to Edit > Stroke

step-0041

Step 42

Create a layer mask on this 'Dot' layer and erase parts of the stroke away so that it looks like stitching. I used a 8px Hard round brush. Then change this layer to 'Hard Light'

step-0042

Step 43 - Placement

Rasterize all of your text layers. Then resize your text layers (Right Click on text layer > Rasterize) and arrange them like the image below Edit > Free Transform. Note: Don't forget to Merge the dot layers onto the text layer and place the text layers beneath the 'Flap' layer

step-0043

Step 44 - Text Drop Shadow

Lets add a Drop shadow to the text.

step-0044

Step 45 - Enhance Shadow

Ok now we will enhance the shadow a bit more. Duplicate all of your text layers (take off the drop shadow by clicking the 'eye') and merge them together and change the Color Overlay to Black #000000. Next 'Convert to Smart object',then 'Rasterize'

step-0045

Step 46 - Blur Shadow

Filter > Blur > Gaussian Blur

step-0046

Step 47

Change this layer to Soft Light with an Opacity of 50%. Move the shadow behind your "Jean" text.

step-0047

Step 48 - Jean Detail

Finished with the text! Now we will go back and add some highlights to the 'Pocket.' Create a new layer and name it 'Pocket Highlights' just make sure that it is above the 'Pocket' layer. Create a selection like the one below from the 'Pocket Layer'. In the next step we will create a stroke.

step-0048

Step 49 - Stroke

While the selection is active. Go to Edit >Stroke> #ffffff

step-0049

Change this layer to Soft Light

step-0049a


Step 50 - Detail Stitching

One last detail and then we will de done! Like the pocket stitching, create a line like the image below in a new layer

step-0050

Right click path and select Stroke Path(make sure your Paint Brush is set to 2px hard round brush #bba958)

step-0050a

Step 51 - Repeat

Erase away sections so that it looks like stitching. Repeat these steps to create the second line also.

step-0051

Step 52 - Layer Styles

Add these layer styles to these two stitching layers. Drop Shadow & Bevel and Emboss

step-0052
step-0052a

Final Results

final-results[1]
step-0053

Authors Comment

profileI hope you enjoyed this tutorial as much as I did.

- Ashlee Harrell

90% Off Cyberpunk Preset Bundle
Sponsored

Make your artwork look like they're from an alternate universe. These Cyberpunk presets work with Photoshop (via the Camera Raw filter) and Lightroom. Download all 788 presets for 90% off.

Leave a Reply

Your email address will not be published. Required fields are marked *

cross