
Turn any photo into a dot grid artwork with these Photoshop actions. You'll get great results with dots that change size. They get larger in brighter areas and smaller in darker areas. Free download available.
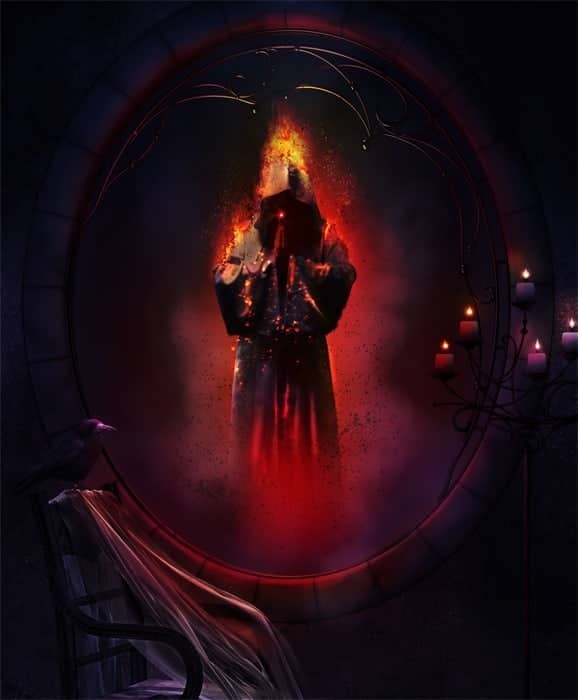
Learn how to create this dark photo manipulation with a burning figure in a mirror. This Photoshop tutorial will show you how stage a scene with multiple photos, add smoke and fire to a witch, and coloring techniques that you can use in other photo manipulations.
Preview of Final Results

Tutorial Resources
- Fenestra - Deviantart
- Model - Deviantart
- Fire - Deviantart
- Particle brushes and png - Wegraphics
- Fireflies and sparks - Deviantart
Step 1
First off create a new blank document (Ctrl+N) with size of 2000 pixels wide and 2424 pixels high.

Take gradient tool in the tool panel and choose linear gradient. We will fill the blank document with gradient color. Make sure to set the foreground color to #151723 and the background to #423e43. Fill the document by hold-clicking and dragging the tool from the top to bottom of the document.

Step 2
Next place the fenestra image in the document.

Activate the free transform tool (Ctrl+T) to scale the image up. Position it in such way that the window of it becomes the main part of the background.


Step 3
Proceed to alter the color of the wall. We will do this by just simply duplicating the original image four times. Set the original image to multiply blending at 100% opacity, the first duplicate to screen blending at 20% opacity and the other three duplicates to soft light blending at 100% opacity. Finally select all the layers and hit Ctrl+G to put them in a folder. I named this folder wall.

Here is what we will have:

Select the original layer within the folder and give it a layer mask. Take a very soft round brush to mask the upper part of this image as indicated by the red color in the screenshot.

Proceed to select the first duplicate layer and give it a layer mask as well. With soft round brush, mask area around the lower part of the window.

Here is the result should be:

Step 4
Open the raven image and extract it from its background.

Add the raven to the main document. Scale its size and place it on the chair.

With the raven layer still selected, go to layer > new adjustment layers > hue/saturation. Make sure to give this hue/saturation layer a clipping mask by checking ‘Use The Previous Layer To Create A Clipping Mask’ in the new layer option box.

Here is the value of the hue/saturation should be set. Select the raven and hue/saturation layer and put them in a folder. I named this folder raven.

Step 5
Now we will set the color of the window background by giving color adjustment layer above the raven folder. Go to layer > new adjustment layer > vibrance. Set the value of this layer as below:


Step 6
Next extract the model image and add it to the main document above the vibrance layer. With free transform tool, scale its size and position it in the middle of the window. Put this model layer in a folder. I named this folder model.

Select the model layer and then go to layer > new adjustment layers > exposure. Give this exposure layer a clipping mask. Set the value as the one given in the screenshot.

Give another adjustment layer with a clipping mask: color balance.

Step 7
Proceed to give the model some highlight and shadow. To do this purpose, create a new layer (Shift+Ctrl+N) above the color balance layer within the folder. Make sure to give this new layer a clipping mask and fill it with color of 50% gray and set its blending to overlay.
22 comments on “How to Create an Infernal Scene in Photoshop”
Interesting
Thanks a lot for the great tutorials you are providing..but as suggestion..why you are not doing the tutorial in videos on youtube channel...it would be really great and more helpful for trainer and trainee
Thanks agaim for the great effort
amazing tutorial can u share again psd link not working for learning
good work!
I lik dis
I am too retarded to complete dis
Please re uploaded PSD file because when i click on download showing 404 not found error, this is best work for me i want check how did you do this
amazing outstanding fantastic best work master blaster
Can you upload the files again
Elegant, modern, very different..
Beautiful, creative and acutely enjoy able!
Thank you for the tutorial.
Very good lesson but it lacks some details, it will be well to repeat the turoriel with more details
Awesome.
Thank you for sharing
how do u create the smoke
Where is the Raven image?
how do you create the smoke layer
simple usa un pincel de humo lo encuentras en la pagina de Devian art
Amaing work you did there, you are great. I will give it a try
really awesome ad heart touching tutorials,but where is the contact us? how to contact you?
Very nice tutorial..
good tut
Very good tutorial!!
mazen