

Make skin look perfect in one-click with these AI-powered Photoshop actions.


Step 14
I painted another cloud (number 1369) at the right of the first one:

Step 15
Paint two other clouds at the left of the first and make reflections for them:
Step 16
I used a Curves adjustment layer with Clipping Mask to darken a cloud a little:

Step 17
Group all the cloud layers and their reflection ones. Change the mode of this group to Normal 100%. Add a Selective Color adjustment layer to add some yellow to the white clouds:

Step 18
I used a Curves adjustment layer to darken and change the color of the clouds:

Step 19
Open the paper boat stock and extract it from the background.

Step 20
Hide the background layer. Hit Cmd/Ctrl+Option/Alt+Shift+E to merge the extracted boat and the clone layers. To reform this boat, use the Lasso Tool to choose the bottom of the boat, right click it, choose Layer via Cut:

Step 21
Place the merged boat at the cloud on the right edge. I set this layer under the clouds group:

Step 22
Group the boat and its reflection layers. I used a Hue/Saturation adjustment layer to reduce the saturation of the boat:
Step 23
Add some vibrant color to the boat with Color Balance:
Step 24
I used a Curves adjustment layer to brighten the top of the boat:

Step 25
Open the model stock. Use your own method to extract her from the background.

Step 26
Make a new layer. Active the Brush Tool with the basic ones and color #989079. Press F5 to change the settings of this brush:


Step 27
Place the model onto the biggest cloud (at the center):

Step 28
Make reflection for the model as done with the others.
Step 29
Group the model and her reflection layers. Make a Hue/Saturation adjustment layer within this group to reduce the redness on two these layers:
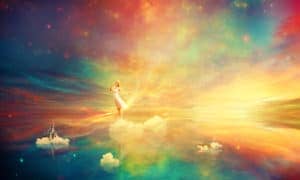
Step 30
Use Color Balance to add some vibrant yellow to the model:

21 comments on “Create a Wonderfully Colorful and Everlasting Dream Fantasy Manipulation”
beautiful thanks a lot
Amazing tutorial!!
beautiful thank you
Thank you! really great work.
More posts like this. Excellent
Yup Indeed
My pic http://j-p-g.net/if/2015/08/16/0941499001439726706.jpg
Thanks. I love this wonderful lesson. Author - genius. the great manipulator adjustment layers
What a great tutorial and different to what you usually see. Thanks.
Dank memes brah
(look at the date)
Thanks a lot! Loved this tutorial =) Here is my version http://milanaserk.deviantart.com/art/Sensibilia-489040508?ga_submit_new=10%253A1413571430
amazing!! great to see the amazing work of great experienced art directors!!
Awesome...
Thanks, really good work!
Thank you for the tutorial!
amazing...
super
Thank u..
Breathtaking picture!! I will try
خوب بود.ممنون
means:good thank you!!
Final image looks amazing brilliant job !!
okay only...