Final Image
What you will be creating
Tutorial Details
- Program: Adobe Photoshop CS6
- Estimated Completion Time:45 minutes
- Difficulty:Beginner-Intermediate
- Tutorial Resources:https://www.dafont.com/joint-by-pizzadude.font
Step 1
Open a new file (File > New) in Adobe Photoshop with the following settings.
Step 2
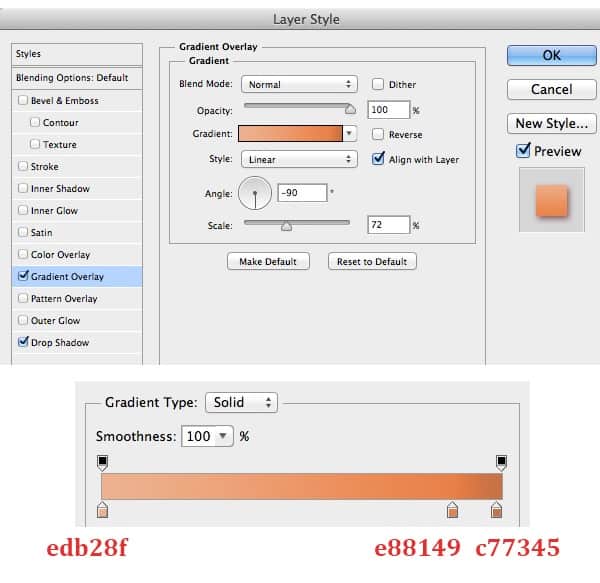
Fill background with any color you like. Then double – click to open Layer Style and set this gradient for our background.


Step 3
Now we create a new group and name this group as ” S “. We will create text in separately. Now we begin with ” S ” text first. Add the text, I’ve choosen joint-by-pizzadude font which set 90px font size. We name this text layer as ” base 1 “
Step 4
Double – click on text layer, from menu choose Blending mode . Add ” Drop shadow “.


Step 5
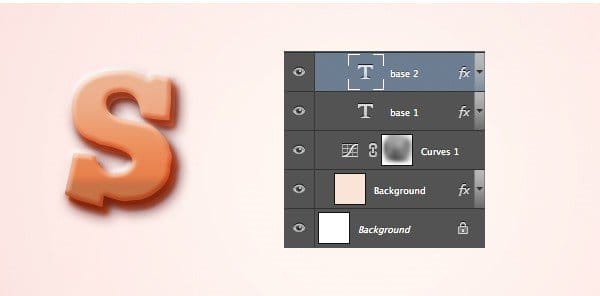
Duplicate the (Cmd + J) ” base 1 ” then we rename this copy as ” base 2 “. Move the ” base 2 ” to upper a little bit.


Step 6
Duplicate the (Cmd + J) ” base 2 ” then we rename this copy as ” base 3 “. In this step, we just change the Gradient Overlay a little bit.


Step 7
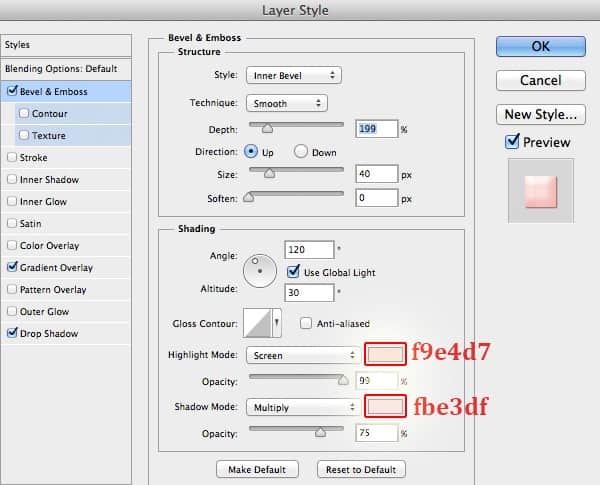
In this step, we will make frosting. Now we create new layer and put on top, just press Ctrl/Cmd and click on “base 3 ” to make selection, then go to Select > Modify > Contract and set the values. We name layer as ” Cream S “

Step 8
Fill the frosting with any color you like. Then double – click to open Layer Style. Now we add ” Drop Shadow “.


28 responses to “Create Delicious Donut Text That Will Make You Hungry”
-
good toturioul
-
how do you change the text S to W
-
Hi, I can’t seem to add a pattern overlay to the S lettering. Followed the steps to add but doesn’t change anything. Please help!
-
Same
-
Lmao truth
-
I rather bake the cookies than to do this tutorial in class.
-
naseau heet burn incojusted upsit stumoch direah
-
how can I get the grain on step 6?
-
Go to Window > Patterns. Click on the panel menu and select “Legacy Patterns and More”.
-
-
Thank you for sharing, it looks great.
-
Luv this❤❤
-
I can’t control my hungry stomach. Just Kidding!
-
Oh my God that looks so good! I cannot believe you created these from scratch! Thank you for sharing!
-
Thanks
-
Mahal ko save mopo ito o iscreenshot galing sa link nayan kpag free ka gawa rin tayo ng donut na font ng text, Rochelle Bantayan ayaw magload po sakin maganda to, using photoshop
-
Heel leuk om te maken
-
Thank you, it was very fun and easy to do !
-
Thanks for sharing :) it’s very nice and i made myself one :”>
-
After Step 6 (creating “base 3” with gradient change), my donut becomes burnt. :(
-
After Step 6 (creating “base 3” with gradient change), my donut becomes burnt. :(
-
I use CS5 and I don’t have this pattern
-
Reminds me of the time I attempted to eat a donut
-
so I’m not have thats pattern
-
Look in your defaults patterns, because came with photoshop
-
-
Mmm! This looks tasty! I can see this being used for things such as cupcake or donut shops. The little droplets of frosting are a nice touch! Thank you for sharing!
-
Very nice tutorial, thanks for sharing!
-
Thanks
-
Nice tutorial


Leave a Reply