

Turn any photo into a dot grid artwork with these Photoshop actions. You'll get great results with dots that change size. They get larger in brighter areas and smaller in darker areas. Free download available.
This the second part of a three-part Roman House tutorial. Roman House Painting Part I - The Drawing describes how to draw the scene and this part shows how to finish the background. Roman House Part III – Finishing how to add a woman to the scene.
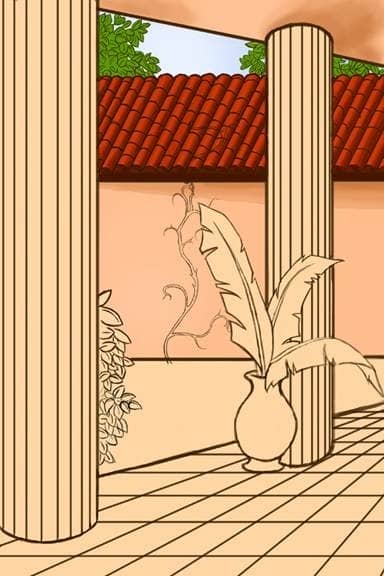
Preview of Final Results

Roman House Part II - The Drawing Photoshop Tutorial
- Program: Photoshop 7
- Difficulty: Intermediate
- Estimated Completion Time: 30 minutes
This is the second part of a three part drawing series. Roman House Painting Part I - The Drawing shows now to create the initial outline sketch.
Step 1
Create a new layer below the sketch titled “wall”.

Step 2
Block in the wall and ceiling with color #FFD2A2 and an opaque hard-edged brush.

Step 3
Make another layer above the “wall” layer.

Step 4
Block in the roof with color #BE2D00.

Step 5
Make another layer above that layer, it will be merged down later.

Step 6
On this layer, add shadows to the right side of each of the columns with a soft edged brush set to 57% opacity (color #701B00).

Step 7
Darken the shadows even more with a 41% opaque brush.

Step 8
Using the same brush, highlight the tiles with color #E14616.

Step 9
Fill in the arches under the tiles with color #701B00 with an opaque hard-edged brush.

Step 10
With color #4B1200 fill in the line under the arches.

Step 11
Merge the layer down onto the “roof” layer.

Step 12
Using the same brush, add a slanting shadow beneath the roof on the wall layer (color #F2AA78).

Step 13
Darken the shadow with color #C57338 (48%, soft-edged brush).

Step 14
Add a shadow to the ceiling with the brush set to 20% opacity.

Step 15
Erase the part of the wall that overlaps the back pillar.

Step 16
Add a highlight to the left side of the wall (color #FFD6B8, 500 pixel brush, 20%) , and in-between the two pillars.

Step 17
Create a new layer beneath the wall and title it “sky”.

Step 18
Block in the sky area above the roof with color #CADEFF (opaque brush).

Step 19
Use a soft-edged brush to lighten the sky with color #F1F6FF (41% opacity, 260 pixel brush).

Step 20
Create a new layer above the sky and name it “trees”.

Step 21
Block in the trees with color #5A9900 using an opaque hard-edged brush.
Step 22
Bock in shadows around the leaves with color #386000 using a soft edged brush set to 55% opacity.

Step 23
Highlight the leaves with color #96E426 with a 13% opaque brush.

Step 24
Now, make a new layer beneath the “vine” layer.