This intensive tutorial will show you from start to finish how to mod and create your own car in Photoshop. This advanced tutorial is recommended for the expert Photoshop user and will show you professional techniques such as body sculpting, creating window reflections, and other photo-realistic effects!
Preview of Final Results

Virtual Tuning Photoshop Tutorial
Step 1
To begin, I’ll be using this photo. You can use any photo you like for this tutorial to create your own virtual tuned car using the techniques in this tutorial.

Step 2
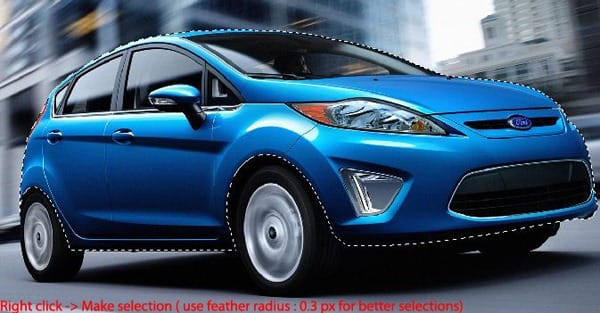
Use the Pen tool to create a path around the body of the car.

Step 3
In the Paths palette (Window > Paths), right-click on the path, then choose Make Selection. You can feather the edges by 0.3 px (Select > Modify > Feather) for smoother results.
Step 4
Choose Edit > Copy to copy the selected area onto your clipboard. Open another picture of a car taken at a similar angle. This picture will be for the background and wheels. Paste the body (Ctrl + V or Edit > Paste) onto the image. Use the Transform tools (Edit > Transform> *) to rotate and position the body so that it covers the car.

Step 5
Using the Lasso tool, create a selection of the bottom of the car and the rims on the background layer. A rough selection is fine.

Step 6
Create a new layer inbetween the two layers and fill the selected area with black.

Step 7
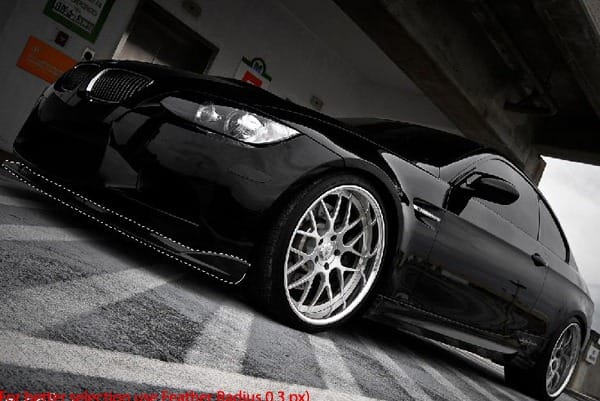
Hide the top two layers and see if there are any parts on the car that you can use. For example, in the image we used, we’ll be using the wheels and the front body kit. We’ll start with the front bumper lip. Create a selection of this bumper with the Lasso tool.
Step 8
Press Ctrl+J to duplicate the selected area into a new layer. Move this layer to the top and use the Move tool to position it on the car.

Step 9
Create a selection of the bumper cutout. Remember to feather the radius by 0.3 px (Select > Modify > Feather) for smoother results.

Step 10
Fill the selected area with black.

Step 11
Now we’ll take some chrome bumper parts. Find an image with a chrome bumper part that you like. Create a selection of it using the Lasso tool then choose Edit > Copy to copy it to your clipboard.

Step 12
Switch back to the main document then choose Edit > Paste to paste it as a new layer. Use the Transform tool (Edit> Free Transform) to position and resize the chrome part onto the bumper.

Step 13
Take the other side of the chrome part from the image and paste it onto the main document. Use the Transform tool (Edit > Free Transform) to resize and position the part into place.

Step 14
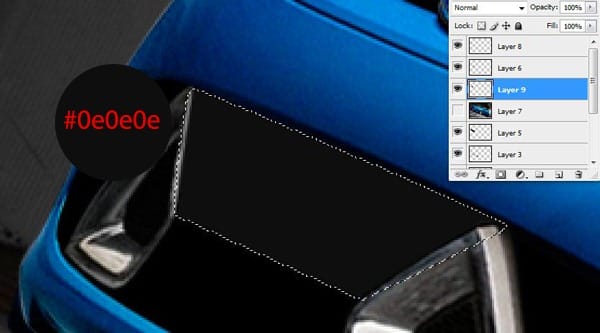
Create a selection like shown below, create a new layer, then fill it with a dark gray color for now.
Step 15
Fill the area with a carbon fiber texture. You can use Google Image Search to find many carbon fiber textures. Once you’ve placed the texture into the selected area, set the blend mode to Soft Light and opacity to 30%.

Step 16
Use the Pen tool to create a path like shown below.

Step 17
Create a new layer, then select the Brush tool and set the brush size to 2 pixels. Make sure that your foreground color is white. In the Paths palette (Window > Paths), right-click on the path you just created, then choose Stroke Path. Change the opacity of this layer to 20%. Repeat steps 16 and 17 for the two sides. Simply draw a path like the white areas below then stroke the path.

Step 18
Use the Lasso tool to create a selection like shown below. Remember to feather the selection by 0.3 pixels for better results. Copy the selected area onto your clipboard (Edit > Copy Merged).

Step 19
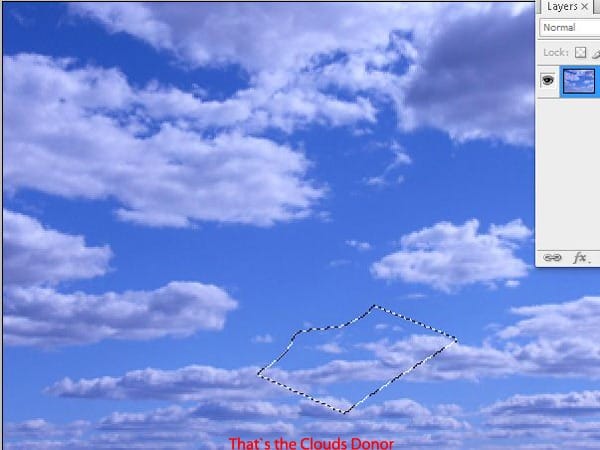
Download and open a photo of a cloudy sky. Choose Edit > Paste then position the new layer to somewhere in the clouds that you want to copy. Ctrl + click on the thumbnail of this layer to load the selection. Delete the layer then select back the Background layer. Copy the selected area onto your clipboard (Edit > Copy).
Step 20
Switch back to the main document then paste (Edit > Paste) the clouds. Position this on the carbon fiber then change the blend mode to Soft Light and opacity to about 50%.

Step 21
Create a selection like shown below.

Step 22
Find an image of a grill like the image below. Just like what you did before with the sky reflection, copy the selection of the grill and paste it back into the main document.

Step 23
Position the mesh texture onto the bumper like shown below then use the Burn tool to add some some shadows to the edge of it.

Step 24
Next, make a selection like shown below. Make sure that the layer with the body is selected.

Step 25
Use the Dodge tool to add some highlights in the corner of the selected area.

Step 26
Switch to the Burn tool then add some shadows to the bottom of the selection.
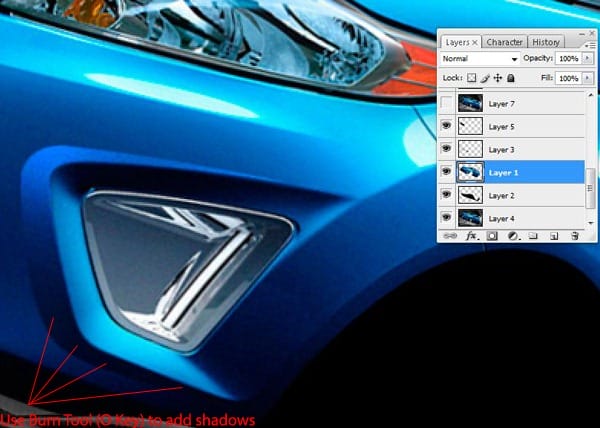
Step 27
Create a new layer (Layer > New Layer) on the top and name it stroke.

Step 28
Create a path like shown below using the Pen tool.

Step 29
Use the Color Picker tool to select the light blue on the bottom left corner. Then in the Paths palette (Window > Paths), right click on the path then choose Stroke Path.

Step 30
Choose Filter > Blur > Gaussian Blur then apply the settings shown below.

Step 31
Decrease the opacity of the current layer to 80%.

Step 32
Using the same technique, add some strokes to other parts of the bevel like shown below. Adjust the opacity for each one to get photo realistic results.

Step 33
Create a new layer on the top then create a selection and fill it with black like shown below.

Step 34
Use the Dodge tool to add some highlights like shown below.

Step 35
Create a selection like shown below then create a new layer as the top layer.

Step 36
Fill the selected area with a gray color. Use the Dodge and Burn tools to shade it. Dodge the left side of the selection then use the burn tool to burn the right side.

Step 37
Select the Move tool then while holding down the Alt key, drag the image to create duplicates of it. It will create a new layer for each duplicate. Repeat this several times to create a grill like shown below.

Step 38
Use the same stroke path technique used earlier on the edges of the grill. This time, use white as your foreground color.

Step 39
Create a selection like shown below. 
Step 40
Paste a mesh texture to the selected area (like shown in Steps 22 and 23).

Step 41
Create a selection of the headlights. Make sure that the layer with the car body is selected.

Step 42
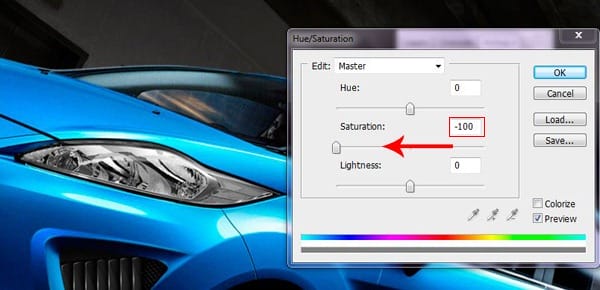
Choose Image > Adjustments > Hue/Saturation then reduce the saturation. I reduced it to –100.
Step 43
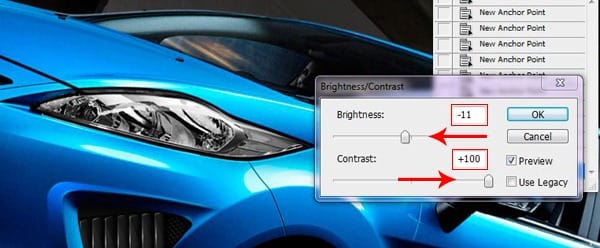
To improve the contrast, choose Image > Adjustments > Brightness/Contrast then adjust the settings to improve the contrast of the headlights.
Step 44
Create a new layer as the top layer then fill the area shown in the image below with black.

Step 45
Using the technique we used earlier, copy a texture of the mesh.

Step 46
Paste the mesh into the grill of the car.

Step 47
Choose Image > Adjustments > Brightness/Contrast to refine the texture.

Step 48
Use the Dodge and Burn tools to add some shadow and highlights to the areas indicated in the image below.

Step 49
Create a selection like shown below then erase the selected area.

Step 50
Create a new layer as the top layer then use the Polygonal Lasso tool to create a shape like shown below. Use the Color Picker tool to select a blue color nearby. Fill the selected area with this color.

Step 51
Use the Burn tool to burn the edges of the current layer. This will create some shadows on the edges.

Step 52
Switch to the Dodge tool to add highlights to the indicated area.

Step 53
Select the second layer (It should be the layer with the black hole), then use the dodge tool on the areas indicated below.

Step 54
Create a new layer. Using the Pen tool, draw a path around the grill. Use the same stroke path technique used earlier (Paths palette > Stroke Path) to create a red outline. Use the Dodge and Burn tools to add some shadow and highlights to the line.

Step 55
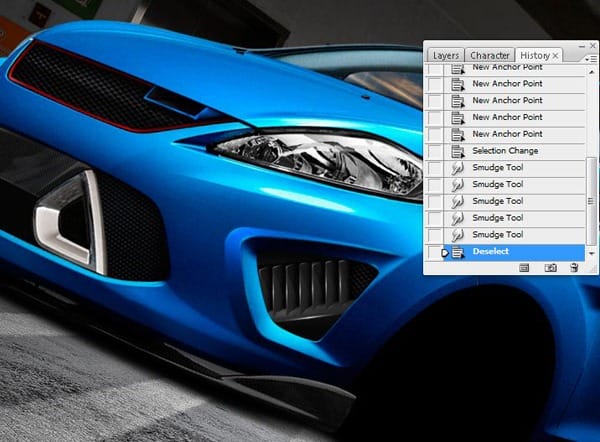
Select the layer with the body of the car. Create a selection of the front bumper then use the Smudge tool and smudge like shown in the image below.

Step 56
After smudging, create a selection of the lower part of the bumper like shown below.

Step 57
Use the Burn tool to add some shadows to the upper area of the selection..

Step 58
Select the Freehand and Polygonal Lasso tool to create a selection like shown below.

Step 59
Select the Dodge tool then add some highlights like shown below to create a bevel.
Step 60
Create a new layer as the top layer to use the Pen tool and the same stroke path technique we used earlier to create a red sketch like shown in the image below.

Step 61
Use the eye dropper tool to select a nearby blue color. Fill the area shown below with this blue color.

Step 62
Create a selection then fill it with a darker blue like shown in the image below.

Step 63
Create a selection with the Lasso tool like shown below.

Step 64
Use the Burn tool to darken the selected area. Use the Pen tool and to create an outline of the upper area like shown below then stroke the path with white.

Step 65
Reduce the opacity to about 80%.

Step 66
Create a new layer then create a selection like shown below and fill it with white.

Step 67
Reduce the opacity to around 70-75%.

Step 68
Select back the previous layer with the hood scoop then use the Burn tool to add some shadows to the corner.

Step 69
Create a new layer under the layer with the hood scoop. Use the Polygonal Lasso tool to create a selection like shown below.

Step 70
Use the Eye Dropper tool to select a blue from nearby. Fill the selected area with this blue color.

Step 71
Create a new layer and name this layer stroke.

Step 72
Using the Pen tool, create a path and stroke it with white like shown below. Use the eraser tool with a soft edge and 50% opacity to erase the edges slightly.

Step 73
Using the same technique from Step 69 to 72, create the rest of the fins. When you’re done, create a selection like shown below.

Step 74
Choose Image > Adjustments > Brightness/Contrast and bump up the brightness slightly. This will create a reflection on the hood scoop.

Step 75
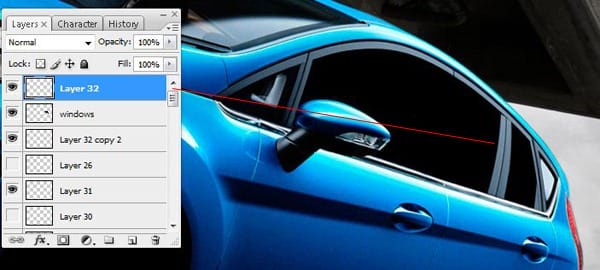
Now we’ll convert this car from 4 doors to 2 doors by merging the doors together. Ensure that the layer with the car body is selected. Create a selection shown below then copy it to your clipboard (Edit > Copy). Now it`s time for two door conversion . Select this part and copy it.

Step 76
Create a new layer as the top layer then create a selection of the window and fill it with black.

Step 77
Paste (Edit > Paste) the dividers that we just copied earlier then use the Free Transform tool (Edit > Free Transform) to move and scale it to the rear like shown in the image below.
Step 78
Create a selection like shown below then use the Smudge tool to smudge away the embossed edge.

Step 79
Here is what the image looks like after smudging.

Step 80
Find a picture of a sport seat like the one below then paste it into Photoshop as the top layer.

Step 81
Mask the seat from its background. We simply used the Magic Wand tool to create a selection of the white background then deleted it.

Step 82
Now we’ll make a roll cage. Use the Brush tool with a hard edge to paint a thick like like shown below.

Step 83
Use the Burn tool to burn the inner edge of the roll cage.

Step 84
Use the Dodge tool to highlight the middle area of the roll cage to give it a round look.

Step 85
Use the Pen tool to create a path shown below and stroke it. This time, enable the Simulate Pressure option when stroking the path. In case you forgot, to stroke a path, right click on the path in the paths palette (Window > Paths) then choose Stroke.

Step 86
Repeat the previous steps to add a roll cage to the back window using the same technique.

Step 87
Using the same technique, draw a roll cage for the interior. This time, do it on new layer then position it behind the car seat.

Step 88
Now we’ll create the highlight stitch on the car seat. Use the Pen tool to create a path like shown below.

Step 89
Select blue as your foreground color then select the Brush tool and set the size of your brush to 2 pixels. In the Paths palette (Window > Paths), right click on the path then choose Stroke Path.

Step 90
Use the eraser tool to erase the line like shown below.

Step 91
Use the Dodge and Burn tools on the stitch to make it look more 3D.

Step 92
Using the same technique, add stitching to the other parts of the car seat.

Step 93
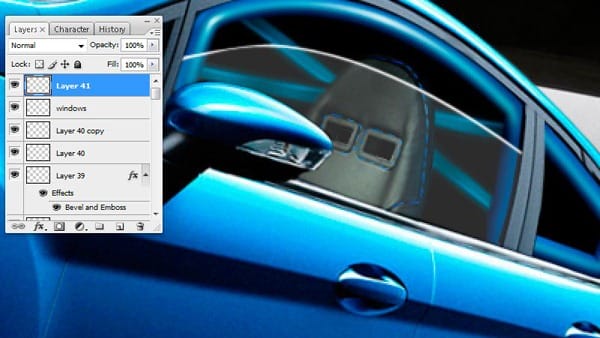
Now we’ll create the window. Create a new layer as the top layer then name it windows. Create a selection like shown below.

Step 94
Fill the selected area with white then reduce the opacity to 19%.

Step 95
Create a thin selection like shown in the image below.

Step 96
Fill the selected area with white.
Step 97
Use the Eraser tool with a soft edge in the brush settings then erase the edges to fade the line slightly.

Step 98
Create a new layer then create a selection of the back window then fill it with white. Reduce the opacity to 19%.

Step 99
Find a picture of a cloudy sky then paste it in your document. Use the Free Transform tool (Edit > Free Transform) to transform and position the image into place like shown below.

Step 100
Reduce the opacity of this layer to 50% then use the Eraser tool to erase the area around the windows.

Step 101
With the clouds layer still selected, erase the bottom half of the windows like shown in the image below.

Step 102
Reduce the opacity of the clouds using the Hue/Saturation tool (Image > Adjustments > Hue/Saturation or Ctrl+U).

Step 103
Next, find and paste a picture of an airplane hanger. Use the Free Transform tool (Edit > Free Transform) to position, resize, and rotate the image into place like shown below.

Step 104
Now use the Warp tool (Edit > Transform > Warp) to warp the image like shown below.

Step 105
Use the Eraser tool with a hard edge to erase the areas outside of the windows.

Step 106
Reduce the opacity to around 23%.

Step 107
Choose Filter > Blur > Motion Blur using the settings shown below. The angle should match the slant of your car.

Step 108
Create a selection like shown below.

Step 109
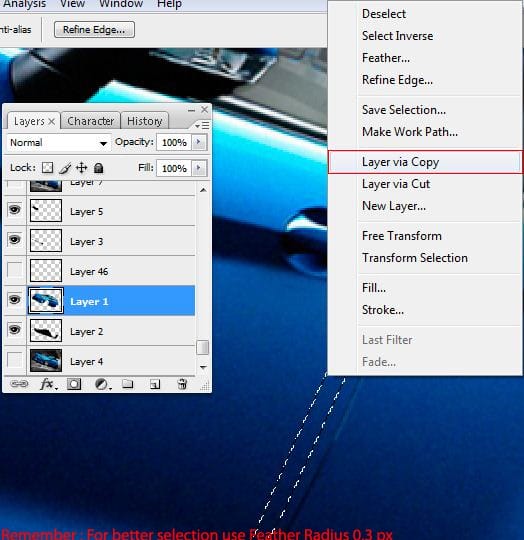
Select the layer with the car body then select any selection tool. On your keyboard, press the arrow keys to nudge the selection to the left of the car slightly so that the selection. Right click on the selected area then choose Layer via Copy. Move this new layer back to the right to cover the door edge.
Step 110
There will still be other parts of the door edge still visible. Use the same technique shown in the previous step to remove the rest of the door edge.

Step 111
Create a new layer and position under the layer with the car body.

Step 112
Se your foreground color to black. Create a path like shown below then in the Paths palette (Window > Paths), right click on the path and choose Stroke Path.

Step 113
Duplicate the current layer (Ctrl+J) then use the Hue/Saturation tool (Ctrl+U or Image > Adjustments > Hue/Saturation) with the colorize option checked to change the color to a light blue like shown below. Move this layer slightly to the right.

Step 114
Use the Eraser tool with a large brush and soft edge to erase the edges slightly so that the opacity is reduced slightly.

Step 115
Use the Burn tool to add some shadows where appropriate like shown in the image below.

Step 116
Use the Smudge tool to smudge the two lines together.

Step 117
Open an image of a car with mufflers that you want to copy. Create a selection of the muffler then copy it to clipboard (Edit > Copy).

Step 118
Paste it in the main document as the top layer. Use the Free Transform tool (Edit > Free Transform) to position, resize, and rotate into place.

Step 119
Use the Eraser tool to erase the excess areas from the bottom. Use the Burn tool to burn the top left of the mufflers so that it looks like it is blended in.

Step 120
Duplicate the layer then move it like shown below.

Step 121
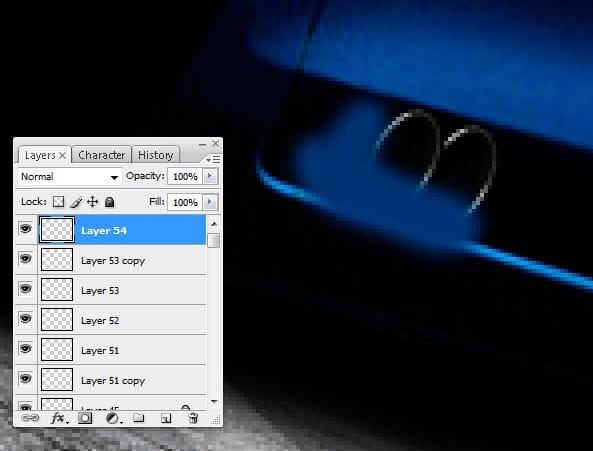
Create a new layer as the top layer the using the Brush tool, paint the area shown below with a dark blue color. A rough paint is fine.
Step 122
Change the blending mode of the current layer to Overlay.

Step 123
Create a new layer as the top layer then use the Line tool to draw some lines like shown below. If they appear as separate layers, merge them back into one layer.

Step 124
Use the Smudge tool to smudge the lines like shown below to create the smoke.
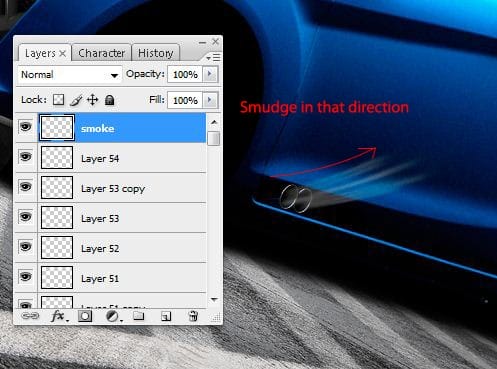
Step 125
Reduce the opacity to about 70%.
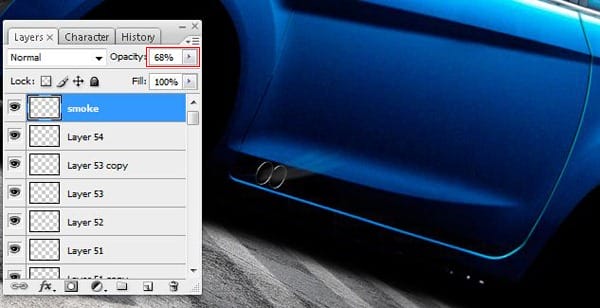
Step 126
Choose Filter > Blur > Motion Blur then apply the settings shown below. The angle should match the horizontal angle of your car.

Step 127
Create a new layer as the top layer then use the Pen to create an outline like shown below. After creating the path, select red as your foreground color then, in the Paths palette (Window > Paths), right click on the path then choose Stroke Path.

Step 128
Use the Polygonal Lasso tool to create a selection like shown below.

Step 129
Fill the selected area with a near black blue.

Step 130
Choose Filter > Noise > Add Noise. Apply the settings shown below.

Step 131
Here’s what it looks like so far.

Step 132
Now we’ll create the path for the upper area. Create a path like shown below then right click on the path then choose Make Selection. Use the settings shown below.

Step 133
Use the Dodge tool to create some highlights in the areas shown below.
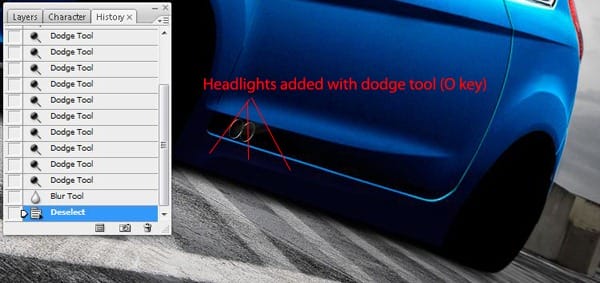
Step 134
Create a selection like shown below.

Step 135
Use the Burn tool to add some shadow to the bottom edge.

Step 136
Create a new layer then create a path and stroke it with a light blue color like shown in the image below.

Step 137
Reduce the opacity of this layer to around 80% then use the Eraser tool to erase the edge slightly.

Step 138
Create a selection like shown below then choose Select > Modify > Feather and feather the selection by about 5 pixels.

Step 139
Select the Dodge tool and add some highlights to the area shown below.

Step 140
Use the Pen tool to create a path like shown below. Right click on the path then choose Make Selection. Use the settings shown below.

Step 141
Use the Burn tool to add some shadows to the selected area.

Step 142
Select the layer with the car body then create a selection of the taillight.

Step 143
Choose Image > Adjustments > Channel Mixer then adjust the settings like shown below.

Step 144
Find images of cars with wheels that you’d like to use. The best images to use are the ones where the car is taken in the same perspective. Create a selection of the wheel like shown below then copy it to your clipboard (Edit > Copy).

Step 145
Switch back to the main document the paste it as a new layer. It should be positioned as the top layer. Use the Free Transform tool (Edit > Free Transform) to position, rotate, and scale into place.

Step 146
Use the Eraser tool to erase the excess areas if there are any.

Step 147
Use the Burn tool then burn the upper edge of the wheels to create a shadow.

Step 148
Repeat the previous steps with the back wheel of the car. Here’s also what our car looks like so far.

Step 149
Select the layer with the back wheel then use the Brightness/Contrast tool (Image > Adjustments > Brightness/Contrast) to darken and increase the contrast of the wheel.

Step 150
Now we’ll create the reflection for the windshield. Create a selection of the wall behind the car then it into the passenger side window.

Step 151
Select the layer with the car body then paint some black in the area shown below.

Step 152
Create a selection of the wall in the background then duplicate it into its own layer.

Step 153
Position it in front of the windshield then use the Warp Transform tool (Edit > Transform > Warp) to distort it so that it is curved like the windshield.

Step 154
Use the Eraser to erase the excessive areas around the windshield.

Step 155
Select another part of the wall and duplicate it into its own layer.

Step 156
Use the Warp tool (Edit > Transform > Warp) to distort the layer like shown in the image below.

Final Results
11 responses to “Virtual Tuning with Photoshop”
-
Ffff
-
Beauyiful
-
Îmi place aplicația
-
foarte fain
-
me gusto la aplicasion la kiero descargar
-
hey
-
nmmmnmmn
-
where can i find this program
-
Awesome! Wish I could Photoshop like that!
-
savršeno samo damije da to ja radim
-
So… Can you ask me how to make suspension down and changing colors in headlight/taillight/window and etc? It’s an cheat on step 4.

Leave a Reply