
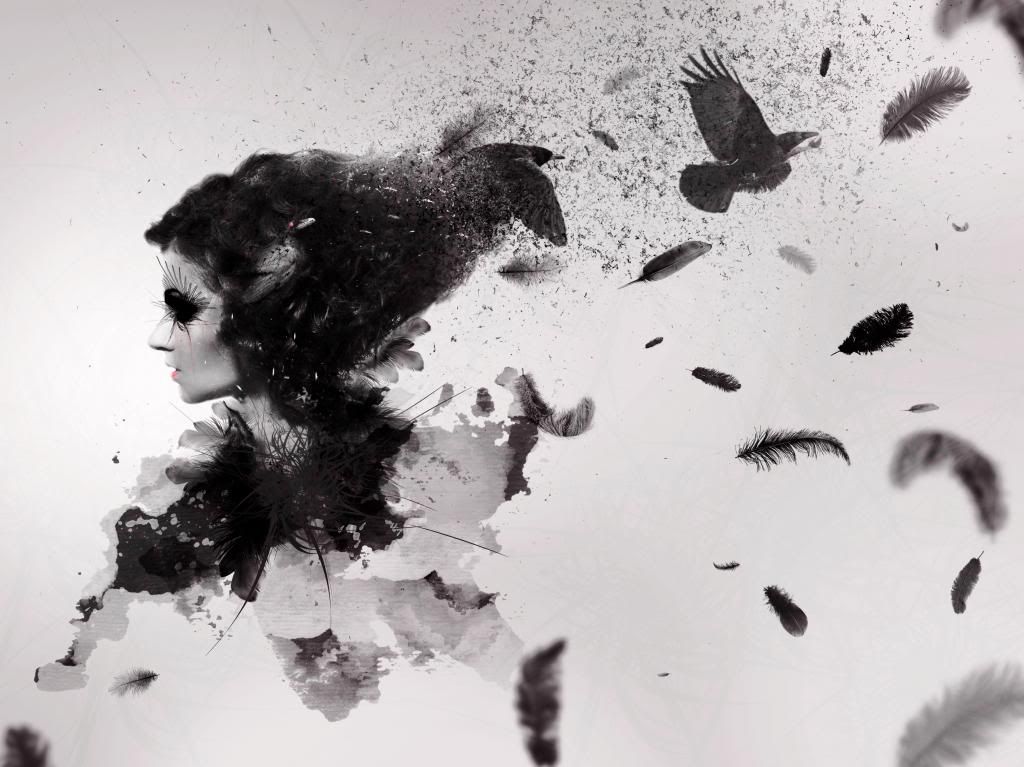
In this tutorial I’ll show you how to create a dark abstract photo manipulation with crows and disintegration effect. You’ll learn how to create this interesting effect in an easy way, add abstract elements, create depth of field and more.
What you’ll be creating
We’ll start this tutorial by creating a black and white background, then adding model and doing some retouch on her. We’ll also create disintegration effect for the hair with the help of debris brushes. Then we’ll add other elements, such as feathers, watercolor brushes, crow and more debris. Finally we’ll add and draw some abstract decoration for model to complete this tutorial. You’ll need Photoshop CS3 or newer to follow the process.

Tutorial Resources
Step 1
Create a new document with size of 3307×2480 px and fill it with white. Press Cmd/Ctrl+Shift+N to make a new layer. Hit G to active Gradient Tool and choose Radial Gradient with color #d5d5d5 and white (#ffffff). Drag a line from the left to right:

Step 2
Go to Layer-New Adjustment Layer-Curves and decrease the lightness:

Press B to active Brush Tool and vary brush opacity from 20 to 100%. Choose Curves layer mask and paint to reduce the dark on the parts shown on screenshot below:


Step 3
Extract model and place her at the left of our main canvas:

Step 4
Click the second button at the bottom of Layer Pallete to add mask to model layer. First I used soft black brush to remove hard edges of the hair, shoulder, neck (don’t paint too much, just enough to make the edges softer). Then I painted with debris brushes on these masked edges to create a disintegration effect there. With debris brushes, I changed settings for them (press F5 to do it) as shown below:

You can choose different brushes to paint.. Here is result on my layer mask and result on picture:

Step 5
Open model stock again. Use Lasso Tool (L) to copy the hair part then put it behind the model on our main picture. Use Warp Tool (Edit-Transform-Warp) to bend this hair a little:

Add layer mask to this one with debris brushes:

Step 6
Make model and hair layers selected then press Cmd/Ctrl+G to make group for them. Change the mode of this group from Pass Through (default group mode) to Normal 100%. On hair layer, go to Layer-New Adjustment Layer-Gradient Map and pick default colors (black and white) to desaturate the model:
26 responses to “Create A Dark Abstract Crow Photo Manipulation”
-

its so good man my name is burhan yürük on devianart.
i used your stuffss. i love u so muchhhhhhhhhh likes from gebze kocaeli. -
nice
-
no entiendo paso 4
-
Thank you for this amazing tutorial.. I loved it!
Here’s what I’ve created:
https://www.deviantart.com/davdajuhi/art/Abstract-Self-Portrait-766073250
-
Looks great! Good job
-
-
I followed your tutorials and I did some modification. Thanks, :)
-
you are really cool ! Thank you so much for sharing !
-
this is really awesome!! thank you! *hugs you*
-
nice very nice
-
I like the idea of this tutorial, it’s very creative and the result looks great.
-
Thank you for the great tutorial! It has been very helpful to see a few techniques in action
-
Some steps are very vague. Good result, though.
-
This tutorial looks awesome, too bad i can’t find a decent model stock..
Where is the best place to search for free stocks? -
i’ve been working with elements for five years and finally got real photoshop… what a fun intro to the program, had so much fun with this!
http://i739.photobucket.com/albums/xx31/closethegap/Crow_01-Recovered_zps7b352356.jpg
-
Great tutorial
-
I made your tutorial, but I did some modifications. :) http://ednasnake.deviantart.com/art/Abstract-crow-girl-449420439?ga_submit_new=10%253A1398203026
-
I do not understand step 4&5 @@!
-
x2
-
-
I love to make design with Photoshop.
-
I found this cool to work on! I found a model profile that already had a few feathers in her hair. Worked good! Thank you!
Su
-
OMG I’m gonna aggree with you both!
-
wow ! so cool thx mate
-
OMG I AGREE WITH MIKE
-
omg i really like this i feel like i can photoshop anything THANK YOU SO MUCH ILOVEYOU
-
Love you Tooo!!!!!!<333333
-
Leave a Reply