Want to retouch skin quick and naturally? Learn how to do that using just the yellow channel in your photo. This technique can be used to emphasize skin detail for a dramatic look or reduce the appearance of wrinkles, freckles, and dark circles under the eyes.
Step 1
Open the photo that you want to edit in Photoshop. The photo should have enough detail in the skin tones with little to no makeup.

Step 2
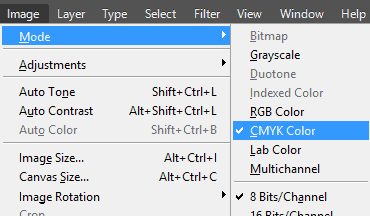
We’ll need to grab the Yellow channel. Before we can do this, we have to convert the image to CMYK by going to Image > Mode > CMYK.

Step 3
In the Channels palette (Window > Channels), select the Yellow channel. As you can see, the Yellow layer reveals the most skin flaws. Copy and paste this layer by going to Select > All then Edit > Copy.

Step 4
Now we need to convert the image back to RGB mode for editing. Instead of converting the image back, which will degrade the image quality even more, we can just undo all the way back to the beginning. Keep pressing Alt+Ctrl+Z (Option+Cmd+Z on Macs) until you’ve reverted back to the original photo. Go to Edit > Paste and Photoshop will place the Yellow channel you copied as a new layer.

Step 5
Change the blending mode to Overlay. You’ll see the effects immediately and you can reduce the effect by reducing the opacity.

Step 6
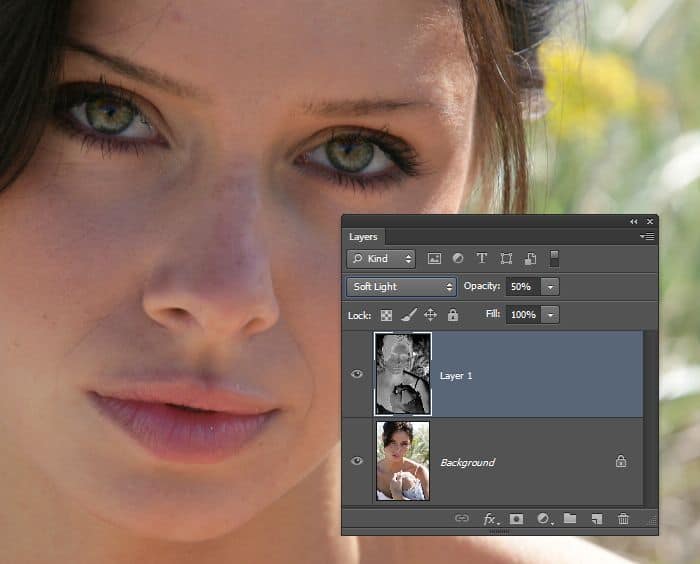
If you want to hide the skin flaws instead of revealing it, invert the layer by going to Image > Adjustments > Invert. Change the blending mode to Soft Light then reduce the opacity until it looks about right.

Step 7
You can also add a layer mask so that this layer only affects the skin tones. This is an optional step because your image will look fine most of the time without any masking. However, should you need to create a layer mask, you can do this by going to Layer > Layer Mask > Hide All. Select the Brush tool (make sure your foreground color is white), then paint with a soft-edge brush around the skin. If you’re using Photoshop CS6, you can also use the skin tone feature in the Color Range tool. To do this, go to Select > Color Range. Select “Skin Tones” from the dropdown menu and enable Detect Faces. Click OK and Photoshop will create a selection of the skin tones for you.
39 responses to “Quick Tip: Emphasize or Hide Skin Flaws With One Layer”
-
Please, tell me is that girl!
-
Wonderful tutorial..Thanks for sharing.
-
wow suber
-
very helping me to edit over expose image,
tqvm!
-
This is very nice post for all, but if you describe step by step than it can be very better for new learner. this post can understand who have advance knowledge in photoshop but new learner can’t understand easily.However, the post is very important for editing photo….
-
Wow! Quite a brief and simple tutorial.nice
-
thanks for it.
-
SUPER LIKE +1
-
Thank you very much
-
Lovely tip, thanks a lot.
I’ve been looking for photoshop tutorials on emphasizing skin detail, and search almost forever until I found this quick tip… Very useful, thank you! -
A lot of the comments on this blog show that there is complete ignorance about these things
-
The Best tutorial Ever. Thanks for sharing it. :)
-
Nice thoughts I like your views. Kindly update your views on daily bases. Zigmz5
-
Very nice post . really made my day. Desperately waiting for your next post to be publish.
-
tnx
-
Incredible
-
Very Nice Man… Keep It Up… I have never seen these kind of blogs ever before.
-
Good Work.. I,m waiting of your 2nd update.
-
This is a keeper. I’m just an amateur PSer and this just a handy dandy tutorial.
Thank you.
-
nice way of work
-
very useful
-
grate site …..i learn a lot thanks for posting….
-
It was a nice way to thank
-
It’s very good ,i use it very often.It’s a small miracle!
-
Cool stuff. Any suggestion if I’m using PSE 10?
-
This technique is awesome! I loved this so much I featured it in a blog of my favorite PS tutorials. Here is a link if you’d like to check it out or comment http://www.theagencysd.com/2013/02/10-helpful-photoshop-tutorials/. I just would like to thank you guys for providing great tutorials all the time and to keep up the great work.
-
awws
-
It’s amazing how you did this just with the yellow channel. I tried it on my photos and you see even the faintest blemish.
-
Very well done
-
very good
-
nice
-
pertamax……..
-
Very good stuff
-
perfect~
-
Fantastic Blog…and valuable too…Thanks.
-
very cool!
-
I can totally see the ugly mode being used in poverty/homeless ads
-
It’s amazing how you can just pull a channel from a photo and make someone’s face look cleaner or dirtier. I would combine both. Use the clean effect for the skin and dirty effect on the eyes. The lips I would mask out. I can see professionals using this over the low-pass/high-pass airbrushed skin. It looks more natural and even the wrinkles look cleaner without removing any details. This is amazing.
-
-
Oh, wow! That’s awesome! Thank you!
Su


Leave a Reply