
Luminar AI lets you turn your ideas into reality with powerful, intelligent AI. Download the photo editor and see how you can completely transform your photos in a few clicks.

PLEASE NOTE! From this point on, everything we are going to be working on needs to be placed below the color correction group.
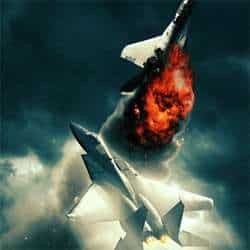
Step 3
Download the image of the F-15 Fighter Jet, open it up in Photoshop and drag it into our composition. Scale and rotate the image just like the image shown below.

Because the aircraft has lots of curves and sharp corners, the best and fastest way to get rid of the sky is by using the Pen Tool (P). Try to get every detail of the aircraft including the smallest metal parts, it will look more realistic in your final design. When you're done creating a path around the aircraft, right-click within the path and click on Make Selection..., click OK.

Once the path is turned into a selection, click on the Mask icon at the bottom of the Layer menu and you'll see that the entire background is gone.

Repeat this step with the image of the MiG-22 Fighter Jet and place the image as shown below. Make sure you flip the image horizontally! For better organizing, create two new groups with the names of the aircraft layers and put the images in the corresponding groups.

Back to the F15 Fighter Jet. Because I want to add some vapor trails we'll need to create a copy of the masked layer, place it below the F15 and press Ctrl + U to bring up the Hue/Saturation menu. Set the Lightness to +100 and click OK.

Go to Filter>Blur>Motion Blur, set the Angle to -52 and set the Distance to 999.

We'll need to remove the white motion blur in front of the aircraft. You can do this by clicking on the layer mask thumbnail, set the Foreground color to black and select a Soft Round brush of around 500px. Now paint away the white area in front of the aircraft.

You can now rename this layer to 'Vapor_trails'. The lines in this layer are too strong so I'm going to add a Gaussian Blur so it will soften up a bit. Select the layer thumbnail and go to Filter>Blur>Gaussian Blur and set the Radius to 15.
Step 4
To blend the aircraft with the background even better is by using the Blur, Dodge and Burn tools.
2 comments on “How to Create an Intense Movie Poster in Photoshop”
the links don't work :( i really want to do this tutorial :> thanks!
just great...