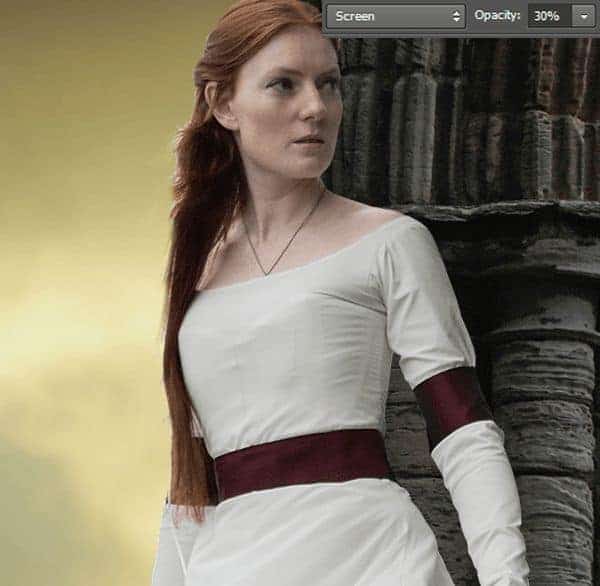

Step 19 – Model
Change the model position, to do this, press ctrl+T the free transform option to make the model smaller and make her fit with the image.
Step 20 – Details
Go to the layer mask from the model and erase some parts.
Step 21 – Skin
Select model’s skin with the lasso tool and duplicate the layer pressin ctrl+j
Step 22 – Saturation
Press Ctrl+U and change the saturation of the model’s skin to -20
Step 23- Light
TO make the skin a little lighter you need to duplicate the layer one more time (ctrl+j) and change layer mode to screen and change the opacity to 30%
Step 24 – Eyes
Paint the model’s eyebrows and eyes to give more life to her.
Step 25 – Make up
This depends on your style but basically you need to add some eyeshades liner and some fine white highlights.

Step 26 – Hairs
For masking the hair, it’s better if you have a tablet, if you don’t you can try with your mouse and the pen tool. With a soft and round black brush, make hair strands. Remember to set the brush to pen pressure, also the brush size has to be 1px.

Step 27 – Hair
You have the base of the hair, so now you have to fill with more hair to give a natural look. In a new layer with a soft round brush (2px size) with a brown tone, (you can pick the same in the model’s original hair with the eyedropper tool) then start painting strands with undular movements keep the pressure really soft.

Step 28 – Shadow
Create a new layer between the columns layer and the model to create the model’s shadow. Paint with a soft round black brush around the model.
Step 29 -Stone
Pick one of the foliage brush from the pack of Jonas de Ro brushes, and paint some yellow flowers, also you can fill some spaces with the rock brush. The result has to be something like this
Step 30 – Plants
Pick a grass brush and paint around the columns to make some vines around them.
Step 31 – Shadows
Like before with a soft round black brush paint in the bottom of the model and the stone to create the shadow, you can add some gaussian blur if you think is necessary14 responses to “How to Create a Breathtaking Medieval Manipulation with Realistic Deteriorated Flags”
-
OMG YOU A PURE GOD ! Great tut kkep on going!
-
Amazing! What an ingenious trick for the old-type flags.
from Fabriano Italy
-
where’s the feet?
-
As the model in the stock being used, and having seen several versions other artists have created using this tutorial, it would be honestly very nice if artists trying to recreate the styling and theme would see if they can do the same thing using alternative stock – of which there are thousands available. The point of tutorials is to make suggestions and provide tips to artists looking to improve their techniques or learn new ones, not to make identical and in some cases poor reproductions of the work used in the tutorial. Change it up people!! :)
-
Done here: http://signhermitcrab.deviantart.com/art/Flags-432532192?ga_submit_new=10%253A1391822204 Thank you! <3
-
An outstanding design sharing that’s very helpful for me. As a graphics designer I have just learned some new technique today from this blog. Thanks and appreciate it.
-
Can you make a video?
-
i like this and i realy like thi
-
i like this
-
This is really cool. I really like the idea; erasing a flag to make it look worn out.
This makes me wonder if you can do it to clothes too. I never even think about making fabric look worn out, I just find worn out stocks which is hard to come by.
-
great tut, thank you all.
-
i like dis tut
-
imi place mult
-
how to great the wall please tell me


Leave a Reply